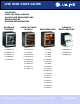
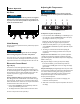
USE AND CARE GUIDE ® 2000 SERIES WINE CAPTAIN® MODELS GLASS DOOR REFRIGERATORS REFRIGERATORS DRAWER REFRIGERATORS BEVERAGE CENTERS WINE CAPTAIN® MODELS REFRIGERATORS DRAWER REFRIGERATORS U-2175BEVCOL-00 U-2115WCOL-00 U-2115RB-00 U-2275DWRCOL-00 U-2175BEVCOL-02 U-2115WCS-00 U-2115RS-00 U-2275DWRCOL-02 U-2175BEVCOL-60 U-2175WCCOL-00 U-2115RS-01 U-2275DWRCS-00 U-2175BEVCS-00 U-2175WCCOL-02 U-2115RS-02 U-2175BEVCS-02 U-2175WCCOL-60 U-2115RSOD-00 U-2175WCCS-00 U-2115RSOD-01 U-2175WCCS-0
Introduction Please Record Your Model Information For nearly five decades and three generations, U-Line continues to be the leader in innovation, quality and value in the premium built-in undercounter ice making, refrigeration and wine preservation market. U-Line has captivated those with an appreciation for the finer things with exceptional functionality, style, inspired innovation and attention to even the smallest details.
Table of Contents Safety Precautions Safety Alert Definitions ........................................................................................................................................1 General Precautions .............................................................................................................................................1 2000 Series Product Features All 2000 Series Models Feature: ........................................................................................
General Precautions Safety Precautions Use this appliance for its intended purpose only. Follow these general precautions with those listed throughout this guide: NOTICE • PLEASE READ all instructions before installing, operating, or servicing the appliance. • Proper installation procedures must be followed when completing an installation or relocation of a unit. An INSTALLATION GUIDE for the unit, providing complete installation information, is available from U-Line Corporation direct.
Wine Captain® Model Features (cont.): 2000 Series Product Features Capacity. 15" Wine Captain® Model, up to 24 .75L Bottles. 24" Wine Captain® Model up to 48 .75L Bottles. Stable temperatures. Stable, consistent temperatures provide longer-term storage capability. All 2000 Series Models Feature: Built-in. Provides custom look. No additional clearance needed around sides, top or rear of unit for ventilation. Do not obstruct front grille. Touch Digital Controls.
Adjusting Air Temperature Product Operation NOTICE Air Flow Adjust the set point temperature in single increments, and wait 24 hours for the temperature to stabilize before rechecking. NOTICE The unit requires proper air flow to perform at its highest efficiency. Do not block the front grille or internal fans at any time, or the unit will not perform as expected. Do not install the unit behind a door. 1 2 3 4 5 To adjust the set point temperature: 1.
Checking Product Temperature Interior Lighting Normal Operation. Opening the door will cause the interior of the cabinet to illuminate. Use LIGHT (5) on the control panel to change the lighting functions. 1 2 3 4 5 Timed Lighting. For Wine Captain® Models and 2175BEVC Models the interior of the cabinet is illuminated for a timed fourhour period. 1. Press and release LIGHT (5) (the °F symbol will flash briefly) to switch from door-operated lighting control to the timed four hour lighting period.
Electronic Control Quick Guide Task Turn ON/OFF Adjust Temperature Touch Hold 10 seconds Display Release when °F flashes. or or Touch and release View Actual Temp Hold 5 seconds Change F/C Hold Blackout Mode Touch Comment °F flashes after first touch, set-point saved after 5 seconds of inactivity and °F stops flashing. or Touch to change temperature WC models will scroll top/ mid/bottom temps. Release when °F flashes. or Display (and cabinet light) will not operate in Blackout Mode.
Food Storage ! CAUTION Drawers The drawers should only be removed for servicing by a trained and certified repair personal. When opening or closing the crisper, pull or push slowly and carefully. If the crisper is pulled out too far or pushed in too hard, it could come out all the way and possibly cause product damage or personal injury. Other Models Crisper Your models may have a lower crisper drawer for storage. To open, grasp the crisper handle and slowly pull out to access the drawer contents.
Matching Food and Wine U-Line Wine Guide Looking Behind the Label To most, wine is a delicious mystery. We purchase it, uncork it, and savor its taste and beauty. But there is so much more to true wine appreciation. Many secrets are simply too good to keep bottled up. Although there are no hard fast rules for matching wine to food, observe some guidelines. Delicate dishes should be accompanied by lighter more delicate wines. Full-flavored foods should be matched with fuller-bodied wines.
The Cork: A Mystery on Its Own. Ideal Wine Storage Considerations Cork Presentation. The ritual of the presentation of the cork has a rich and fascinating history dating back to the late 1800’s. A phylloxera (root louse) devastation to the vineyards severely limited the supply of great wines. Restaurateurs would remove labels on inferior wines and replace them with labels from superior wines.
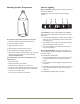
Wine Stocking Recommendation Wine Rack Removal and Installation Specially designed horizontal wine racks properly positioned the bottles so the wine remains in contact with the cork and assure the cork does not become dry. To remove a rack from the cabinet: 3. Remove any bottles stored on the rack. 4. Grasp the end of the rack, and gently slide it out until it stops. Stock the unit as follows: 1. Stock the wine racks beginning with the lowest rack, at the back, and working forward.
Wood Trim Finishing Staining and final finish application: NOTICE ! CAUTION You MUST remove the wood trim from the unit for staining or finishing to prevent permanent damage to the inner liner of the unit. Allow stain or finish to dry thoroughly (at least 24 hours for each coat) following the product manufacturer’s instructions before reinstallation. Not following this warning may cause the inner liner of the unit to have a permanent odor, which the warranty will not cover.
Removing and Installing Grille Maintenance ! WARNING Light Bulb Replacement Disconnect electric power to the unit before removing the grille. To replace the light bulb in your U-Line unit: 1. Find the light located at the top of the unit. Grasp the edges of the light housing lens (1) opposite the exposed tab and gently push the lens toward the tab (2). 2. Pull the edge of the lens down (1) and swing it out of the light housing. ! WARNING DO NOT touch the condenser fins (4).
Removing and Installing Interior Shelves For models equipped with glass shelves having shelf supports, remove the shelves as follows: 1. Open door completely. 2. Grasp the shelf edge in the center and slide the shelf from the unit. Insert the shelves as follows: Reposition the shelf as required, ensure the raised edge strip is toward the rear of the unit and graphics, if applied, are on the underside of the shelves.
Doors (Self-Closing) Door Alignment and Adjustment Align and adjust the door if it is not level, or is not sealing properly. If the door is not sealed the unit may not cool properly, or excessive frost may form in the interior. NOTICE • Properly aligned, the door’s gasket should be firmly in contact with the cabinet all the way around the door (no gaps). Carefully examine the door’s gasket to ensure that it is firmly in contact with the cabinet.
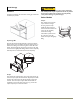
Reversing Black or White Doors Remove Door 3 1 2 1. Hold door to keep it from falling. 2. Remove hinge screw pin (1) from top hinge using a Phillips screwdriver. 3. Remove door by tilting forward and lifting door off bottom hinge closer inserts. 4. Reinstall hinge screw pin (1) into top hinge using a Phillips screwdriver. • The hinge hardware will be removed and reinstalled on the opposite side of the cabinet. Remove hole plugs.
Remove preexisting bottom hinge. Reversing Stainless Steel Glass Doors 1. Remove the preexisting bottom hinge (three screws) (2). Remove Door Reinstall hinge to top opposite. 3 1 1. Install the hinge just removed from the bottom to the TOP opposite side of the cabinet (three screws) (2). Reinstall Hole Plugs. 1. Install plastic screw plugs (three each, top and bottom) (3) into holes where hinge hardware was removed. 2 1. Hold door to keep it from falling. 1 2.
3. Grasp outer edge of stainless frame and firmly press inside edge of glass in while pulling stainless frame in opposite direction. 3. Swing door into frame. 4. Install screws removed in “Remove Stainless Frame” step 1 to top of door, opposite handle. 5. Install pivot plat to bottom of door, opposite of handle, using hardware removed in “Remove Stainless Frame” step 2. Arrange pivot plate so the flat edge is against the edge of the door.
Remove existing bottom hinge. 1. Remove the existing bottom hinge (three screws) (2). Reinstall hinge to top opposite. 1. Install the hinge just removed from the bottom to the TOP opposite side of the cabinet (three screws) (2). Reinstall Hole Plugs. 1. Install plastic screw plugs (three each, top and bottom) (3) into holes where hinge hardware was removed. Install Door. 1. Hold door upright and tilted forward. 2. Lift door on to bottom hinge closer inserts. 3. Tilt door forward into position. 4.
Defrosting . Cleaning Automatic Defrost Models Exterior Cleaning Frost on the rear wall is normal and will melt during each off cycle. If there is excessive build-up of 1/4" or more, manually defrost the unit. Vinyl Clad (Black or White) Models: • Clean surfaces with a mild detergent and warm water solution. Do not use solvent-based or abrasive cleaners. Use a soft sponge and rinse with clean water. Wipe with a soft, clean towel to prevent water spotting.
Condenser Cleaning Storage, Vacation and Moving Interval - Every Six Months If not using the unit for an extended period, or otherwise stored, follow these steps completely: To maintain operational efficiency, keep the front grille free of dust and lint, and clean the condenser every six months. Depending on environmental conditions, more or less frequent cleaning may be necessary. ! WARNING ! WARNING Electrical Shock Hazard. Disconnect power before servicing. Before operating, replace all panels.
Troubleshooting Guide Service ! DANGER Before Calling for Service ELECTROCUTION HAZARD. Never attempt to repair or perform maintenance on the unit until disconnecting the main electrical power. If you think your U-Line product is malfunctioning, read the OPERATION section of this guide to understand clearly the function of the control.
USE AND CARE GUIDE ® PRODUCT INFORMATION Complete Installation Guides, Use and Care Guides, Specifications & Features and Benefits, CAD Drawings, Overlay Panel/Frame and Toe-Kick Specifications and Instructions, Compliance Documentation and Applicable Energy Guides are available for reference and download at u-line.com. SERVICE INFORMATION Please consult your Use and Care Guide for troubleshooting information. Answers to Customer Frequently Asked Questions are available at u-line.