QUICK START GUIDE 1000 Series • CLR1215 • 115 V / 60 Hz
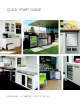
QUICK START GUIDE u-line.com WELCOME TO U-LINE Congratulations on your U-Line purchase. Your product comes from a company with over five decades and three generations of premium modular ice making, refrigeration, and wine preservation experience. U-Line continues to be the American leader, delivering versatility and flexibility for multiple applications including residential, light commercial, outdoor and marine use.
QUICK START GUIDE Contents 1 Model List 2 Safety and Warning 2 Environmental Requirements 3 Electrical 3 Water Hookup 7 Drain 8 Door Swing 9 General Installation 9 Integrated Panel Installation 11 Control Operation 11 First Use 11 Ice 13 Sabbath Mode 13 Warranty u-line.
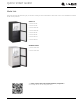
QUICK START GUIDE u-line.com Model List This guide provides the basics to get you started. Looking for more information? Visit u-line.com to view detailed User Guides for all U-Line products. Clear Ice U-CLR1215S-00B U-CLR1215S-40B U-CLR1215INT-00B U-CLR1215INT-40B U-CLR1215B-00B U-CLR1215B-40B U-CLR1215W-00B U-CLR1215W-40B Outdoor Series U-CLR1212SOD-00B U-CLR1212SOD-40B Visit http://www.u-line.com/product-literature/userguides or scan this QR code to view all user guides online.
QUICK START GUIDE u-line.com Safety and Warning This unit is designed to operate between 50°F (10°C) and NOTICE the unit’s ability to reach low temperatures and/or reduce Please read all instructions before installing, 100°F (38°C). Higher ambient temperatures may reduce ice production on applicable models. operating, or servicing the appliance.
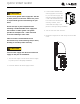
QUICK START GUIDE Electrical ! WARNING SHOCK HAZARD — Electrical Grounding Required. Never attempt to repair or perform maintenance on the unit until the electricity has u-line.com Water Hookup INDOOR MODELS PREPARE PLUMBING Please use the braided stainless steel water supply line which comes attached. The water line is fitted with a standard 1/4" (6.35 mm) compression fitting. been disconnected. Never remove the round grounding prong from the plug and never use a two-prong grounding adapter.
QUICK START GUIDE ! CAUTION u-line.com 3. Locate braided stainless steel water supply line and connect to your cold water supply. The Do not use any plastic water supply line. The line water line should be looped into is under pressure at all times. Plastic may crack 2 coils. This will allow the unit or rupture with age and cause damage to your to be removed for cleaning and home. servicing.
QUICK START GUIDE OUTDOOR MODELS PREPARE PLUMBING The water valve uses a standard 1/4" (6.35 mm) compression fitting. U-Line recommends using accessory water hook up kit – part # WATERHOOKUP. The kit includes a 10' (3 m) braided flexible water supply line and a brass hose fitting. When using a 1/4" (6.35 mm) O.D. u-line.com ! CAUTION Do not use any plastic water supply line. The line is under pressure at all times. Plastic may crack or rupture with age and cause damage to your home.
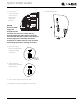
QUICK START GUIDE u-line.com 8. Install retaining clip. 3. Locate water valve in the front of the unit and thread water supply line through. NOTICE Route the water supply line through the unit so it does not come into contact with any internal components other than the solenoid valve. Normal operation creates some vibration. A water supply line contacting an internal component or cabinet wall can cause excessive noise during operation or damage to the line. 4.
QUICK START GUIDE Drain u-line.com GRAVITY DRAIN Model numbers including “-00” or “-07” do not include a factory installed drain pump. Normal Proper Drain Model numbers including “-40” or “-47” include a factory installed drain pump. With Trap Poor Drainage, Water Will Back Up DRAIN CONNECTION ! CAUTION With Trap and Vent Proper Drain If your U-Line unit did not come with a factory installed drain pump you must use a gravity style drain connection.
QUICK START GUIDE u-line.com FACTORY INSTALLED DRAIN PUMP If your drain line will run up to a stand pipe, disposal or Y-Branch Tailpiece P60 Pump Required Air Gap (Optional Hook-Up) spigot assembly, or does not otherwise meet the requirements for a gravity drain, you may have ordered a pre-installed U-Line P60 drain pump. Waste If you need to install a P60 drain pump into your unit, see 6KXW 2ɞ Valve DRAIN PUMP section in the User Manual.
QUICK START GUIDE General Installation u-line.com INSTALLATION 1. Plug in the power/electrical cord. LEVELING INFORMATION 1. Use a level to 2. Gently push the unit into position. Be careful not to confirm the unit is entangle the cord or water and drain lines. level. Level should be placed along top 3. Re-check the leveling, from front to back and side to edge and side edge side. Make any necessary adjustments. The unit’s top as shown.
QUICK START GUIDE 8. Align door with cabinet. Tighten the top 3 screws, securing the top hinge to the cabinet. u-line.com It is important to ensure that all drilled holes are drilled to the correct depth in order to avoid splits in the wood when hardwood is installed. Align Top Of Panel With Highest Point Of Door/Drawer 11.Locate 6 of the #6x 1-1/4" (32 mm) screws provided with your unit. Align Panel Against Door/Drawe Edge First 12.
QUICK START GUIDE u-line.com Control Operation Light Power Clean LED Up Down CONTROL FUNCTION GUIDE FUNCTION COMMAND DISPLAY/OPTIONS ON/OFF Press Unit will immediately turn ON or OFF. Adjust ice thickness See “Ice” section View temperature in unit Press Toggle between F/C Hold Sabbath Mode See “Sabbath Mode” section and release and and The display will flash and then toggle from set point together and release to temperature in unit.
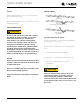
QUICK START GUIDE u-line.com The ice cube thickness is factory set for best overall Your clear ice machine is pre-set to produce ice between performance. The factory setting is designed to maintain the optimal dimensions illustrated below: an ice bridge of approximately 1/16" to 1/8" (1.6 mm to Cube Details 3.2 mm) under normal conditions, resulting in a dimple of approximately 1/4" to 1/2" (6.4 mm to 12.7 mm) in depth. A fuller cube with less of a dimple results in a thicker ice bridge.
QUICK START GUIDE u-line.com Warranty U-LINE CORPORATION LIMITED WARRANTY Sabbath Mode 1. U-Line Corporation (“U-Line”) warrants each U-Line product to be free from defects in materials and 1 2 3 4 5 6 7 workmanship for a period of one year (two years on Modular 3000 Series) from the date of installation.
QUICK START GUIDE 3. The warranty listed above does not apply to floor u-line.com 7. If a product defect is discovered during the applicable display models. The warranty for these models shall warranty period, you must promptly notify U-Line at be one year from the date of installation. This one-year 1-800-779-2547 or the dealer from whom you warranty does not apply to cosmetic damages. A proof purchased the product. In no event shall such of purchase may be required.