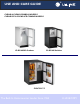
® USE AND CARE GUIDE CLEAR & CLEAR COMBO® MODELS CLEAR ICE & CLEAR ICE COMBO MODELS CLR2160OD Outdoor CLR2160 Stainless CLRCO2175 The Built-In Undercounter Leader Since 1962 U-LINE.
Introduction Please Record Your Model Information Building on 45 years, U-Line has captivated those with an appreciation for the finer things with exceptional design, inspired innovations and attention to even the smallest details. U-Line is synonymous with premium built-in under counter ice making, refrigeration and wine storage appliances, the U-Line Corporation is committed to luxury under the counter. U-Line is known and respected for unwavering dedication to product innovation, quality and selection.
1 Table of Contents U-Line Clear Ice & Clear Combo® Models i - Introduction ................................................................................................................................................................. i Read and save this Use and Care Guide. ......................................................................................................... i Please Record Your Model Information ........................................................................................
This page intentionally left blank.
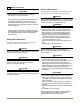
2 Safety Precautions General Precautions IMPORTANT • PLEASE READ all instructions before installing, operating, or servicing the appliance. • Proper installation procedures must be followed when completing an installation or relocation of a unit. Consult the installation guide before any installation begins. U-Line contact information appears on the rear cover of this guide.
Vinyl-clad cabinets. Textured, rich look. More resistant to scratching, peeling and flaking. (Black, White & Stainless Indoor models). 3 Product Features Guide Coverage This guide covers the following list of models.
4 Product Operation Adjusting Air Temperature CLRCO2175 Air Flow IMPORTANT IMPORTANT The unit requires proper air flow to perform at its highest efficiency. Do not block the front grille or internal fans at any time, or the unit will not perform as expected. Do not install the unit behind a door. Adjust the set point temperature in single increments, and wait 24 hours for the temperature to stabilize before rechecking. 1 2 3 4 5 Note: The CLRCO2175 refrigerator section temperature is adjustable.
Interior Lighting Checking Product Temperature Normal Operation. Opening the door will cause the interior of the cabinet to illuminate. Use the LIGHT icon (5) on the control panel to change the lighting functions. 1 2 3 4 5 Blackout (Sabbath) Mode. The interior of the cabinet and control display remains darkened until reset. (Blackout (Sabbath) Mode is not Star K certified). To turn the lights and display OFF. To check the actual product temperature in the unit. 1.
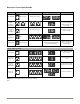
Electronic Control Quick Guide Task Turn ON/OFF Adjust Temperature CLRCO2175 View Actual Temp CLRCO2175 Change F/C CLRCO2175 Blackout Mode Touch Hold 5 seconds or Touch and release Hold 5 seconds Touch Display Release when °F flashes. or Comment °F flashes after first touch, set-point saved after 5 seconds of inactivity and °F stops flashing. or Touch to change temperature WC models will scroll top/ mid/bottom temps. Release when °F flashes.
5. Re-install the standpipe into the water trough. 5 Clear Ice Maker 6. Clean the Interior Bin as follows: Clear Ice Maker Cleaning Cycle Interval - Every 3 Months To maintain operational efficiency, clean the unit every three months (depending on water conditions, more or less frequent cleaning may be necessary). If the ice maker requires more frequent cleaning, consult a qualified plumber to test the water quality and recommend appropriate treatment.
IMPORTANT • Discard all ice produced in the first harvest. • Should power to the unit be interrupted during the self-clean cycle, it will be necessary to repeat the complete cleaning cycle after power is restored. Refresh Kit Due to variations in water quality or inadequate maintenance your unit may become excessively coated in lime scale or calcium. ULine offers a cost effective refresh kit which replaces many interior components and will return your unit to like new condition.
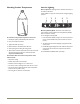
6 Maintenance Removing and Installing Interior Shelves Leveling IMPORTANT Unit must be level, for proper door and ice maker (if equipped) operation. 1. Pull shelf out about 6" (Figure 40) until back of shelf clears the "hump" on the right-hand side. 2. Tilt right-hand edge of shelf up. Remove shelf from unit by pulling out. 2 1 Insert the shelves as follows: 1.
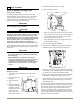
Removing and Installing Grille Removing and Installing Door Shelves WARNING Disconnect electric power to the unit before removing the grille. 1 WARNING DO NOT touch the condenser fins(4). The condenser fins are SHARP and can be easily damaged. Removing the grille. 1. Disconnect power to the unit. 2. Loosen the two screws (1). 2 3. Remove grille (2) from unit. Installing the grille: 1. Place the hook-hinge located on the rear bottom side of the grille (2) onto the front lip of the unit base.
7 Self-Closing Doors Door Alignment and Adjustment Align and adjust the door if it is not level, or is not sealing properly. If the door is not sealed the unit may not cool properly, or excessive frost may form in the interior. IMPORTANT • Properly aligned, the door’s gasket should be firmly in contact with the cabinet all the way around the door (no gaps). Carefully examine the door’s gasket to ensure that it is firmly in contact with the cabinet.
To reverse the door: Remove existing bottom hinge. Remove the existing bottom hinge (three screws) (2). 3 1 Reinstall hinge to top opposite. Install the hinge just removed from the bottom to the TOP opposite side of the cabinet (three screws) (2). Reinstall Hole Plugs. Install plastic screw plugs (three each, top and bottom) (3) into holes where hinge hardware was removed. 2 Remove door: 1 1. Hold door to keep it from falling. 2. Remove hinge screw pin (1) from top hinge using a Phillips screwdriver.
. 8 Cleaning Defrosting Automatic Defrost Models Exterior Cleaning Frost on the rear wall is normal and will melt during each off cycle. If there is excessive build-up of 1/4” or more, manually defrost the unit. Vinyl Clad (Black or White) Models: • Clean surfaces with a mild detergent and warm water solution. Do not use solvent-based or abrasive cleaners. Use a soft sponge and rinse with clean water. Wipe with a soft, clean towel to prevent water spotting.
Condenser Cleaning Storage, Vacation and Moving Interval - Every Three Months If not using the unit for an extended period, or otherwise stored, follow these steps completely: To maintain operational efficiency, keep the front grille free of dust and lint, and clean the condenser every three months. Depending on environmental conditions, more or less frequent cleaning may be necessary. WARNING Disconnect electric power to the unit before cleaning the condenser. WARNING DO NOT touch the condenser fins.
9 Service Troubleshooting Guide Before Calling for Service DANGER If you think your U-Line product is malfunctioning, read the OPERATION section of this guide to understand clearly the function of the control. If the problem persists, read the NORMAL OPERATING SOUNDS and TROUBLESHOOTING GUIDE section of this guide to help you quickly identify common problems, and possible causes and remedies. Most often, this will resolve the problem without the need to call for service.
U-Line Corporation Limited Warranty 1. U-Line Corporation ("U-Line") warrants each U-Line product to be free from defects in materials and workmanship for a period of one year from the date of purchase. U-Line further warrants the sealed system (consisting of the compressor, the condenser, the evaporator, the hot gas bypass valve, the dryer and the connecting tube) in each U-Line product to be free from defects in materials and workmanship for a period of five years from the date of purchase. 2.
® USE AND CARE GUIDE PRODUCT INFORMATION Installation Guides with complete installation information, Custom Wood Panel Size Specifications & Installation Instructions, CAD Drawings, Use and Care Guides, Specifications & Feature Benefits are available for viewing and download on-line at www.u-line.com/specs/.