
Service manual


35
Service Information
44
Model
CLR2160
front to back. For disposal connections an optional
adapter may be required (included with the kit) to
adapt from the 7/8" connection.
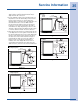
11. For the gravity/floor drain or the standpipe drains it is
important to secure the drain tubing to those items to
prevent it from coming loose. For the disposal or
Y-branch tailpiece connections press the drain tube over
the barbed end on the connector. Make sure the
knockout inside the tailpiece has been removed for
both types of connections. Attach these two with a
worm drive hose clamp. Depending on the size of the
Y-branch or disposer fitting an adapter may be needed
to interface between the 5/8" hose and connection.
12. After all connections have been completed turn the unit
to the ON position. Pour one gallon of water into the ice
bin and check all drain connections for leaks. During this
time also ensure that the water flows from the bin. If
the water does not flow from the bin there may be a
problem with the drain connection such as kinks or
improper slope. If your unit has a drain pump an
indicator of P1 on the display will alert to a slow or
clogged drain. If any problems are found, retrace the
drain connection, correct the issue and retest with water.
Figure 13
Figure 14
Figure 15
Figure 16
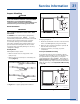
Waste
Cold
Water
Shut-Off
Valve
Hot
Water
Air Gap
(Optional Hook-Up)
Y-Branch Tailpiece
P60 Pump Required
ULIN_0600a_A
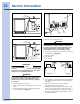
Cold
Water
Hot
Water
Waste
Waste
Shut-Off
Valve
Standpipe
P60 Pump Required
Air gap must
be left between
drain line and
water level.
ULIN_0598a_A
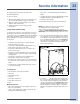
Air Gap
(Optional Hook-Up)
Cold
Water
Hot
Water
Waste
Shut-Off
Valve
Disposal
P60 Pump
Required
ULIN_0599a_A
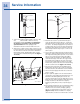
Waste
Waste
Cold
Water
Shut-Off
Valve
Hot
Water
Floor Drain
Air gap must
be left between
drain line and
water level.
ULIN_0597a_A