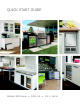
QUICK START GUIDE Modular 3000 Series • 3018 CLR • 115 V / 60 Hz
QUICK START GUIDE u-line.com WELCOME TO U-LINE Congratulations on your U-Line purchase. Your product comes from a company with over five decades and three generations of premium modular ice making, refrigeration, and wine preservation experience. U-Line continues to be the American leader, delivering versatility and flexibility for multiple applications including residential, light commercial, outdoor and marine use.
QUICK START GUIDE Contents 1 Model List 2 Safety and Warning 2 Environmental Requirements 3 Water Hookup 4 Drain 6 Door Swing 7 General Installation 8 Control Quick Guide 8 First Use 8 Ice 10 Sabbath Mode 10 Warranty u-line.
QUICK START GUIDE u-line.com Model List This guide provides the basics to get you started. Looking for more information? Visit u-line.com to view detailed User Guides for all U-Line products. Clear Ice Machines U-3018CLRS-00A U-3018CLRS-01A U-3018CLRS-40A U-3018CLRS-41A U-3018CLRINT-00A U-3018CLRINT-01A U-3018CLRINT-40A U-3018CLRINT-41A Visit http://www.u-line.com/product-literature/userguides or scan this QR code to view all user guides online.
QUICK START GUIDE u-line.com Safety and Warning Environmental Requirements NOTICE This unit is designed to operate between 50°F (10°C) and 100°F (38°C). Higher ambient temperatures may reduce PLEASE READ all instructions before installing, the unit’s ability to reach low temperatures and/or reduce operating, or servicing the appliance. ice production on applicable models.
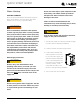
QUICK START GUIDE u-line.com Water Hookup Do not use Teflon tape or joint compound on the PREPARE PLUMBING adequate seal. Other materials could cause Please use the braided stainless steel water supply line blockage of the valve. water fitting. The rubber washer provides an which comes attached. The water line is fitted with a standard 1/4" (6.35 mm) compression fitting. Failure to follow recommendations and instructions may result in damage and/or harm, flooding or void the product warranty.
QUICK START GUIDE u-line.com 5. Route water supply line in cable clamp and secure with NOTICE screw. Drain can NOT be located directly below the unit. Unit has a solid base that will not allow the unit to drain below itself. There is a possibility that hose connections may have loosened during shipment. Verify all connections and fittings are free from leaks.
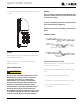
QUICK START GUIDE u-line.com Y-Branch Tailpiece P60 Pump Required ! CAUTION Air Gap (Optional Hook-Up) Failure to connect water supply or drain line connections properly can result in personal injury and property damage. Gravity drain connections must be routed downward from the Waste rest of the unit at the rate of 1/4" per foot (1 cm 6KXW 2ɞ Valve per 50 cm).
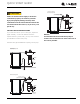
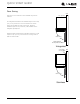
QUICK START GUIDE u-line.com Door Swing Wall Units have a zero clearance when installed adjacent to 1/4" (6 mm) cabinets. For Integrated models that are installed adjacent to a wall, 1/4" (6 mm) clearance is recommended from wall on hinge side to allow the door to open 90°. Allow for additional space for any knobs or pulls installed on the integrated panel/frame.
QUICK START GUIDE u-line.com General Installation INSTALLATION TIP If the room floor is higher than the floor in the cut-out LEVELING INFORMATION opening, adjust the rear feet to achieve a total unit rear 1. Use a level to confirm height of 1/8" (3 mm) less than the opening’s rear height. the unit is level. Level Shorten the unit height in the front by adjusting the front should be placed along feet. This allows the unit to be gently tipped into the top edge and side edge as shown. opening.
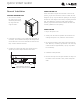
QUICK START GUIDE u-line.com Control Quick Guide Actual Display: Zone Toggle Up Select ICE PRODUCTION Power U-Select Lighting Down Control Function Guide: FUNCTION COMMAND DISPLAY/OPTIONS OFF Press and hold Display will count down from 5 to off. ON Press and release Unit will come on immediately. Adjust lighting Press to adjust lighting Press or to set low, medium or high. Customer menu Press and hold for 5 seconds Press or to scroll through menu.
QUICK START GUIDE u-line.com ICE ADJUST 12.7 mm) in depth. A fuller cube with less of a dimple results in a thicker ice bridge. As the ice bridge thickens, Up the tendency for the cubes to stay together as a slab Select increases. A bridge thicker than 1/8" (3.2 mm) may cause RETURN TO MENU ICE ADJUST ICE ADJUST = 0 cubes to overfill the ice bucket. Down Adjust ice thickness as follows: DIMPLES 1. Press and and hold for 5 seconds to enter the Customer Menu. 2. Press ICE BRIDGE 3.
QUICK START GUIDE u-line.com Warranty U-LINE CORPORATION LIMITED WARRANTY Sabbath Mode 1. U-Line Corporation (“U-Line”) warrants each U-Line product to be free from defects in materials and workmanship for a period of one year (two years on Up Modular 3000 Series) from the date of purchase.
QUICK START GUIDE u-line.com unit is completed and mailed back or electronically of pool water, or directing a spray from a hose or submitted to U-Line. This 30 day warranty does not similar device into and around the unit. apply to cosmetic damages. A proof of purchase may be required. 7. If a product defect is discovered during the applicable warranty period, you must promptly notify either 4. The following conditions are excluded from this limited U-Line at 8900 N.