
User Guide & Service Manual


USER GUIDE
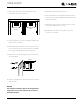
Remove Fan and Cover 1
u-line.com
SAFETY • INSTALLATION & INTEGRATION • OPERATING INSTRUCTIONS • MAINTENANCE • SERVICE
Remove Fan and Cover
CONVECTION COOLING
This unit is equipped with an advanced convection cooling
system. Convection cooling stabilizes cabinet
temperature, cools product faster and increases energy
efficiency.
Evaporator Fan
The evaporator fan is responsible for circulating warm air
from the refrigeration zone, past the evaporator and back
into the refrigerated zone.
The evaporator fan is factory set to have a 1 minute delay
at the beginning of a cooling cycle. This delay gives the
evaporator time to cool properly before warm air is passed
over it. The fan will continue to run for an additional 2
minutes at the end of a cooling cycle. Fan delay times can
be modified through the service menu.
Evaporator fan operation is also determined by door
switch state. If the door switch circuit opens, the fan will
stop. When the door switch circuit is closed the fan will
either continue running with the cooling cycle, or if not
currently cooling, the fan will run for 1 minute to circulate
air and clear any condensation that may have appeared
on glass doors and shelves.
Note: If the unit is set to sabbath mode, the evaporator
fan will no longer respond to the state of the door switch.
In order to operate efficiently, the evaporator fan blade
and vents should be unobstructed and free of any dust
buildup.
Evaporator Fan Replacement
Should an evaporator fan need to be replaced follow the
steps below.
1. Remove any product from the unit.
2. Uninstall unit.
3. Disconnect power to the unit.
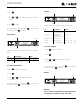
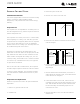
4. Remove rear center cover from unit.
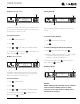
5. Disconnect fan electrical connection to the fan which
must be changed.
6. Remove insulating foam from refrigerant line pass-
through hole as needed to gain clearance to pass fan
plug through.
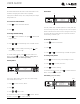
7. Remove internal bins and bin holders, wine racks or
shelf supports as dictated by unit, on the side that fan
motor needs to be changed in.
8. If the unit has bins or wine racks, remove the rear
mounting screw only from the slide assembly on each
side. This will allow the slide to pivot downward from
the front mounting screw allowing ample room to
remove the fan cover.
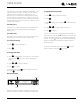
9. Remove thermistor cover. From the zone with the
defective fan.
Upper
Back Panel
Fan
Electrical
Connection
(Left Zone)
Fan
Electrical
Connection
(Right Zone)