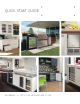
QUICK START GUIDE Ice Makers • 115 V / 60 Hz & 220-240 V / Hz
QUICK START GUIDE u-line.com WELCOME TO U-LINE Congratulations on your U-Line purchase. Your product comes from a company with over five decades of premium modular ice making, refrigeration, and wine preservation experience. U-Line continues to be the American leader, delivering versatility and flexibility for multiple applications including residential, light commercial, outdoor and marine use.
QUICK START GUIDE u-line.com This Quick Start Guide covers the basics of installation and general use of your product. For more details, see the complete User Guide & Service Manual on u-line.com. Contents 1. Safety and Warning 2. Environmental Requirements 3. Electrical 4. Water Hookup 7. Door Swing 8. Door Adjustments 13. General Installation 14. Integrated Panel Installation 16. First Use 16. Defrost 16.
QUICK QUICK START START GUIDE GUIDE u-line.com u-line.com Safety and Warning that they do not play with this appliance. Cleaning and NOTICE without supervision. user maintenance shall not be performed by children PLEASE READ all instructions before installing, operating, or servicing the appliance. ! DANGER SAFETY ALERT DEFINITIONS Do not use electrical appliances inside the food Throughout this guide are safety items labeled with a storage compartment of this appliance.
START GUIDE GUIDE QUICK START u-line.com u-line.com This appliance is intended to be used in household and ! CAUTION similar applications such as: Use care when moving and handling the unit. • Staff kitchen areas in shops, office and other working Use gloves to prevent personal injury from sharp environments. edges. • Farm houses and by clients in hotels, motels and other If your model requires defrosting, DO NOT use residential type environments.
QUICK START START GUIDE GUIDE QUICK u-line.com 220-240 V UNITS ! CAUTION This model is intended for indoor/interior applications only and is not to be used in installations that are open/ Damages caused by ambient temperatures of exposed to natural elements. 40°F (4°C) or below are not covered by the warranty. This unit is designed to operate between 50°F (10°C) and 90°F (32°C).
QUICK START START GUIDE GUIDE QUICK u-line.com u-line.com The unit requires a grounded and polarized 115 VAC, The unit requires a grounded and polarized 230 VAC, 60 Hz, 15A power supply (normal household current). An 50 Hz, 8A power supply (normal household current). An individual, properly grounded branch circuit or circuit individual, properly grounded branch circuit or circuit breaker is recommended. A GFCI (ground fault circuit breaker is recommended.
QUICK QUICK START START GUIDE GUIDE u-line.com u-line.com • The water line MUST have a shut-off valve in the 1. Turn off water supply and disconnect electrical supply supply line. to product prior to attempting installation. • The water line should be looped into 2 coils. This will 2. Remove the grille (plinth strip/base fascia) and access allow the unit to be removed for cleaning and servicing. panel (if equipped) along with back panel.
QUICK QUICK START START GUIDE GUIDE u-line.com u-line.com Water Supply Connection 6. Turn on water supply and check for leaks. When connecting the water supply, please note the following: 7. Reinstall the grille (plinth strip/base fascia) and access panel (if equipped) along with the back panel. • Before installing the unit and connecting to the cold water supply, review the local plumbing codes. 8. Install retaining clip. • The water pressure should be between 20 and 120 psi (138 and 827 kPa).
QUICK QUICK START START GUIDE GUIDE u-line.com u-line.com 7. Turn on water supply and check for leaks. ! CAUTION 8. Reinstall back panel. Turn off water supply and disconnect electrical supply to unit prior to installation. 9. Install retaining clip. Use caution when handling back panel. The edges could be sharp. 1. Turn off water supply and disconnect electrical supply to product prior to attempting installation. 2. Remove the back panel. 3. Locate water valve inlet.
QUICK START START GUIDE GUIDE u-line.com u-line.com Door Adjustments Stainless Steel and black and white models require 2-1/8" (54 mm) door clearance to accommodate the handle if installed next to a wall. DOOR ALIGNMENT AND ADJUSTMENT ADA15IM Models Integrated models require 1/4" (6 mm) clearance if installed next to a wall. Allow for additional space for any knobs or pulls installed on the integrated panel/frame. Align and adjust the door if it is not level or is not sealing properly.
QUICK START START GUIDE GUIDE QUICK u-line.com u-line.com 4. Remove three screws from hinge holes on the opposite side using a Torx T-25 screwdriver. Reinstall into holes where the hinge was removed. Take care not to scratch cabinet. Remove bottom hinge: 1. Remove bottom hinge from cabinet using 1/4” socket. TO REVERSE THE DOOR Remove grille: Remove the grille (see GRILLE-PLINTH INSTALLATION 2. Remove corresponding screws on opposite side of section of this guide). cabinet.
QUICK START START GUIDE GUIDE QUICK u-line.com u-line.com DOOR ALIGNMENT AND ADJUSTMENT the assembly to the door. Reinstall on the opposite end of the door BI1215 and Marine Models 3. Rotate gasket 180°, aligning notch with magnet Align and adjust the door if it is not level or is not sealing assembly and pressing firmly into the gasket channel properly. If the door is not sealed, the unit may not cool starting at the corners. properly, or excessive frost may form in the interior.
QUICK START START GUIDE GUIDE QUICK u-line.com u-line.com 3. Remove door by tilting forward and lifting door off bottom hinge. Retain shoulder washers; they will be reused. 4. Remove three screws from hinge holes on the opposite side. Reinstall into holes where the hinge was removed. Take care not to scratch cabinet. Remove bottom hinge: 1. Remove bottom hinge from cabinet using 1/4” socket. TO REVERSE THE DOOR Remove grille: Remove the grille (see GRILLE-PLINTH INSTALLATION section of this guide).
QUICK START START GUIDE GUIDE u-line.com u-line.com Install top hinge and door: 2. Place spacer (2) over mounting holes. Place latch (1) on top of spacer (2). NOTE: Spacer (2) only required if 1. Use alternate hinge supplied with unit and reinstall the included with unit. screws. Do not tighten.. 3. Re-install the screws, but do not tighten all the way. 4. Verify door latch engagement and adjust as necessary. 5. Tighten screws. 2.
QUICK START START GUIDE GUIDE QUICK u-line.com u-line.com General Installation 1200 SERIES LEVELING INFORMATION MARINE AND BI SERIES 1. Use a level to LEVELING INFORMATION confirm the unit is NOTICE level. Level should be placed along top Because these units do not have leveling legs, it edge and side edge is extremely important that they sit on a level as shown. surface. If they are not level, the ice mold will not fill evenly. 1 Use a level to confirm the unit is level.
QUICK START START GUIDE GUIDE u-line.com u-line.com INSTALLATION 2. Pull door gasket out of groove (top edge of door only). Start in 1. Plug in the power/electrical cord. the middle and pull outward, moving toward the edge. This 2. Gently push the unit into position. Be careful not to may take some force. kink the water supply line or entangle the cord. 3. Re-check the leveling, from front to back and side to side. Make any necessary adjustments. The unit’s top 3.
QUICK QUICK START START GUIDE GUIDE u-line.com u-line.com CRESCENT ICE MAKERS AND ADA15IM Due to differences in floor construction or 1. Fully open door/drawer. surrounding cabinetry, the panel may not sit flush with the top of the door/drawer. 2. Starting at corner, pull gasket away from door/ Panel Door drawer. 3. Continue to pull gasket free from gasket channel. 9. Secure integrated panel to door/drawer 4. Upon removal, lay gasket Bar Clamp using clamps. A down on a flat surface.
QUICK START START GUIDE QUICK QUICK START GUIDE GUIDE u-line.com u-line.com u-line.com Ice Defrost Ice 13.Be sure the screws force their way past the opening on 13.Be thechannel screws force their way past the thesure gasket and sit flush against theopening bottom on of the channel and sit flush against the bottom of the gasket channel. the channel. Integrated Panel Integrated Panel ICE MAKER OPERATION ICE OPERATION This MAKER unit requires manual defrost, periodically.
QUICK START GUIDE To turn off ice production: Raise the bin arm into u-line.com an upright and locked position. The unit will preserve temperature for ice storage. NOTICE If not intending to use the ice maker, turn the water supply valve off. It is also important to raise the bin arm of the ice maker (see above). Failure to raise the bin arm may result in damage to the water valve. Certain sounds are normal during the unit’s operation.
U-Line Corporation (U-Line) Limited Warranty One Year Limited Warranty For one year from the date of original purchase, this warranty covers all parts and labor to repair or replace any part of the product that proves to be defective in materials or workmanship. For products installed and used for normal residential use, material cosmetic defects are included in this warranty, with coverage limited to 60 days from the date of original purchase.