QUICK START GUIDE 5 CLASS 30615_A
QUICK START GUIDE u-line.com WELCOME TO U-LINE Congratulations on your U-Line purchase. Your product comes from a company with over five decades of premium modular ice making, refrigeration, and wine preservation experience. U-Line continues to be the American leader, delivering versatility and flexibility for multiple applications including residential, light commercial, outdoor and marine use.
QUICK START GUIDE u-line.com This Quick Start Guide covers the basics of installation and general use of your product.
QUICK START GUIDE u-line.com Safety and Warning ! DANGER NOTICE This unit contains R600a (Isobutane) which is a Please read all instructions before installing, flammable hydrocarbon. It is safe for regular operating, or servicing the appliance. use. Do not use sharp objects to expedite defrosting.
QUICK START GUIDE u-line.com Environmental Requirements NOTICE This model is intended for indoor/interior applications only local codes. This unit requires connection to a Electrical installation must observe all state and grounded (three-prong), polarized receptacle and is not to be used in installations that are open/ exposed to natural elements. that has been placed by a qualified electrician.
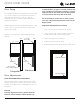
QUICK START GUIDE u-line.com Door Swing around the door (no gaps). Carefully examine the For Integrated models that are installed adjacent to a wall, with the cabinet. Also make sure the door gasket door’s gasket to ensure that it is firmly in contact is not pinched on the hinge side of the door. 1/2” (13 mm) clearance is recommended from wall on hinge side to allow the door to open 90°.
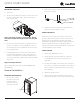
QUICK START GUIDE u-line.com REVERSING THE DOOR 2. If the unit is not level, adjust the legs on the corners of the unit as necessary. 1. Open door. 2. Using T-25 Torx bit loosen screw #1 and remove screw #2 on top and bottom hinge. Slide and remove the door from the unit. Turn to Adjust 3. Confirm the unit is level after each adjustment and repeat the previous steps as needed.
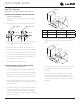
QUICK START GUIDE u-line.com Anti-Tip Bracket Surrounding area (Top view) Use one of the methods below to secure the unit CABINET/COUNTER ANTI-TIP INSTALLATION (For built-in applications) 1. Back of unit Back wall Slide unit out so screws on front of unit are easily accessible. B Remove the two screws from the front of the unit. A 2. A CL Front of unit 5. 3. 518 524 7 5⁄8” 9” 11 15⁄16” B 22” 22” 22” Place the anti-tip brackets on the floor against the line drawn for the outer edge.
QUICK START GUIDE u-line.com Integrated Panel Installation 8. Integrated Models Only with your unit. 1. Fully open door. 2. Starting at corner, pull gasket 9. overtighten screws. Continue to pull gasket free from gasket channel. 4. Using a Phillips screwdriver, place one screw into each of the 6 pilot holes and screw down. Do not away from door. 3. Locate 6 of the #6x 1-1/2” (38 mm) screws provided 10.
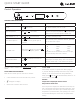
QUICK START GUIDE u-line.com Control Operation CONTROL FUNCTION GUIDE FUNCTION COMMAND NOTES ON/OFF Press Unit will immediately turn On or OFF and release When the display is flashing, press Adjust Temperature Press or and release or to adjust the set point temperature.
QUICK START GUIDE USER GUIDE u-line.com u-line.com Airflow & Product Loading NOTICE Restricting airflow may result in poor product AIRFLOW performance, product failure, and uneven External internal temperatures and may freeze contents.
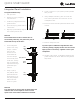
QUICK START GUIDE u-line.com Interior Adjustments 5. Once removed, retract the slides. Note: The slides on the rack have a thin coating which All 5 Class models feature side mounted rack supports with is used to block moisture and provide lubrication. Use 19 adjustment positions. care when handling. All units ship with wine racks or Slide and Secure storage Wine Rack Installation bins - or a combination of both. 1.
QUICK START GUIDE u-line.com Wine Storage Options WINE RACK BOTTLE POSITION Specially designed horizontal wine racks properly position the bottles so the wine remains in contact with the cork, which ensures the cork does not become dry.
QUICK START GUIDE u-line.com SLIDE AND SECURE STORAGE BIN ADJUSTMENT 5. Slide and Secure Storage Bin Removal Note: The slides on the frame have a thin coating 1. which is used to block moisture and provide Empty and remove bin. Once removed, retract the slides. lubrication. Use care when handling. Slide and Secure Storage Bin Installation 1. Insert empty storage bin frame into unit with one side tilted slightly downward until back pin is between front and rear rail supports. 2.
QUICK START GUIDE USER GUIDE u-line.com u-line.com Cleaning Integrated Models To clean integrated panels, use household cleaner per the Stainless Models cabinet manufacturer’s recommendation. Stainless door panels and handles can discolor when exposed to chlorine gas, pool chemicals, saltwater or INTERIOR CLEANING cleaners with bleach. Disconnect power to the unit.
U-Line Corporation (U-Line) Limited Warranty One Year Limited Warranty For one year from the date of original purchase, this U-Line product warranty covers all parts and labor to repair or replace any part of the product that proves to be defective in materials or workmanship. For products installed and used for normal residential use, material cosmetic defects are included in this warranty, with coverage limited to 60 days from the date of original purchase.