USER GUIDE & SERVICE MANUAL 1 Class ● UHCR115 ● 15” Crescent Ice Maker
USER GUIDE & SERVICE MANUAL Table of Contents Installation Integrated Panel Dimensions Integrated Panel Installation Grille Installation u-line.
USER GUIDE u-line.com WELCOME TO U-LINE Congratulations on your U-Line purchase. Your product comes from a company with over five decades of premium modular ice making, refrigeration, and wine preservation experience. U-Line creates products focused on functionality, style, and inspired innovations — paying close attention to even the smallest details. Applications include residential, outdoor, ADA height compliant, marine, and commercial.
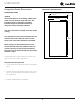
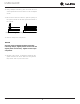
USER GUIDE USER GUIDE u-line.com u-line.com SAFETY • INSTALLATION & INTEGRATION • OPERATING INSTRUCTIONS • MAINTENANCE • SERVICE Integrated Panel Dimensions Integrated Panel Dimensions INTEGRATED PANEL BACK SURFACE MUST HAVE AMPLE FLAT SURFACE TO MOUNT OVERLAY PANEL FLAT AND WITHOUT 3/4" INTERFERENCE (20 mm) NOTICE 14-3/4" (375 mm) Due to differences in surrounding cabinetry the panel may not perfectly align with door.
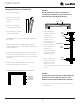
QUICK START GUIDE USER GUIDE (Amended) u-line.com u-line.com SAFETY • INSTALLATION & INTEGRATION • OPERATING INSTRUCTIONS • MAINTENANCE • SERVICE Integrated Panel Installation NOTICE Due to differences in floor construction or 1. Fully open door/drawer. surrounding cabinetry, the panel may not sit flush with the top of the door/drawer. 2. Starting at corner, pull gasket away from door/ drawer. Panel Door 3. Continue to pull gasket free from gasket channel. 4. Upon removal, lay gasket 9.
USER GUIDE USER GUIDE u-line.com u-line.com SAFETY • INSTALLATION & INTEGRATION • OPERATING INSTRUCTIONS • MAINTENANCE • SERVICE 12.Using a Phillips screwdriver, place one screw into each of the 6 pilot holes and screw down. Do not overtighten screws. 13.Be sure the screws force their way past the opening on the gasket channel and sit flush against the bottom of the channel. Integrated Panel Integrated Panel 14.Remove clamps from door/drawer.
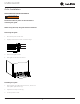
USER GUIDE u-line.com Grille Installation REMOVING AND INSTALLING GRILLE ! WARNING Disconnect electric power to the unit before removing the grille. When using the unit, the grille must be installed. Removing the grille 1. Disconnect power to the unit. 2. Slightly loosen three screws on bottom hinge. 3. Remove two grille screws. 4. Slide grille to the left and remove. 2 3 Installing the grille 1. Align cabinet and grille holes and secure, but do not over tighten grille screws (3). 2.