
Quick Start Guide


QUICK START GUIDE
u-line.com
Ice
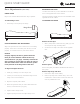
The Nugget Ice Machine produces cylindrical bits of
Ice is produced until the machine senses the bin is full.
As ice slowly melts in the bin, the level of ice drops and
ice production resumes. This ensures a constant supply
of fresh ice is always available.
The factory default ice setting is 0, which produces
of adjustment from 0 to -5. At -5 the ice is soft and
chewable.
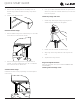
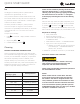
To adjust the ice density:
1.
setting
2. Adjust using or
3.
Cleaning
17
USER GUIDE
u-line.com
Cleaning
Integrated Models
To clean integrated panels, use household cleaner per the
cabinet manufacturer’s recommendations.
INTERIOR CLEANING
Disconnect power to the unit.
Clean the interior and all removed components using a mild
nonabrasive detergent and warm solution applied with a
soft sponge or non-abrasive cloth.
Rinse the interior using a soft sponge and clean water.
Do not use any solvent-based or abrasive
cleaners. These types of cleaners may transfer taste
and/or odor to the interior products and damage or discolor
the interior.
NUGGET ICE MACHINE CLEANING CYCLE
This ice machine has an automatic clean alert function.
The control will indicate
CL in the display, reminding you
to clean your unit. When
CL is displayed, ice production
will continue. Depending on water conditions, more
frequent cleaning may be necessary: see chart below.
Cleaning removes lime scale, other mineral deposits, and
sanitizes the machine. Poor ice quality and reduced ice
output are signs that cleaning is necessary.
Clean surfaces with a mild detergent and warm water
solution. Do not use solvent-based or abrasive cleaners.
Use a soft sponge and rinse with clean water. Wipe with a
soft, clean towel to prevent water spotting.
Clean any glass surfaces with a non-chlorine glass
cleaner.
EXTERIOR CLEANING
Vinyl Clad (Black or White) Models
Stainless Models
Stainless door panels, handles and frames can discolor
when exposed to chlorine gas, pool chemicals, saltwater or
cleaners with bleach.
Keep your stainless unit looking new by cleaning with a
good quality all-in-one stainless steel cleaner and polish
monthly. For best results use Claire
®
Stainless Steel
Polish and Cleaner. Comparable products are acceptable.
Frequent cleaning will remove surface contamination that
could lead to rust. Some installations may require cleaning
weekly.
Do not clean with steel wool pads.
Do not use stainless steel cleaners or polishes on
any glass surfaces.
Clean any glass surfaces with a non-chlorine glass cleaner.
Do not use cleaners not specically intended for
stainless steel on stainless steel surfaces (this
includes glass, tile, and counter cleaners).
If any surface discoloring or rusting appears, clean it
quickly with Bon-Ami
®
or Barkeepers Friend Cleanser
®
and
a nonabrasive cloth. Always clean with the grain. Always
nish with Claire
®
Stainless Steel Polish and Cleaner or
comparable product to prevent further problems.
Using abrasive pads such as ScotchBrite™ will
cause the graining in the stainless steel to
become blurred.
Rust not cleaned up promptly can penetrate the
surface of the stainless steel and complete
removal of the rust may not be possible.
For information on Keg and Tap Towers, please reference
the Single and Double Tap Tower Kits User Guide on
u-line.com.
Cleaning
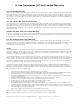
TDS (Total Dissolved Solids)
Level mg/L (ppm)
Cleaning Interval
5 - 150 6 months
150 - 250 4 months
250 - 400 3 months (or sooner)
Hardness Level mg/L (ppm) Cleaning Interval
0 - 66 6 months
67 - 133 4 months
134 - 200 3 months (or sooner)
USER GUIDE
u-line.com
Cleaning
Under normal conditions cleaning should be done
when the display shows
CL. You may initiate a
cleaning cycle at any time by pressing and holding
the clean button for 10 seconds.
0 1 will appear
in the display indicating the start of the cleaning
process.
Failure to clean may reduce the quality and quantity of ice
produced. Once the clean cycle begins, it can be canceled
by pressing three times. Press once more to start
making ice. The clean cycle will automatically cancel if user
fails to activate control at steps 2, 3b, and 5b within 2 hours.
Required for cleaning:
• Clean potable water
• Bucket and cleaning sponge
•
ULANUGGETFILTER**
•
• ” ID x
Register your product at u-line.com and receive
a free cleaning kit - ULANUGGETCLEANKIT**
** available for purchase at u-line.com or your local dealer
Need more cleaner? Visit u-line.com
CAUTION
!
Use only SafeCLEAN Plus™ Cleaner. Use of any
other cleaner may damage the nish of the
evaporator and will void the warranty.
Follow safety and handling instructions printed on
the SafeCLEAN Plus™ bottle.
Notice:
Select models include a water lter. The lter
must remain in place when using and cleaning
the machine. The lter is designed to lter out
scale, sediment, particles and cloudiness as well
as reduce chlorine and other o tastes and odors.
U-Line recommends replacing the lter (Part No.
ULANUGGETFILTER) when you clean your machine.
The lter is available at u-line.com.
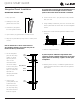
1. Press and Hold for 10 seconds
a.
0 1 will appear in the display
b. Remove access shield
c. Remove all ice in bin
d. Remove any ice protruding from the ice dispenser
tube.
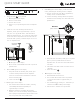
2. Insert the end of the cleaning tube into the ice
dispenser; slowly pour in approximately 1 quart of
inside the dispenser tube. It is normal for some water
vent tube while pouring. Omit this step if no ice is in
the ice dispenser tube.
3. Press and release
a.
02 will appear in the display
b. Mix 4 ounces of SafeCLEAN Plus™ with 2 quarts of
potable water.
4. Wait until
03 appears in the display
a. Using the funnel and cleaning tube, slowly pour
of the cleaning solution into the dispenser
tube. Air and some water will exit the vent tube.
b. Press and release
5
. 04 will appear in the display
a. The machine will circulate the solution, cleaning
and sanitizing the internal components, for
approximately 20 minutes.
b. While the machine is circulating the cleaning
solution, use of the remaining cleaning solution
and a sponge to wipe down the inside of the ice bin
and scoop. Rinse with clean potable water.
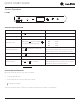
Cl
Cleaning Tube
and Funnel
Ice
Dispenser
Tube
Vent Tube