Quantum Imager Quick Start Guide © Copyright 2015 No part of this document may be photocopied or otherwise reproduced without the prior permission in writing of US Radar, Inc.
CERTIFICATE OF WARRANTY US Radar warrants under the following conditions that new equipment products are free of defects in material and workmanship and that only appropriate materials were used. The warranty period for hardware is two (2) years from the date of purchase, this excludes battery packs. The warranty period for battery packs is one (1) year from the date of purchase.
Safety and Compliance This device complies with part 15 of the FCC Rules. Operation is subject to the following two conditions: (1) This device may not cause harmful interference. (2) This device must accept any interference received, including interference that may cause undesired operation. US Radar Inc. assumes no liability for any injuries or damage caused by proper or improper operation of its equipment, regardless of any system defects.
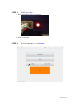
STEP 1: TURN Power ON 1. Press illuminating switch on antenna. 2. Turn on tablet PC.
STEP 3: Set Up the Antenna 1. From the Settings menu, touch Antenna 2. Touch the Auto-Configure All Channels button.
Note: It is a good idea to perform this function before commencing work at each new site. 3. When complete, the following message will display: Touch the OK button. Note: These values will vary Note: If Auto-configure fails, you will be prompted to try again. 4. Touch the OK button to return to the Settings Menu.
5. Touch the Back button to return to the Main Menu. STEP 4: Set Radar Survey Parameters 1.
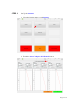
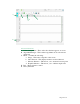
2. The Survey Settings screen will display. A B A This field indicates the filename that will be assigned to this survey file if you choose to record the data. B Under Mode, if you have a choice of Single Line and Multi Line, make sure that the Single Line option is selected. Note: Multi-Line is used for acquiring 3D surveys and requires a license from US Radar Inc. . 3. Press OK to begin Surveying.
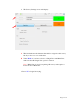
STEP 5: Starting and Stopping a Radar Survey 1 5 4 4 2 3 4 Primary Functions 1. Recording Controls 2. Flat Gain 3. Depth Scales 4. Dotted Lines representing surface of the material being scanned. 5.
A C D E B Advanced functions A. Selected Algorithms – These affect how the data appears on screen. B. Algorithm Manager – This is where algorithms can be selected and deselected. C. Menu – Contains the following: a. Image – This takes a snapshot of the screen b. Show Interval – This displays markers at a fixed interval c. Measure Distance – This allows you to measure between points d. Depth Calibration – This allows you to calibrate depth scale D. Pass – Resets distance counter E.
To begin a survey: 1. Touch the Start button to start a radar scan. 2. Push the Radar System forward. Data will feed right to left on the screen.
3. Use Flat Gain to adjust contrast of displayed data.
STEP 6: Ending a Radar Survey 1. Touch the Stop button to end a radar scan. 2. Press Save to save your file.
3. Touch the Close button to exit the radar file. 4. From the Main Start Menu, touch the Exit button to end the survey session.
Introduction to Ground Penetrating Radar (GPR) Data With a minimal amount of training and practice, it is possible for most operators to become proficient at reading raw GPR data in less than a day. First, it is essential to understand that the radar signal spreads in a fan shape when it is transmitted. Because of this, an object will be visible to the radar before and after the radar is directly over it. This is the reason that a point-shaped object will show up as a hyperbola (arc shape).
For Support: www.usradar.