
Instruction manual


70
cylinder seeing to it that they are never empty in order to
prevent penetration of air into the system again.
During the whole operation, keep the free end of the hose
dipped in fluid. If neither fluid nor air escape from the hose, the
hose is clogged or the valve is closed.
5. With the brake pedal pressed down, tightly screw in the
by-pass valve of the wheel brake cylinder, remove the hose and
put the cap on the valve.
6. Bleed the remaining brake cylinders in the following
sequence: first the rear r.h. brake, rear l.h. brake, then the front
r.h. brake, front l.h. brake. On the brakes of the front wheels,
first bleed the lower cylinder, then the upper one.
7. After all the brakes have been bled, add brake fluid into
the brake master cylinder reservoirs. Screw on the caps of the
reservoirs.
8. Switch off the brake warning device for which purpose,
do as follows:
- screw out the by-pass valve of the r.h or l.h. wheel brake
cylinder of the rear brakes;
- smoothly press the brake pedal until the warning lamp on
the instrument panel goes out; if the warning lamp flashes, this
means that the pistons of the warning device are passed over the
neutral position and it is necessary to repeat the operation by
unscrewing the by-pass valve of the front wheel.
- screw in the by-pass valve with the brake pedal depressed.
Check the brakes with the automobile
in motion. If the service brake, their control
linkage and their hydraulic system have
been adjusted and bled correctly, the full
application of the brakes should take place
within 1/2 - 2/3 of the pedal travel.
Do not add into the brake master
cylinder the brake fluid collected in the
glass vessel during bleeding.
Do not depress the brake pedal with
the brake drum removed because due to
pressure in the hydraulic system, the pis-
tons will be forced out of the wheel brake
cylinders and the fluid will flow outside.
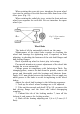
Change brake fluid once every two
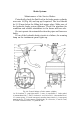
Fig. 63. Bleeding
brake system