Security Camera
Introduction Introduction Thank you for purchasing the airCam™. This Quick Start Guide is designed to guide you through the installation of the airCam and show you how to access the airCam's configuration interface. This Quick Start Guide also includes the warranty terms. The airVision™ software and User Guide are available for download at downloads.ubnt.com/airvision. The hardware installation process is different for indoor and outdoor installations.
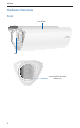
airCam Hardware Overview Front Sun Shade Lens remove plastic lens film before use 2
Hardware Overview Back Mounting Slots Ethernet Door Plug (for outdoor installations) LEDs Power The Power LED will light steady orange when the airCam is connected to a power source. Ethernet The Ethernet LED will light steady green when an active Ethernet connection is made and flash when there is activity.
airCam Installation Overview The installation process is different depending on whether you are mounting the camera outdoors or indoors. Follow the instructions for the installation that you are performing. Outdoor Installation Important: The ideal outdoor location for mounting the airCam would be under an overhang/eave that shelters the camera. If the airCam is located in a completely open outdoor environment without an overhang/eave, do not install camera with a downtilt of more than 45°.
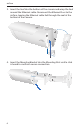
Outdoor Installation 1. Press down on the release to remove the Ethernet Door. Important: Do not remove the plug. Plug 2. Connect the Ethernet cable to the Ethernet port.
airCam 3. Insert the Seal into the bottom of the camera and wrap the Seal around the Ethernet cable. Reconnect the Ethernet Door to the airCam, leaving the Ethernet cable fed through the seal at the bottom of the camera. 4. Insert the Mounting Bracket into the Mounting Slots until a click is heard to confirm a secure connection.
Outdoor Installation 5. There are three recessed areas for the Ethernet cable on the Mounting Bracket Base. Thread the Ethernet cable through two of the recessed areas and out the one that will be closest to your power source. Important: If the power source is above the camera, extend the cable 70-80 mm below the camera body before routing up to the power source. 6. Position the Mounting Bracket in the desired location and use a pencil to mark the holes on the wall. 7.
airCam Indoor Installation 1. Remove the screw and knob that connect the Mounting Bracket Base to the camera attachment by turning the knob counter‑clockwise. Mounting Bracket Base 2. Insert an Ethernet cable through the Mounting Bracket Base. 3. Reconnect the Mounting Bracket Base to the camera attachment by reconnecting the screw and knob. Turn the knob clockwise to lock the camera attachment back to the Mounting Bracket Base.
Indoor Installation 4. Unscrew the Plug on the back of the airCam. 5. Connect the Ethernet cable to the Ethernet port. 6. Insert the Mounting Bracket into the Mounting Slots until a click is heard to confirm a secure connection.
airCam 7. Position the Mounting Bracket in the desired location and use a pencil to mark the holes on the wall. 8. Use a 6 mm drill bit to drill the holes in the wall. 9. Insert the three Screw Anchors into the wall. 10. Secure the Mounting Bracket to the wall using the Self‑Tapping Screws. Note: There are three recessed areas for the Ethernet cable on the Mounting Bracket Base. Place the Ethernet cable in the recessed area that will be closest to your power source. Connecting the Power 1.
Connecting the Power 2. Connect an Ethernet cable from your LAN to the Ethernet port labeled LAN on the PoE Adapter. 3. Connect the power cord to the power port on the PoE Adapter. Connect the other end of the power cord to a power outlet. The Power LED should light up on the airCam.
airCam airVision Download and install the latest version of the airVision software at downloads.ubnt.com/airvision; the airVision auto management feature should automatically detect and install your new camera. • Go to the airVision interface to verify the camera is installed. It should appear on the left under Unplaced Cameras. • Drag the Camera to the appropriate location on the map. • Click the Camera icon. • Click the Live Feed be displayed.
Camera Configuration Interface Camera Configuration Interface Access the Camera Configuration Interface if you have not yet installed airVision, or plan to use the airCam as a stand‑alone camera without airVision. 1. Make sure that your host machine is connected to the same LAN as the airCam. 2. The airCam is set to DHCP by default. If you have a router or DHCP server providing addresses on your network, please check your DHCP Client Table or download the Ubiquiti Discovery Tool from: http://www.ubnt.
airCam 6. The Main screen will appear and you should see a live video stream from the airCam. Note: If you need to change the airCam network settings (DHCP/Static), go to Network Settings on the Device tab.
Adjusting the Camera View Adjusting the Camera View Adjusts Mounting Bracket Base Adjusts Camera Side to Side Adjusts Camera Up and Down Adjusts Camera Focus Hardware installation is complete. For details on using the airVision software or the Camera Configuration Interface, download the User Guide from downloads.ubnt.
airCam Limited Warranty UBIQUITI NETWORKS, Inc (“UBIQUITI NETWORKS”) warrants that the product(s) furnished hereunder (the “Product(s)”) shall be free from defects in material and workmanship for a period of one (1) year from the date of shipment by UBIQUITI NETWORKS under normal use and operation.
Limited Warranty Returns No Products will be accepted for replacement or repair without obtaining a Return Materials Authorization (RMA) number from UBIQUITI NETWORKS during the warranty period, and the Products being received at UBIQUITI NETWORKS’ facility freight prepaid in accordance with the RMA process of UBIQUITI NETWORKS. Products returned without an RMA number will not be processed and will be returned freight collect or subject to disposal.
airCam Limitation of Liability EXCEPT TO THE EXTENT PROHIBITED BY LOCAL LAW, IN NO EVENT WILL UBIQUITI OR ITS SUBSIDIARIES, AFFILIATES OR SUPPLIERS BE LIABLE FOR DIRECT, SPECIAL, INCIDENTAL, CONSEQUENTIAL OR OTHER DAMAGES (INCLUDING LOST PROFIT, LOST DATA, OR DOWNTIME COSTS), ARISING OUT OF THE USE, INABILITY TO USE, OR THE RESULTS OF USE OF THE PRODUCT, WHETHER BASED IN WARRANTY, CONTRACT, TORT OR OTHER LEGAL THEORY, AND WHETHER OR NOT ADVISED OF THE POSSIBILITY OF SUCH DAMAGES.
Compliance Compliance FCC Changes or modifications not expressly approved by the party responsible for compliance could void the user’s authority to operate the equipment. This device complies with Part 15 of the FCC Rules. Operation is subject to the following two conditions: 1. This device may not cause harmful interference, and 2. This device must accept any interference received, including interference that may cause undesired operation.
airCam RoHS/WEEE Compliance Statement English European Directive 2002/96/EC requires that the equipment bearing this symbol on the product and/or its packaging must not be disposed of with unsorted municipal waste. The symbol indicates that this product should be disposed of separately from regular household waste streams. It is your responsibility to dispose of this and other electric and electronic equipment via designated collection facilities appointed by the government or local authorities.
Compliance Français La directive européenne 2002/96/CE exige que l’équipement sur lequel est apposé ce symbole sur le produit et/ou son emballage ne soit pas jeté avec les autres ordures ménagères. Ce symbole indique que le produit doit être éliminé dans un circuit distinct de celui pour les déchets des ménages.
airCam Declaration of Conformity Česky [Czech] UBIQUITI NETWORKS tímto prohla uje, e tento UBIQUITI NETWORKS device, je ve shod se základními po adavky a dal ími p íslu n mi ustanoveními sm rnice 1999/5/ES. Dansk [Danish] Undertegnede UBIQUITI NETWORKS erklærer herved, at følgende udstyr UBIQUITI NETWORKS device, overholder de væsentlige krav og øvrige relevante krav i direktiv 1999/5/EF.
Declaration of Conformity Latviski [Latvian] Ar o UBIQUITI NETWORKS deklar , ka UBIQUITI NETWORKS device, atbilst Direkt vas 1999/5/EK b tiskaj m pras b m un citiem ar to saist tajiem noteikumiem. Lietuviškai [Lithuanian] UBIQUITI NETWORKS deklaruoja, kad šis UBIQUITI NETWORKS įrenginys atitinka esminius reikalavimus ir kitas 1999/5/EB Direktyvos nuostatas.
airCam The Advanced Gigabit PoE Managed Switch from Ubiquiti Networks Power your Ubiquiti devices with TOUGHSwitch™ PoE. TOUGHSwitch PoE delivers reliable power and fast Gigabit connectivity to devices that support passive Power over Ethernet. Simplify Your Deployment TOUGHSwitch PoE deployments increase efficiency and greatly reduce the number of potential failure points, resulting in faster installations and less maintenance and troubleshooting.
Support support.ubnt.com Community community.ubnt.com Downloads downloads.ubnt.com www.ubnt.com © 2011-2013 Ubiquiti Networks, Inc. All rights reserved.