
User guide


3
Chapter 2: InstallationairCam
™
User Guide
Ubiquiti Networks, Inc.
10. Insert the Mounting Bracket into the airCam until a click
is heard to confirm a secure installation.
Continue to “Connecting the Power” on page 4.
Outdoor Installation
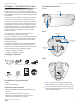
Important: The ideal outdoor location for mounting
the airCam would be under an overhang/eave that
shelters the camera. If the airCam is located in a
completely open outdoor environment without an
overhang/eave, do not install camera with a down
tilt of more than 45 degrees.
45°
Celing Mount
Wall-Mount
Camera is at 45
degrees when the
indicator on the joint is
aligned with the corner
of the mounting arm.
1. Press down on the release to remove the Outdoor
Ethernet Port Cover.
2. Connect the Ethernet cable to the Ethernet port.
3. Reconnect the Outdoor Ethernet Port Cover to the
airCam leaving the Ethernet cable fed through the
bottom of the camera.
4. Position the Mounting Bracket in the desired location
and use a pencil to mark the holes on the wall.
5. Use a 6 mm drill bit to drill the holes in the wall.
6. Insert the 3 screw anchors into the wall.