Network Video Recorder Model: airVision-C
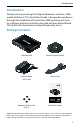
Introduction Introduction Thank you for purchasing the Ubiquiti Networks™ airVision™ NVR, model airVision-C. This Quick Start Guide is designed to guide you through the installation of the airVision NVR and show you how to configure airVision Controller using the airVision Setup Wizard. This Quick Start Guide also includes the warranty terms. Package Contents airVision NVR Vertical Support Stand Power Adapter (19V, 3.
airVision™ NVR Quick Start Guide Hardware Overview Back Panel 10/100/1000 Ethernet Not used by airVision Power Not used Front Panel Power Button Not used by airVision Interface Reset Button Description Powers ON or OFF the airVision NVR • Power ON Press the Power button to turn on the airVision NVR and start all services. Power Button • Soft Power OFF Briefly press the Power button to stop all services and safely shut down the airVision NVR.
Hardware Overview Hardware Installation The small form factor of the airVision NVR allows it to be placed vertically or horizontally on any flat surface. Vertical Placement Place the airVision NVR in the narrow opening of the Vertical Support Stand.
airVision™ NVR Quick Start Guide Horizontal Placement Place the four Magnetic Rubber Feet on the bottom of the airVision NVR case.
Connecting the airVision NVR Connecting the airVision NVR 1. Connect an Ethernet cable from your LAN to the Ethernet port. 2. Connect the Power Adapter to the Power port.
airVision™ NVR Quick Start Guide 3. Connect the Power Cord to the Power Adapter. Connect the other end of the Power Cord to a power outlet. Accessing the airVision Configuration Portal The airVision Configuration Portal is accessed by using a web browser. There are three different ways to access the portal: • airVision Online Registration The simplest method for airVision NVRs connected to a DHCP-enabled LAN with Internet access.
Accessing the airVision Configuration Portal 3. After registering the airVision NVR, the web browser will be automatically redirected to the Configuration Portal. 4. Go to Configuring the airVision Controller on page 9. Ubiquiti Device Discovery Tool If it is not already installed, download the Ubiquiti Device Discovery Tool (v2.3.1) at www.ubnt.com/download#app 1. Press the Power button on the airVision NVR, and wait about one minute for it to fully boot up and start all services. 2.
airVision™ NVR Quick Start Guide Direct Connection to airVision NVR 1. Connect the Ethernet cable from the airVision NVR directly to your computer. 2. Press the Power button on the airVision NVR, and wait about one minute for it to fully boot up and start all services. 3. Configure the Ethernet adapter on your computer with a static IP address on the 192.168.1.x subnet. 4. Launch a web browser and type http:// 192.168.1.30 in the address field. Press enter (PC) or return (Mac).
Accessing the airVision Configuration Portal Configuring the airVision Controller 1. The airVision Configuration Portal will appear in your browser. Click airVision Controller. Note: Advanced configuration options, such as network settings, may be accessed in Device Configuration. 2. The airVision Setup Wizard will appear: a. Enter a system name for the NVR. b. Select your preferred language. c. Specify your time zone. d. Click Next.
airVision™ NVR Quick Start Guide 3. Enter an administrator email address, name, and password to use when accessing the airVision Controller Interface. Confirm your password. Click Next. 4. Choose one of the following: • To set up this airVision NVR as a new airVision Controller, select Create a new Controller. Click Next. • To link this airVision NVR to an existing airVision Controller, click Detect Controllers and select the Controller from the drop‑down list. Click Next.
Accessing the airVision Configuration Portal 5. Select your desired management settings. To enable automatic airCam management, enter the airCam login username and password. Click Next. 6. Review your settings. Click Finish to save your settings, or click Back to make changes. When finished, the airVision Controller Interface will launch.
airVision™ NVR Quick Start Guide 7. A login screen will appear for the airVision Controller Interface. Enter the email address and password that you created, and click Login. For detailed information on using airVision software, download the airVision User Guide at documentation.ubnt.
Safety Notices Safety Notices 1. Read, follow, and keep these instructions. 2. Heed all warnings. 3. Only use attachments/accessories specified by the manufacturer. WARNING: Do not use this product in location that can be submerged by water. WARNING: Avoid using this product during an electrical storm. There may be a remote risk of electric shock from lightning. Electrical Safety Information 1.
airVision™ NVR Quick Start Guide Limited Warranty UBIQUITI NETWORKS, Inc (“UBIQUITI NETWORKS”) warrants that the product(s) furnished hereunder (the “Product(s)”) shall be free from defects in material and workmanship for a period of one (1) year from the date of shipment by UBIQUITI NETWORKS under normal use and operation.
Limited Warranty Disclaimer EXCEPT FOR ANY EXPRESS WARRANTIES PROVIDED HEREIN, UBIQUITI NETWORKS, ITS AFFILIATES, AND ITS AND THEIR THIRD PARTY DATA, SERVICE, SOFTWARE AND HARDWARE PROVIDERS HEREBY DISCLAIM AND MAKE NO OTHER REPRESENTATION OR WARRANTY OF ANY KIND, EXPRESS, IMPLIED OR STATUTORY, INCLUDING, BUT NOT LIMITED TO, REPRESENTATIONS, GUARANTEES, OR WARRANTIES OF MERCHANTABILITY, ACCURACY, QUALITY OF SERVICE OR RESULTS, AVAILABILITY, SATISFACTORY QUALITY, LACK OF VIRUSES, QUIET ENJOYMENT, FITNESS FO
airVision™ NVR Quick Start Guide Compliance FCC Changes or modifications not expressly approved by the party responsible for compliance could void the user’s authority to operate the equipment. This device complies with Part 15 of the FCC Rules. Operation is subject to the following two conditions: 1. This device may not cause harmful interference, and 2. This device must accept any interference received, including interference that may cause undesired operation.
Compliance CE Marking CE marking on this product represents the product is in compliance with all directives that are applicable to it. RoHS/WEEE Compliance Statement English European Directive 2002/96/EC requires that the equipment bearing this symbol on the product and/or its packaging must not be disposed of with unsorted municipal waste. The symbol indicates that this product should be disposed of separately from regular household waste streams.
airVision™ NVR Quick Start Guide Español La Directiva 2002/96/CE de la UE exige que los equipos que lleven este símbolo en el propio aparato y/o en su embalaje no deben eliminarse junto con otros residuos urbanos no seleccionados. El símbolo indica que el producto en cuestión debe separarse de los residuos domésticos convencionales con vistas a su eliminación.
Declaration of Conformity Declaration of Conformity Česky [Czech] UBIQUITI NETWORKS tímto prohla uje, e tento UBIQUITI NETWORKS device, je ve shod se základními po adavky a dal ími p íslu n mi ustanoveními sm rnice 1999/5/ES. Dansk [Danish] Undertegnede UBIQUITI NETWORKS erklærer herved, at følgende udstyr UBIQUITI NETWORKS device, overholder de væsentlige krav og øvrige relevante krav i direktiv 1999/5/EF.
airVision™ NVR Quick Start Guide Latviski [Latvian] Ar o UBIQUITI NETWORKS deklar , ka UBIQUITI NETWORKS device, atbilst Direkt vas 1999/5/EK b tiskaj m pras b m un citiem ar to saist tajiem noteikumiem. Lietuviškai [Lithuanian] UBIQUITI NETWORKS deklaruoja, kad šis UBIQUITI NETWORKS įrenginys atitinka esminius reikalavimus ir kitas 1999/5/EB Direktyvos nuostatas.
Support support.ubnt.com Wiki Page wiki.ubnt.com Support Community community.ubnt.com Downloads downloads.ubnt.com www.ubnt.com © 2013 Ubiquiti Networks, Inc. All rights reserved.