airMAX® 2x2 PtP Bridge Dish Antenna Model: RD-5G30-LW
Introduction Thank you for purchasing the Ubiquiti Networks® RocketDish™, an airMAX® 2x2 PtP Bridge Dish Antenna. This Quick Start Guide is designed to guide you through the installation of the antenna. This Quick Start Guide also includes the warranty terms and is for use with the RocketDish, model RD-5G30-LW. Package Contents Dish Antenna Upper Pole Bracket Hex Head Bolts (M8, Qty. 5) Mounting Bracket Support Arm Lock Washers (M8, Qty. 5) Antenna Feed Brace Screws (M6, Qty.
Installation Requirements • Rocket™5ac PtP, Rocket5ac Lite, RocketM5 Titanium, or RocketM5 (sold separately) • Phillips screwdriver • 13 mm wrench • Wrench or channel lock pliers with 63.5 mm (2.5") capacity • Shielded Category 5 (or above) cabling should be used for all wired Ethernet connections and should be grounded through the AC ground of the PoE.
Installation Important: Handle the Dish Reflector with care. Deformations in its shape may reduce the RocketDish's effectiveness. 1. Line up the alignment tabs of the Mounting Bracket with the alignment slots of the Dish Reflector. Insert the tabs and rotate the Mounting Bracket until they lock into place.
2. The Dish Reflector and Antenna Feed are keyed so the Antenna Feed can only be installed in a single orientation. Follow these steps: a. Remove the knob from the Antenna Feed. b. Line up the alignment pins of the Antenna Feed with the alignment holes of the Dish Reflector and Mounting Bracket. Note: Ensure that the straight edge of the Antenna Feed end (shown below) and arrow on the Antenna Feed cap are pointing straight up. c. Insert the Antenna Feed.
3. To secure the Antenna Feed to the Dish Reflector: a. Replace the knob and tighten it by hand until the knob touches the surface of the Mounting Bracket. b. Use a wrench or channel lock pliers to tighten the knob an additional ¼ turn. Do NOT over-tighten the knob. Note: Ensure that the Antenna Feed is securely attached by the knob. Important: Do not handle the RocketDish by the Antenna Feed once the feed is attached.
4. Attach the Rocket to the Mounting Bracket. a. Align the mounting tabs on the back of the Rocket with the Rocket mount. b. Slide the Rocket down to lock it into place. 5. Attach the other end of the RF Cables to the RF connectors on the Rocket in this combination: H to Chain 1 and V to Chain 0. Then slide the jackets over the RF connectors to protect them.
6. Attach the Protective Shroud. a. Align the hash mark on the top of the shroud with the notch on the Dish Antenna. b. Rotate the shroud clockwise until it locks into place.
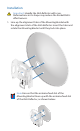
7. Attach two Hex Head Bolts, two Lock Washers, and two Flat Washers to the bottom of the Mounting Bracket. Ensure that there is a gap of 8 mm between each Flat Washer and the Mounting Bracket. Note: Ensure that each Lock Washer is always installed between the Hex Head Bolt and Flat Washer.
8. Attach the horizontal slot of the Support Arm to the Upper Pole Bracket using a Hex Head Bolt, Lock Washer, and Flat Washer. Note: Ensure that the degree settings are the same on both arms of the Upper Pole Bracket. Degree markings facing outward 9. Attach the Brace to the pole brackets using the four Screws.
10. Each M8x150 Carriage Bolt includes a serrated flange nut. Remove these and use them in the next step. 11. Attach one Pole Clamp to each pole bracket. a. Insert two M8x150 Carriage Bolts into each pole bracket. b. Slide the hole of a Pole Clamp over one bolt of each pole bracket. c. Place one serrated flange nut on each bolt.
. Attach the Stabilizer Brackets to the pole just beneath the area where the RocketDish will be attached. Note: The pole-bracket assembly can accommodate a Ø 38 - 101 mm pole. a. Place one Stabilizer Bracket on each side of the pole. b. Insert the two M10x100 Bolts into the Stabilizer Brackets. c. Secure each bolt with one Serrated Flange Nut.
. Attach the pole-bracket assembly to the pole: a. Slide the slot of each Pole Clamp over the corresponding M8x150 Carriage Bolt. b. Tighten the serrated flange nuts of the bolts to secure the pole-bracket assembly to the pole.
. Lift the Dish Reflector and align the two lower Hex Head Bolts with the slots on the Lower Pole Bracket. Seat the bolts in the slots. 15. Attach each arm of the Upper Pole Bracket to the Mounting Bracket using a Hex Head Bolt, Lock Washer, and Flat Washer.
16. Before adjusting the tilt angle, ensure that the six Hex Head Bolts are loose enough to allow movement. IMPORTANT: If you cannot spin the washers freely by hand, then loosen the Hex Head Bolts until you can. 17. To adjust the tilt angle, turn the screw head of the Elevation Rod until the desired tilt is reached. 18. Lock the alignment by tightening all six Hex Head Bolts to 25 N-m.
Specifications RocketDish RD-5G30-LW Dimensions 650 x 650 x386 mm (25.6 x 25.6 x 15.2") Weight 7.4 kg (16.31 lb) (Mount Included) Frequency 5.1 - 5.9 GHz Gain 30 dBi Max. VSWR 1.6:1 Wind Survivability Wind Loading 200 km/h (125 mph) 790 N @ 200 km/h (178 lbf @ 125 mph) Polarization Dual Linear F/B Ratio 30 dB ETSI Specification Mounting EN 302 326 DN2 Universal Pole Mount, Rocket Bracket, and Weatherproof RF Jumpers Included Safety Notices 1. Read, follow, and keep these instructions. 2.
Limited Warranty UBIQUITI NETWORKS, Inc (“UBIQUITI NETWORKS”) warrants that the product(s) furnished hereunder (the “Product(s)”) shall be free from defects in material and workmanship for a period of one (1) year from the date of shipment by UBIQUITI NETWORKS under normal use and operation.
Disclaimer EXCEPT FOR ANY EXPRESS WARRANTIES PROVIDED HEREIN, UBIQUITI NETWORKS, ITS AFFILIATES, AND ITS AND THEIR THIRD PARTY DATA, SERVICE, SOFTWARE AND HARDWARE PROVIDERS HEREBY DISCLAIM AND MAKE NO OTHER REPRESENTATION OR WARRANTY OF ANY KIND, EXPRESS, IMPLIED OR STATUTORY, INCLUDING, BUT NOT LIMITED TO, REPRESENTATIONS, GUARANTEES, OR WARRANTIES OF MERCHANTABILITY, ACCURACY, QUALITY OF SERVICE OR RESULTS, AVAILABILITY, SATISFACTORY QUALITY, LACK OF VIRUSES, QUIET ENJOYMENT, FITNESS FOR A PARTICULAR PUR
Note Some countries, states and provinces do not allow exclusions of implied warranties or conditions, so the above exclusion may not apply to you. You may have other rights that vary from country to country, state to state, or province to province. Some countries, states and provinces do not allow the exclusion or limitation of liability for incidental or consequential damages, so the above limitation may not apply to you.
RoHS/WEEE Compliance Statement English European Directive 2002/96/EC requires that the equipment bearing this symbol on the product and/or its packaging must not be disposed of with unsorted municipal waste. The symbol indicates that this product should be disposed of separately from regular household waste streams. It is your responsibility to dispose of this and other electric and electronic equipment via designated collection facilities appointed by the government or local authorities.
Español La Directiva 2002/96/CE de la UE exige que los equipos que lleven este símbolo en el propio aparato y/o en su embalaje no deben eliminarse junto con otros residuos urbanos no seleccionados. El símbolo indica que el producto en cuestión debe separarse de los residuos domésticos convencionales con vistas a su eliminación.
Declaration of Conformity Česky [Czech] UBIQUITI NETWORKS tímto prohla uje, e tento UBIQUITI NETWORKS device, je ve shod se základními po adavky a dal ími p íslu n mi ustanoveními sm rnice 1999/5/ES. Dansk [Danish] Undertegnede UBIQUITI NETWORKS erklærer herved, at følgende udstyr UBIQUITI NETWORKS device, overholder de væsentlige krav og øvrige relevante krav i direktiv 1999/5/EF.
Lietuviškai [Lithuanian] UBIQUITI NETWORKS deklaruoja, kad šis UBIQUITI NETWORKS įrenginys atitinka esminius reikalavimus ir kitas 1999/5/EB Direktyvos nuostatas. Malti [Maltese] Hawnhekk, UBIQUITI NETWORKS, jiddikjara li dan UBIQUITI NETWORKS device, jikkonforma mal- ti ijiet essenzjali u ma provvedimenti o rajn relevanti li hemm fid-Dirrettiva 1999/5/EC.
www.ubnt.com ©2014-2015 Ubiquiti Networks, Inc. All rights reserved. Ubiquiti, Ubiquiti Networks, the Ubiquiti U logo, the Ubiquiti beam logo, airMAX, airOS, Rocket, RocketDish, and TOUGHCable are trademarks or registered trademarks of Ubiquiti Networks, Inc. in the United States and in other countries. All other trademarks are the property of their respective owners.