introduction Thank you for purchasing the Ubiquity Networks® sunMAX™ Solar Gateway Pico™. This Quick Start Guide is designed to guide you through the installation and setup of this product, and also includes safety instructions and warranty terms. Package Contents a o 4 Solar Gateway Antenna Mounting Screws Pict Bracket (M3.5x14, Oty.
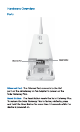
Hardware Overview Ports Ethernet Port Reset Button Ethernet Port The Ethernet Port connects to the PoE port on the air Gateway or PoE Adapter to power on the Solar Gateway Pict. Reset Button The Reset Button resets the Solar Gateway Pict. To restore the Solar Gateway Pict to factory defaults, press and hold the Reset Button for more than 10 seconds while the device is powered on.
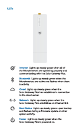
LED SE fen inverter Lights up steady green when all of the Micro inverters are operating properly and communicating with the Solar Gateway Pict. Bluetooth Lights up steady green when the Micro inverters are active and flashes when there is activity. Cloud Lights up steady green when the Solar Gateway Pict has established a connection to the cloud server. Network Lights up steady green when the Solar Gateway Pict establishes an Ethernet link.
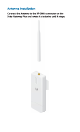
Antenna Installation Connect the Antenna to the RP-S MA connector on the Solar Gateway Pict and rotate it clockwise until it stops.
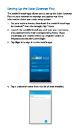
Setting Up the Solar Gateway Pict The sun Max Install app allows you to set up the Solar Gateway Pict on your network to manage and gather real-time information about your solar array system. 1. On your mobile device, download the sun Max Install app for Android™ from the Google Play™ Store. 2. Launch the sun Max Install app and type your username and password into their corresponding fields. These credentials are created when you register online at 3. Tap Sign In to sign in to the mobile app.
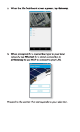
5. When the Site Dashboard screen appears, tap Gateway. 6. When prompted for a connection type to your local network, tap Ethernet for a wired connection or air Gateway to use WI-Fi to connect to your LAN. Proceed to the section that corresponds to your selection.
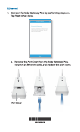
Ethernet 1. Connect the Solar Gateway Pict by performing steps a-c. Tap Next when done. Remove the Port Cover from the Solar Gateway Pict, connect an Ethernet cable, and replace the port cover.
b. Connect the other end of the Ethernet cable to the PoE port on the PoE Adapter. Ensure that the PoE Adapter is plugged into a power source. ¢. Connect an Ethernet cable from your local area network to the LAN port on the PoE Adapter.
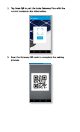
2. Tap Scan QR to pair the Solar Gateway Pict with the current customer site information. 3. Scan the Gateway OR code to complete the pairing process.
4, When the MAC address screen appears, tap Next to continue or Redo Scan if necessary. ia 5. The following screen appears while the Solar Gateway Pict is connecting to your network and being configured.
6. Tap Done to complete the installation. Once the Solar Gateway Pict has been set up and connected to your home network, return to the Dashboard screen to verify that the Gateway status icon is solid blue. Setup is now complete. Note: It may take up to five minutes for the Solar Gateway Pict to register with the cloud and update the status of the Gateway.
air Gateway 1. Tap Scan QR to pair the Solar Gateway Pict with the current customer site information. 2. Scan the QR code on the Solar Gateway Pict to complete the pairing process.
3. When the MAC address screen appears, tap Next to continue or Redo Scan if necessary. china ia 4, Remove the Port Cover from the Solar Gateway Pict, connect an Ethernet cable, and replace the port cover.
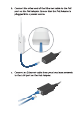
5. Connect the air Gateway to the PoE port on the PoE Adapter and tap Next. 6. Connect the Ethernet port from the Solar Gateway Pict to the PoE port on the air Gateway and connect the power cord.
7. Wait for a list of discovered wireless networks to appear and make your selection. Le HEE Hla LA an 8. Type your password in the Password field and tap Country to select your country. When you are finished, tap Connect.
9. Once the Solar Gateway Pict has connected to your network, tap Done to complete the installation. Once the Solar Gateway Pict has been set up and connected to your home network, return to the Dashboard screen to verify that the Gateway status icon is solid blue. Note: It may take up to five minutes for the Solar Gateway Pict to register with the cloud and update the status of the Gateway.
Mounting the Solar Gateway Pict Note: The Solar Gateway Pict must be installed within a 50-foot range of all Micro inverters in your solar array. Wall Mount 1. Secure the mounting bracket vertically to a wall or flat surface using the two Screws. Insert the Solar Gateway Pict into the mounting bracket and slide it down until it snaps into place.
Pole Mount 1. Insert the Zip Tie through the bracket on the Solar Gateway Pict. 2. Place the Solar Gateway Pict against the pole at the desired height, 3. Fasten the Zip Tie to the pole until the Solar Gateway Pict is secure.
Mounting the PoE Adapter (Optional) 1. Slide the PoE Mounting Bracket down to remove it from the PoE Adapter. 2. Place the Pof Mounting Bracket at the desired location and use it as a template to mark the hole location for each mounting screw. Use both mounting screws to secure the PoF Mounting Bracket in place. vr 3. Line up the notches on the PoE Adapter with the tabs on the PoE Mounting Bracket. Push the PoE Adapter into place on the bracket and slide it down until iris secure.
Specifications Be SEE 0 Dimensions 153 x 40% 374 mm (B02 x 1.57 x 1.
Safety Notices 1. 2. Heed all warnings. Read, follow, and keep these instructions. 3. Only use attachments/accessories specified by the manufacturer. z a 1 WARNING: Do not use this product in locations that can be submerged by water. WARNING: Avoid using this product during an electrical storm. There may be a remote risk of electric shock from lightning. Electrical Safety Information 1. Compliance is required with respect to voltage, frequency, and current requirements indicated on the manufacturer's label.
Limited Warranty UBIQUITY NETWORKS, Inc ("UBIQUITY NETWORKS") warrants that the product(s) furnished hereunder (the shall be free from defects in material and workmanship for a period of one (1) year from the date of shipment by UBIQUITY NETWORKS under normal use and operation.