
User's Manual
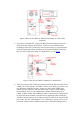
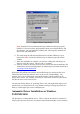

Table Of Contents
- FEDERAL COMMUNICATIONS COMMISSION
- General Information
- Installing Hardware
- Installing Driver and Pen Utilities
- Verifying Hardware Installation
- Verifying Overall Installation
- Usage Tips
- Pen Scrolling
- Configuring the Pen Device
- Pen Utilities
- Annotate for Word V2.0 Program
- PenMail V1.0 Program
- PenSigner V2.0 Program
- Annotate All V1.0 Program

COM1, COM2, COM3, and COM4 ports, please seek help from a professional
to ensure that the Tablet Keyboard can indeed use an apparently unused serial
port. A built-in modem may use up a COM port which is shared by an outside
COM port socket. The Tablet Keyboard requires a free COM port to operate,
and it can co-exist with a mouse and/or a modem connected to a different
COM port not in conflict with the port used by the Tablet Keyboard. If the
mouse uses a PS/2 port, it will not conflict with any COM port.
6. Turn power on and wait for Windows to start up.
7. Verify
that the Tablet Keyboard hardware functions properly.
The hardware installation is now complete. Please proceed to installing Driver and
Pen Utilities that provides pointing device function and Pressure Sensitivity (through
a Wintab-compatible interface), plus additional pen functions with Pen Utilities such
as
Annotate All, Annotate for Word
, PenSigner, and PenMail.
Installing Driver and Pen Utilities
To install Driver and Pen Utilities on Windows system other than Windows 3.1, we
recommend that you follow the procedure below, and do not rely on the Plug and Play
feature. For Windows 3.1 system, please refer to the section
Installing Driver
Program on Windows 3.1. For DOS system, please refer to the section Installing
Driver Program on DOS.
Installing Driver and Pen Utilities on Windows
95/98/ME/NT/2000
1. Attach the Pen Device to your computer as described before and turn on
power if it was turned off. When Windows starts, it may display a New
Hardware Found dialog. If so, choose Cancel to get out of it.
2. Insert the Driver Disc into the CD-ROM drive. Assume this drive to be “E”.
3. Select "Start" at the lower left corner of the screen and select "Run".
4. Type in "E:\setup", and press Enter key to initiate the Setup Program.
5. You will be offered a chance to change the directory where the Driver and Pen
Utilities will be copied. You may also select or deselect the installation of
some of Pen Utilities and/or online User's Manual. Change it if you wish and
select OK to continue.