
User's Manual

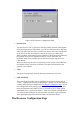

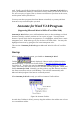

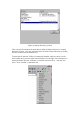
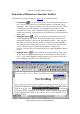
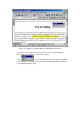
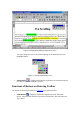
Table Of Contents
- FEDERAL COMMUNICATIONS COMMISSION
- General Information
- Installing Hardware
- Installing Driver and Pen Utilities
- Verifying Hardware Installation
- Verifying Overall Installation
- Usage Tips
- Pen Scrolling
- Configuring the Pen Device
- Pen Utilities
- Annotate for Word V2.0 Program
- PenMail V1.0 Program
- PenSigner V2.0 Program
- Annotate All V1.0 Program

Figure 18 The Pressure Configuration Page
• Pressure Test
You may test the "feel" of the Pen in this area. When you draw with a lighter
force pressing down on Tablet Plate, you will see a narrower line in this area;
when you draw with more force, you will see that the Pen leaves a wider trace
in the area. You may also choose a color for the test to get a better feel.
While you draw, the barometer on the right side of the drawing area indicates
the pressure level you are applying to Pen Tip. At the same time, the
numerical value of the pressure level is also shown on the right above the
Clear Button.
When you draw fast, the trace it leaves may become a series of unconnected
dots (filled circles), instead of a solid line. This gives an indication of the
speed of your computer.
• Clear
You press Clear Button to clear the drawing from Pressure Test area.
• Click Sensitivity
This controls the feel when you tap with the Pen to cause an action such as
“select”. Tapping with Pen Tip is equivalent to “clicking” on the left button of
a mouse unless you have changed it on the Button Configuration Page
or you
have changed the mouse setting on the Control Panel to “left-handed”. You
move the Sensitivity Bar closer to “low” if you wish to get a “click” action
with smaller force; you move it closer to “high” for a heavier pointing device.
Note that this has nothing to do with how heavy you draw to get a thick line.
Your application program controls the latter, not the Tablet Driver.
The Resource Configuration Page