UCTRONICS Ultimate Starter Leaning Kit for Raspberry Pi #K0064 UCTRONICS Ultimate Starter Kit for Raspberry Pi #K0064 User Guide 1 www.uctronics.
UCTRONICS Ultimate Starter Leaning Kit for Raspberry Pi #K0064 Table of Contents 1. Introduction....................................................................................................................................5 2. Kit contents.....................................................................................................................................6 3. Assembly........................................................................................................................
UCTRONICS Ultimate Starter Leaning Kit for Raspberry Pi #K0064 3.26 Diode................................................................................................................................ 38 3.27 Transistor..........................................................................................................................40 3.28 Capacitor.......................................................................................................................... 42 3.29 Jumper Wires..........
UCTRONICS Ultimate Starter Leaning Kit for Raspberry Pi #K0064 8.20 Project 20: Controlling an LED through LAN............................................................. 110 8.21 Project 21: Movement Detection Based on PIR.........................................................113 8.22 Project 22: DC Motor....................................................................................................115 8.24 Project 24: How to control a stepper motor...................................................
UCTRONICS Ultimate Starter Leaning Kit for Raspberry Pi #K0064 1. Introduction UCTRONICS designs, manufactures and provides technical service for open source (Arduino and Raspberry Pi) hardware and software. We are dedicated to applying the Internet and the latest industrial technology in open source area, we strive to provide hardware support and software service for general makers and electronic enthusiasts around the world.
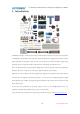
UCTRONICS Ultimate Starter Leaning Kit for Raspberry Pi #K0064 2.
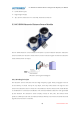
UCTRONICS Ultimate Starter Leaning Kit for Raspberry Pi #K0064 3. Assembly 3.1 ADXL345 Triaxial Accelerometer Sensor Module ADXL345 is a compact, slim, low-power triaxial accelerometer that allows high-resolution (13-bit) measurements for accelerations up to 16 g. The digital output data is a 16-bit twos complement format and can be accessed via a SPI (3-wire or 4-wire) or i2c digital interface. 3.1.
UCTRONICS Ultimate Starter Leaning Kit for Raspberry Pi #K0064 3.1.3 Schematic 3.2 DHT-11 Digital Temperature & Humidity Sensor This DHT11 Temperature & Humidity Sensor features a temperature & humidity sensor complex with a calibrated digital signal output. By using the exclusive digital-signal acquisition technique and temperature & humidity sensing technology, it ensures high reliability and long-term stability.
UCTRONICS Ultimate Starter Leaning Kit for Raspberry Pi #K0064 DATA: MCU IO port Digital signal output Tips: Do not reverse the VCC and GND, otherwise it will burn 3.3 HC-SR04 Ultrasonic Distance Sensor Module The HC-SR04 ultrasonic sensor module for Arduino is used for obstacle detection. Ultrasonic sensor transmits the ultrasonic waves from its sensor head and again receives the ultrasonic waves reflected from an object. Ultrasonic sensor general diagram 3.3.
UCTRONICS Ultimate Starter Leaning Kit for Raspberry Pi #K0064 Ultrasonic working principle The ultrasonic sensor enables the robot to virtually see and recognize object, avoid obstacles, measure distance. The operating range of ultrasonic sensor is 2cm to 450cm. 3.3.2 Specification Working Voltage : 5V (DC) Static current: < 2mA Output signal: Electric frequency signal Output Voltage: 0~5V Sensor angle: <= 15 degrees. Detection distance: 2~450cm High precision: Up to 0.
UCTRONICS Ultimate Starter Leaning Kit for Raspberry Pi #K0064 3.4 Pyroelectric Infrared PIR Motion Sensor Module PIR sensors respond to heat and can be triggered by animals such as cats and dogs, as well as people and other heat sources. The ‘output’ pin of Passive Infrared (PIR) sensor will go HIGH when the motion has been detected. 3.4.
UCTRONICS Ultimate Starter Leaning Kit for Raspberry Pi #K0064 buzzer, automatic doors, electric fans, automatic washing machine and dryer Machines and other devices. 3.5 PS2 Joystick Module A joystick is an input device consisting of a stick that pivots on a base and reports its angle or direction to the device it is controlling. A joystick, also known as the control column, is the principal control device in the cockpit of many civilian and military aircraft, either as a center stick or side-stick.
UCTRONICS Ultimate Starter Leaning Kit for Raspberry Pi #K0064 3.5.2 Application Video games controlling Machines controlling such as cranes, trucks, surveillance cameras Mobile device 3.6. LCD1602 LCD1602 is a kind of character LCD display. The LCD display has a parallel interface, meaning that the micro-controller has to manipulate several interface pins at once to control the display. 3.6.
UCTRONICS Ultimate Starter Leaning Kit for Raspberry Pi #K0064 3.7 ULN2003 Stepper Motor Driver Board There are four LEDs on the module. The white socket in the middle is for connecting a stepper motor. IN1, IN2, IN3, IN4 are used to connected with the Raspberry Pi. 3.7.1 Specification White socket in the middle is for connecting a stepper motor. IN1, IN2, IN3, IN4 are used to connected with the Raspberry Pi.
UCTRONICS Ultimate Starter Leaning Kit for Raspberry Pi #K0064 it should move to. 3.8.1 Specification Torsional moment: 1.5kg/cm Working voltage: 4.2~6V Temperature range : 0℃~-55℃ Operating speed: 0.1 seconds /60° Dead band width: 10 microseconds Size: 23x12.2x29 mm Weight: 9g 3.9 DC 5V 4 Phase Step Stepper Motor Stepper motors, due to their unique design, can be controlled to a high degree of accuracy without any feedback mechanisms.
UCTRONICS Ultimate Starter Leaning Kit for Raspberry Pi #K0064 Current : 92mA Resistance : 130Ω Voltage : 5V DC No-Load Pull-Out Frequency : 800bps No-Load Pull-In Frequency : 500bps Pull-In Torque : ≥ 78.4mN.m Wiring Instruction : A (Blue), B (Pink), C (Yellow), D (Orange), E (Red, Mid-Point) 3.10 4x4 Matrix Array 16 Key Keyboard This 16-button keypad provides a useful human interface component for micro-controller projects.
UCTRONICS Ultimate Starter Leaning Kit for Raspberry Pi #K0064 (2) 100V Dielectric Withstand: 250VRms (60Hz, 1min) Contact Bounce: <=5ms Life Expectancy: 1 million closures Operation Temperature: -20~ +40℃ Pad Size: 68x7x0.8mm Cable Length: 85 mm (include connector) 3.11 T Type 40pin GPIO Board T Type 40pin GPIO Board is a small board that connects to the 40-pin GPIO connector on the Raspberry Pi and breaks the pins out to breadboard-friendly arrangement and spacing.
UCTRONICS Ultimate Starter Leaning Kit for Raspberry Pi #K0064 3.12 20cm FC40 40pin GPIO cable This 2x20 flat ribbon-cable fits the GPIO headers on the Raspberry Pi 3, 2, and B+, so you can easily connect to the low-level peripherals. You can plug the 40-pin GPIO cable between the Pi computer and the T Type Plus GPIO expansion board. 3.12.1 Specification Cable Length: 20cm 40Pin FC cable Female to Female Dimension: 18 www.uctronics.
UCTRONICS Ultimate Starter Leaning Kit for Raspberry Pi #K0064 3.13 830 Tie Point Solderless Breadboard This is true full size solderless breadboard! It has 2 split power buses, 10 columns, and 63 rows - with a total of 830 tie in points. All pins are spaced by a standard 0.1". The two sets of five columns are separated by about 0.3", perfect for straddling a DIP package over. The board accepts wire sizes in the range of 20-29AWG. 3.13.
UCTRONICS Ultimate Starter Leaning Kit for Raspberry Pi #K0064 Input voltage: 6.5~12 V (DC) USB power supply Output voltage: 3.3V/5V Maximum output current: <700 mA Fluctuation two road independent control, can switch to 0V, 3.3V, 5V On-board two groups of 3.3V,5V DC output plug pin 3.15 B10K Potentiometer A potentiometer, informally a pot, is a three-terminal resistor with a sliding or rotating contact that forms an adjustable voltage divider.
UCTRONICS Ultimate Starter Leaning Kit for Raspberry Pi #K0064 3.16 Relay A relay is an electrically operated switch. It is generally used in automatic control circuit. Actually, it is an "automatic switch" which uses low current to control high current. It plays a role of automatic regulation, security protection and circuit switch. 3.16.
UCTRONICS Ultimate Starter Leaning Kit for Raspberry Pi #K0064 3.17 Buzzer A buzzer or beeper is an audio signaling device. An active buzzer will generate a tone using an internal oscillator, so all that is needed is a DC voltage. A passive buzzer requires an AC signal to make a sound. It is like an electromagnetic speaker, where a changing input signal produces the sound, rather than producing a tone automatically. 3.17.1 Passive buzzer Specification: Resistance: 16Ω Dimension: 22 www.
UCTRONICS Ultimate Starter Leaning Kit for Raspberry Pi #K0064 3.17.2 Active Buzzer Specification: Voltage: 4V~8V DC Maximum current: 30MA/5V DC Minimum sound pressure: 85db/10cm Resonant frequency: 2300+~-300HZ Working temperature: -20~70℃ 3.18 Chips 3.18.1 ADC0832 Specification: Resolution: 8Bits 23 www.uctronics.
UCTRONICS Ultimate Starter Leaning Kit for Raspberry Pi #K0064 Total Unadjusted Error: ±0.5LSB and ±1LSB Single Supply: 5V DC Low Power: 15mW Conversion Time: 32μs 3.18.2 74HC595 Specification: Supply voltage: 2V~6V Pin number: 16 Working temperature sensitivity: -40℃ Operating temperature: 85℃ Chip label: 74HC595 Maximum output current: 7.8mA Logic chip function: 8bit Shift Register (3-State) 24 www.uctronics.
UCTRONICS Ultimate Starter Leaning Kit for Raspberry Pi #K0064 3.18.3 L9110 motor driver Specification: Supply voltage: 2.5V~12V Output capability: 800mA continuous current per channel Operating temperature: 0℃~80℃ TTL / CMOS output level compatible, and can be directly connected to the CPU Output built-in clamp diodes for inductive load Integrated control and drive into a monolithic IC With pin high-voltage protection function 3.
UCTRONICS Ultimate Starter Leaning Kit for Raspberry Pi #K0064 3.19.1 Specification Length: 25mm Diameter: 21mm Axis diameter: 2mm Axis length: 9mm Voltage: 3V~6V 3.20 Displays 3.20.1 Segment Display The segment display is a form of electronic display device for displaying decimal numerals that is an alternative to the more complex dot matrix displays. (1) 7-segment display 26 www.uctronics.
UCTRONICS Ultimate Starter Leaning Kit for Raspberry Pi #K0064 Dimension: (2) 4-bit 7-segment Display Dimension: 27 www.uctronics.
UCTRONICS Ultimate Starter Leaning Kit for Raspberry Pi #K0064 3.20.2 LED Bar Graph Display Dimension: 28 www.uctronics.
UCTRONICS Ultimate Starter Leaning Kit for Raspberry Pi #K0064 3.20.3 Dot-matrix Display The display consists of a dot matrix of lights or mechanical indicators arranged in a rectangular configuration. A dot matrix controller converts instructions from a processor into signals which turns on or off lights in the matrix so that the required display is produced.
UCTRONICS Ultimate Starter Leaning Kit for Raspberry Pi #K0064 3.21 LEDs 3.21.1 RGB LED The Hyper Red source color devices are made with AlGaInP on GaAs substrate Light Emitting Diode. The Blue source color devices are made with InGaNLight Emitting Diode. The Green source color devices are made with InGaN on Sapphire Light Emitting Diode. Static electricity and surge damage the LEDS. It is recommended to use a wrist band or anti-electrostatic glove when handling the LEDs.
UCTRONICS Ultimate Starter Leaning Kit for Raspberry Pi #K0064 3.21.2 Red, Green, Yellow, Blue LEDs Light Emitting Diode (LED) LEDs are solid state devices that emit light when electricity passes through them. They are directional and need to go in the circuit the right way around. Once a certain “on” threshold voltage is reached (about 2V for a red LED) the current through an LED rises very quickly with the voltage.
UCTRONICS Ultimate Starter Leaning Kit for Raspberry Pi #K0064 3.22 Push Button, Switches and Caps 3.22.1 Button (large) Buttons are a common component used to control electronic devices. They are usually used as switches to connect or disconnect circuits. Although buttons come in a variety of sizes and shapes. Dimension: 32 www.uctronics.
UCTRONICS Ultimate Starter Leaning Kit for Raspberry Pi #K0064 3.22.2 Button (small) Specification Size: 6x6x5mm color: Black Pin number: 4 Temperature:-25°~+-85℃ Rated Load:DC 12V, 0.1A Contact Resistance:<=0.03Ω Withstand Voltage:AC250 V (50Hz) /MIN Actuation Force:1.3+-0.5N Lnsulation Resistance:>=100MΩ Life:100000 times 3.22.3 Button cap Specification: Diameter: 9.58mm Height: 5.1mm 33 www.uctronics.
UCTRONICS Ultimate Starter Leaning Kit for Raspberry Pi #K0064 Compatible with switch Size: 12x12x7.3mm Dimension: 3.23.4 Switch 34 www.uctronics.
UCTRONICS Ultimate Starter Leaning Kit for Raspberry Pi #K0064 Specification: Rate: DC 50V/0.5A Contact Resistance: 30moh Operating Life: 10,000cycles Dimension: 3.23 220 , 1K and 10K Ohm Resistors Resistors limit the flow of electricity through part of the circuit. This can be used to control timing circuits, divide voltages in to smaller portions or protect devices that are sensitive to too much current. 35 www.uctronics.
UCTRONICS Ultimate Starter Leaning Kit for Raspberry Pi #K0064 Resistance is measured in Ohms (Ω), kilohms (1,000Ω=1kΩ) or Megohms (1,000,000Ω =1MΩ) Resistors can go in the circuit either way round. The value is marked on the device with a color code (see right), or it can be measured with almost any multimeter. A shorthand is often used to write the value of a resistor. For example: “100R”=100Ω “10k”=10kΩ “4k7”=4.
UCTRONICS Ultimate Starter Leaning Kit for Raspberry Pi #K0064 Gray: 8 White: 9 3.24 Light Sensor (Photoresistor) A photoresistor is a light-controlled variable resistor. The resistance of a photoresistor decreases with the increasing incident light intensity; in other words, it exhibits photoconductivity. 3.24.
UCTRONICS Ultimate Starter Leaning Kit for Raspberry Pi #K0064 3.25 Analog Temperature Sensor (Thermistor) A thermistor is a type of resistor whose resistance varies significantly with temperature, When the temperature increases, the thermistor resistance decreases; when the temperature decreases, the thermistor resistance increases. It can detect surrounding temperature changes in real time. 3.25.
UCTRONICS Ultimate Starter Leaning Kit for Raspberry Pi #K0064 3.26.1 1N4148 Diode 3.26.1.1 Specification Normal Forward Current: 150mA Maximum Forward Current: 500mA Maximum Repetitive Peak Current: 450mA Maximum Repetitive Peak Voltage: 100V Maximum Continuous Reverse Voltage: 75V Maximum Forward Voltage: 1V Maximum Reverse Recovery Time: 4ns Maximum Power: 500mW Diameter: 1.85mm External Length (height): 4.25mm Maximum Junction Temperature: 200℃ 3.26.
UCTRONICS Ultimate Starter Leaning Kit for Raspberry Pi #K0064 3.26.2.1 Specification Maximum Peak Repetitive Reverse Voltage: 50V Maximum Working Peak Reverse Voltage: 50V Maximum DC Blocking Voltage: 35V Average rectified output Current: 1V Maximum Typical junction Capacitance: 15pF Maximum Typical Thermal Resistance Junction to Ambient: 100 K/W Maximum DC Blocking Voltage temperature: +150℃ Operating and Storage Temperature Range: -65~150℃ Weight: 0.30 g 3.
UCTRONICS Ultimate Starter Leaning Kit for Raspberry Pi #K0064 3.27.1 NPN Transistor (8050) 3.27.1.1 Specification Maximum Collector-base Voltage: 40V Maximum Collector-Emitter Voltage: 25V Maximum Emitter-Base Voltage: 6V Maximum Collector Current: 1.5A Maximum Junction Temperature: 150℃ Maximum Storege Temperature: -65~150℃ 3.27.2 PNP Transistor (8550) 41 www.uctronics.
UCTRONICS Ultimate Starter Leaning Kit for Raspberry Pi #K0064 3.27.2 Specification Maximum Collector-base Voltage: -40V Maximum Collector-Emitter Voltage: -25V Maximum Emitter-Base Voltage: -6V Maximum Collector Current: -1.5A Maximum Junction Temperature: 150℃ Maximum Storege Temperature: -65~150℃ 3.28 Capacitor A capacitor is a passive two-terminal electrical component that stores electrical energy in an electric field. The effect of a capacitor is known as capacitance.
UCTRONICS Ultimate Starter Leaning Kit for Raspberry Pi #K0064 3.28.2 Capacitor (10uF) 3.28.2 Specification Rated Voltage: 50V Capacitance: 10µF Capacitance Tolerance: ±20% Dimensions (without pins): 12x5mm 3.
UCTRONICS Ultimate Starter Leaning Kit for Raspberry Pi #K0064 3.29.1 40x Male to Male Jumper Wires 3.29.2 20x Male to Female Jumper Wires 3.29.3 20x Female to Female Jumper Wires 3.30 Header (40pin) A pin header (often abbreviated as PH, or simply header) is a form of electrical connector. 44 www.uctronics.
UCTRONICS Ultimate Starter Leaning Kit for Raspberry Pi #K0064 4. Raspberry Pi Pin Number Introduction There are three methods for numbering Raspberry Pi’s GPIO: 1. Numbering according to the physical location of the pins, from left to right, top to bottom, the left is odd, the right is even. 2. Numbering according the GPIO registers of BCM2835/2836 SOC. 3. Numbering according the GPIO library wiringPi. 45 www.uctronics.
UCTRONICS Ultimate Starter Leaning Kit for Raspberry Pi #K0064 5. Raspberry Pi GPIO Library Introduction Currently, there are two major GPIO libraries for Raspberry Pi, RPi.GPIO and wiring Pi. RPi.GPIO: RPi.GPIO is a python module to control Raspberry Pi GPIO channels. For more information about RPi.GPIO, please visit: https://pypi.python.org/pypi/RPi.GPIO/ For examples and documentation, please visit: http://sourceforge.net/p/raspberry-gpio-python/wiki/Home/ The RPi.
UCTRONICS Ultimate Starter Leaning Kit for Raspberry Pi #K0064 You can verify whether the wiringPi is installed successfully or not by the following commands: $ sudo gpio -v $ sudo gpio readall If you can see the information shown above, it indicates that the wiringPi has been installed successfully. 47 www.uctronics.
UCTRONICS Ultimate Starter Leaning Kit for Raspberry Pi #K0064 6. How to use the wiringPi and the RPi.GPIO Here we take a blinking LED for example to illustrate how to use the wiringPi C library and the RPi.GPIO Python module. Step 1 : Build the circuit according to the following schematic diagram Note : Resistance=220Ω For Python user: Step 2 : Create a file named led.py $ sudo touch led.py Step 3 : Open the file led.py with vim or nano $ sudo vim led.
UCTRONICS Ultimate Starter Leaning Kit for Raspberry Pi #K0064 Step 4 : Run the program $ sudo python led.py Press Enter, you should see that the LED is blinking. Press ’Ctrl+C’, the program execution will be terminated. Resources : http://sourceforge.net/p/raspberry-gpio-python/wiki/Examples/ http://wiringpi.
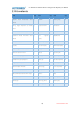
UCTRONICS Ultimate Starter Leaning Kit for Raspberry Pi #K0064 7. Project contents NO. Project NO.
UCTRONICS Ultimate Starter Leaning Kit for Raspberry Pi #K0064 8. Project details 8.1 Project 1: LED blinking 8.1.1 Overview In this tutorial, we will start the journey of learning Raspberry Pi. In the first lesson, we will learn how to control an LED. 8.1.2 Requirement Raspberry Pi ×1 220Ω Resistor ×1 LED ×1 Breadboard ×1 Jumper Wires ×2 8.1.3 Principle In this lesson, we will program the Raspberry Pi to output high(+3.
UCTRONICS Ultimate Starter Leaning Kit for Raspberry Pi #K0064 ① As shown in the schematic diagram above, the anode of LED is connected to VCC(+3.3V), and the cathode of LED is connected to the ground (GND). When the GPIO output high level, the LED is on; when the GPIO output low level, the LED is off. ② As shown in the schematic diagram above, the anode of LED is connected to Raspberry Pi GPIO via a resistor, and the cathode of LED is connected to the ground GND).
UCTRONICS Ultimate Starter Leaning Kit for Raspberry Pi #K0064 connector or change your code. The second numbering system is the BCM(GPIO.BCM) numbers. This is a lower level way of working - it refers to the channel numbers on the Broadcom SOC. You have to always work with a diagram of which channel number goes to which pin on the RPi board. Your script could break between revisions of Raspberry Pi boards. ● GPIO.setup(channel, mode) This sets every channel you are using as an input(GPIO.
UCTRONICS Ultimate Starter Leaning Kit for Raspberry Pi #K0064 8.1.5 Procedures 1. Build the circuit 2. Program Python user: 2.1 Edit and save the code with vim or nano. (https://github.com/UCTRONICS/Arducam_Starter_Kit_Python_Code_for_RPi.git) 2.2 Run the program $ sudo python 01_blinkingLed_1.py Press Enter, and then you can see the LED is blinking. 54 www.uctronics.
UCTRONICS Ultimate Starter Leaning Kit for Raspberry Pi #K0064 55 www.uctronics.
UCTRONICS Ultimate Starter Leaning Kit for Raspberry Pi #K0064 8.2 Project2: Active Buzzer 8.2.1 Overview In this lesson, we will learn how to program the Raspberry Pi to make an active buzzer sound. 8.2.2 Requirement Raspberry Pi ×1 Active buzzer ×1 1 k Resistor ×1 NPN Transistor (S8050) ×1 Breadboard ×1 Jumper wires 8.2.3 Principle 1. What’s Buzzer ? Please refer to chapter 3.17 Buzzer In this study, the buzzer we used is active buzzer.
UCTRONICS Ultimate Starter Leaning Kit for Raspberry Pi #K0064 then the buzzer will sound; set the Raspberry Pi GPIO as low level, the transistor S8050 will cut off, then the buzzer will stop. Figure 2: Set the Raspberry Pi GPIO as low level, the transistor S8550 will conduct, and the buzzer will sound; set the Raspberry Pi GPIO as a high level, the transistor S8550 will cut off, then the buzzer will stop. 8.2.4 Procedures 1. Build the circuit 2. Program Python user: 2.
UCTRONICS Ultimate Starter Leaning Kit for Raspberry Pi #K0064 8.2.5 Summary By learning this lesson, we have mastered the basic principle of the buzzer and the transistor. We also learned how to program the Raspberry Pi and then control the buzzer. I hope you can use what you have learned in this lesson to do some interesting things. 58 www.uctronics.
UCTRONICS Ultimate Starter Leaning Kit for Raspberry Pi #K0064 8.3 Project 3: Passive Buzzer 8.3.1 Overview In this lesson, we will learn how to program the Raspberry Pi to make a passive buzzer sound with different frequency. 8.3.2 Requirement Raspberry Pi ×1 Passive buzzer ×1 1 kΩ Resistor ×1 NPN Transistor (S8050) ×1 Breadboard ×1 Several Jumper wires 8.3.3 Principle 1. What’s Active Buzzer ? Please refer to chapter 3.17 Buzzer 2. Key functions Python user: ● GPIO.
UCTRONICS Ultimate Starter Leaning Kit for Raspberry Pi #K0064 To change the frequency. ● p.stop() To stop PWM. 8.3.4 Procedure 1. Build the circuit 2. Program Python user: 2.1 Edit and save the code with vim or nano. (https://github.com/UCTRONICS/Arducam_Starter_Kit_Python_Code_for_RPi.git) 2.2 Run the program $ sudo python 03_passiveBuzzer.py Now, you should be able to hear the sound of the buzzer 60 www.uctronics.
UCTRONICS Ultimate Starter Leaning Kit for Raspberry Pi #K0064 61 www.uctronics.
UCTRONICS Ultimate Starter Leaning Kit for Raspberry Pi #K0064 8.4 Project 4: Controlling an LED with a button 8.4.1 Overview In this lesson, we will learn how to detect the status of a button, and then toggle the status of LED based on the status of the button. 8.4.2 Requirement Raspberry Pi ×1 Button ×1 LED ×1 220Ω Resistor ×1 Breadboard ×1 Several Jumper wires 8.4.3 Principle 1. What’s Button ? Please refer to chapter 3.22.1 Button 2.
UCTRONICS Ultimate Starter Leaning Kit for Raspberry Pi #K0064 Each time you press the button, the Raspberry Pi will think you have pressed the button many times due to the jitter of the button. We must to deal with the jitter of buttons before we use the button. We can through the software programming method to remove the jitter of buttons, and you can use a capacitance to remove the jitter of buttons. We introduce the software method.
UCTRONICS Ultimate Starter Leaning Kit for Raspberry Pi #K0064 The event_detected( ) function is designed to be used in a loop with other things, but unlike polling it is not going to miss the change in state of an input while the CPU is busy working on other things. This could be useful when using something like Pygame or PyQt where there is a main loop listening and responding to GUI events in a timely basis. 8.4.4 Procedures 1. Build the circuit 2. Program Python user: 2.
UCTRONICS Ultimate Starter Leaning Kit for Raspberry Pi #K0064 8.4.5 Summary Through this lesson, you should have learned how to use the Raspberry Pi detect an external button status, and then toggle the status of LED relying on the status of the button detected before. 65 www.uctronics.
UCTRONICS Ultimate Starter Leaning Kit for Raspberry Pi #K0064 8.5 Project 5: Relay 8.5.1 Overview In this lesson, we will learn how to control a relay to cut off or connect a circuit. 8.5.2 Requirement Raspberry Pi ×1 Relay ×1 NPN Transistor (S8050) ×1 Diode (1N4001) ×1 1KΩ Resistor ×1 Breadboard ×1 Several Jumper wires 8.5.3 Principle 1. What’s relay ? Please refer to chapter 3.16 Relay 2.
UCTRONICS Ultimate Starter Leaning Kit for Raspberry Pi #K0064 8.5.4 Procedures 1. Build the circuit 2. Program Python user: 2.1 Edit and save the code with vim or nano. (https://github.com/UCTRONICS/Arducam_Starter_Kit_Python_Code_for_RPi.git) 2.2 Run the program $ sudo python 05_relay.py Press Enter, you should be able to hear the sound of relay toggling. 67 www.uctronics.
UCTRONICS Ultimate Starter Leaning Kit for Raspberry Pi #K0064 68 www.uctronics.
UCTRONICS Ultimate Starter Leaning Kit for Raspberry Pi #K0064 8.6 Project 6: LED Flowing Lights 8.6.1 Overview In the first class, we have learned how to make an LED blink by programming the Raspberry Pi. Today, we will use the Raspberry Pi to control 8 LEDs, so that 8 LEDs showing the result of flowing. 8.6.2 Requirement Raspberry Pi ×1 LED ×8 220Ω Resistor ×8 Breadboard ×1 Several Jumper wires 8.6.3 Principle 1.
UCTRONICS Ultimate Starter Leaning Kit for Raspberry Pi #K0064 tested; if it's true, the statement block, and the increment is executed, then the condition is tested again. When the condition becomes false, the loop ends. 8.6.4 Procedures 1. Build the circuit 2. Program Python user: 2.1 Edit and save the code with vim or nano. (https://github.com/UCTRONICS/Arducam_Starter_Kit_Python_Code_for_RPi.git) 2.2 Run the program $ sudo python 06_flowingLed.
UCTRONICS Ultimate Starter Leaning Kit for Raspberry Pi #K0064 8.6.5 Summary Through this simple and fun experiment, we have learned more skilled programming about the Raspberry Pi. In addition, you can also modify the circuit and code we provided to achieve even more dazzling effect. 71 www.uctronics.
UCTRONICS Ultimate Starter Leaning Kit for Raspberry Pi #K0064 8.7 Project 7: Breathing LED 8.7.1 Overview In this lesson, we will learn how to program the Raspberry Pi to generate PWM signal. And use the PWM square-wave signal control an LED gradually becomes brighter and then gradually becomes dark like the animal's breath. 8.7.2 Requirement Raspberry Pi ×1 LED ×1 220Ω Resistor ×1 Breadboard ×1 Several Jumper wires 8.7.3 Principle 1.
UCTRONICS Ultimate Starter Leaning Kit for Raspberry Pi #K0064 ● p = GPIO.PWM(channel, frequency) This is used for creating a PWM. ● p.start(dc) Start the pwm you have created. ● p.ChangeFrequency(freq) Change the frequency of pwm. ● p.stop( ) Stop the pwm. 8.7.4 Procedures 1. Build the circuit 2. Program Python user: 2.1 Edit and save the code with vim or nano. (https://github.com/UCTRONICS/Arducam_Starter_Kit_Python_Code_for_RPi.git) 2.2 Run the program $ sudo python 07_breathingLed.
UCTRONICS Ultimate Starter Leaning Kit for Raspberry Pi #K0064 continuing to repeat the process, its rhythm like the animal's breathing. 8.7.5 Summary By learning this lesson, I believe that you have understood the basic principles of the PWM, and mastered the PWM programming on the Raspberry Pi platform. 74 www.uctronics.
UCTRONICS Ultimate Starter Leaning Kit for Raspberry Pi #K0064 8.8 Project 8: Controlling a RGB LED with PWM 8.8.1 Overview In this lesson, we will program the Raspberry Pi for RGB LED control, and make RGB LED emits a variety of colors of light. 8.8.2 Requirement Raspberry Pi ×1 RGB LED ×1 220Ω Resistor ×3 Breadboard ×1 Several Jumper wires 8.8.3 Principle 1. What’s RGB LEDs ? Please refer to chapter 3.21.1 RGB LED What we used in this experiment is the common anode RGB LED.
UCTRONICS Ultimate Starter Leaning Kit for Raspberry Pi #K0064 that haven’t previously been initialised via softPwmCreate will be silently ignored. 8.8.4 Procedures 1. Build the circuit 2. Program Python user: 2.1 Edit and save the code with vim or nano (https://github.com/UCTRONICS/Arducam_Starter_Kit_Python_Code_for_RPi.git) 2.2 Run the program $ sudo python 08_rgbLedLed.
UCTRONICS Ultimate Starter Leaning Kit for Raspberry Pi #K0064 8.8.5 Summary By learning this lesson, I believe that you have already known the principle and the programming of RGB LED. I hope you can use your imagination to achieve even more cool ideas based on this lesson. 77 www.uctronics.
UCTRONICS Ultimate Starter Leaning Kit for Raspberry Pi #K0064 8.9 Project 9: 7-segment display 8.9.1 Overview In this lesson, we will program the Raspberry Pi to achieve the controlling of segment display. 8.9.2 Requirement Raspberry Pi ×1 220Ω Resistor ×1 7-Segment display ×1 Breadboard ×1 Several Jumper wires 8.9.3 Principle 1.
UCTRONICS Ultimate Starter Leaning Kit for Raspberry Pi #K0064 When using a common anode LED, the common anode should to be connected to the power supply (VCC); when using a common cathode LED, the common cathode should be connected to the ground (GND). Each segment of a segment display is composed of LED, so a resistor is needed for protecting the LED. A 7-segment display has seven segments for displaying a figure and a segment for displaying a decimal point.
UCTRONICS Ultimate Starter Leaning Kit for Raspberry Pi #K0064 8.9.4 Procedures 1. Build the circuit 2. Program Python user: 2.1 Edit and save the code with vim or nano. (https://github.com/UCTRONICS/Arducam_Starter_Kit_Python_Code_for_RPi.git) 2.2 Run the program $ sudo python 09_segment.py Now, you should see the number 0~9, a~F are displayed on the segment display. 80 www.uctronics.
UCTRONICS Ultimate Starter Leaning Kit for Raspberry Pi #K0064 8.9.4 Summary Through this lesson, we have learned the principle and programming of segment display. I hope you can combine the former course to modify the code we provided in this lesson to achieve cooler originality. 81 www.uctronics.
UCTRONICS Ultimate Starter Leaning Kit for Raspberry Pi #K0064 8.10 Project 10 4-digit 7-segment display 8.10.1 Overview In this lesson, we will program the Raspberry Pi to achieve the controlling of 4-digit 7-segment display. 8.10.2 Requirement Raspberry Pi ×1 220Ω Resistor ×4 4-digit 7-segment display ×1 Breadboard ×1 Several Jumper wires 8.10.3 Principle 1.
UCTRONICS Ultimate Starter Leaning Kit for Raspberry Pi #K0064 8.10.4 Procedures 1. Build the circuit 2. Program Python user: 2.1 Edit and save the code with vim or nano. (https://github.com/UCTRONICS/Arducam_Starter_Kit_Python_Code_for_RPi.git) 2.2 Run the program $ sudo python 10_fourBitSegment.py Now, you should see the number is displayed on the segment display. 83 www.uctronics.
UCTRONICS Ultimate Starter Leaning Kit for Raspberry Pi #K0064 84 www.uctronics.
UCTRONICS Ultimate Starter Leaning Kit for Raspberry Pi #K0064 8.11 Project 11: LCD1602 8.11.1 Overview In this lesson, we will learn how to use a character display device — LCD1602 on the Raspberry Pi platform. First, we make the LCD1602 display a string "Hello Geeks!" scrolling, then display“ Uctronics” and“ www.uctronics.com” static. 8.11.2 Requirement Raspberry Pi x 1 1x LCD1602 x 1 1x 10KΩ Potentiometer x 1 1x Breadboard x 1 Several Jumper wires 8.11.3 Principle 1.
UCTRONICS Ultimate Starter Leaning Kit for Raspberry Pi #K0064 register. The wiringPiDev Library simplifies this for you, so you don't need to know the low-level instructions. The Hitachi-compatible LCDs can be controlled in two modes: 4-bit or 8-bit. The 4-bit mode requires six I/O pins from the Raspberry Pi, while the 8-bit mode requires 10pins. For displaying text on the screen, you can do most everything in 4-bit mode, so example shows how to control a 2x16 LCD in 4-bit mode.
UCTRONICS Ultimate Starter Leaning Kit for Raspberry Pi #K0064 At the moment, there is no clever scrolling of the screen, but long lines will wrap to the next line, if necessary. 8.11.4 Procedures 1. Build the circuit 2. Program Python user: 2.1 Edit and save the code with vim or nano. (https://github.com/UCTRONICS/Arducam_Starter_Kit_Python_Code_for_RPi.git) 2.2 Run the program $ sudo python 11_lcd1602.
UCTRONICS Ultimate Starter Leaning Kit for Raspberry Pi #K0064 8.11.5 Summary I believe that you have already mastered the driver of LCD1602 through this lesson. I hope you can make something more interesting base on this lesson and the previous lesson learned. 88 www.uctronics.
UCTRONICS Ultimate Starter Leaning Kit for Raspberry Pi #K0064 8.12 Project 12: A Simple Voltmeter 8.12.1 Overview In this lesson, we will make a simple voltmeter with Raspberry Pi and LCD1602, the range of this voltmeter is 0~5V. Then, we will measure the voltage of the potentiometer’s adjustment end with the simple voltmeter and display it on the LCD1602. 8.12.2 Requirement Raspberry Pi ×1 LCD1602 ×1 Potentiometer ×2 Breadboard ×1 Several Jumper wires 8.12.
UCTRONICS Ultimate Starter Leaning Kit for Raspberry Pi #K0064 2. Program Python user: 2.1 Edit and save the code with vim or nano. (https://github.com/UCTRONICS/Arducam_Starter_Kit_Python_Code_for_RPi.git) 2.2 Run the program $ sudo python 12_voltmeter.py Now, when you turning the shaft of the potentiometer, you will see the voltage displayed on the LCD1602 will be changed. 8.12.5 Summary The substance of voltmeter is reading analog voltage which input to ADC.
UCTRONICS Ultimate Starter Leaning Kit for Raspberry Pi #K0064 8.13 Project 13: Matrix Keyboard 8.13.1 Overview In this lesson, we will learn how to use a matrix keyboard. 8.13.2 Requirement Raspberry Pi ×1 4x4 Matrix Keyboard×1 Several Jumper wires 8.13.3 Principle 1. What’s 4x4 matrix keyboard ? Please refer to chapter 3.10 4x4 Matrix Array 16 Key Keyboard In order to save the resources of the microcontroller port, we usually connect the buttons in a matrix in an actual project.
UCTRONICS Ultimate Starter Leaning Kit for Raspberry Pi #K0064 8.13.4 Procedures 1. Build the circuit 2. Program Python user: 2.1 Edit and save the code with vim or nano. (https://github.com/UCTRONICS/Arducam_Starter_Kit_Python_Code_for_RPi.git) 2.2 Run the program $ sudo python 13_matrixKeyboard.py Now, when you press one of the button on the 4x4 matrix keyboard, you will see the corresponding key value will be displayed on the terminal. 92 www.uctronics.
UCTRONICS Ultimate Starter Leaning Kit for Raspberry Pi #K0064 93 www.uctronics.
UCTRONICS Ultimate Starter Leaning Kit for Raspberry Pi #K0064 8.14 Project 14: Measure the distance 8.14.1 Overview In this lesson, we will learn how to measure the distance by the ultrasonic distance sensor. 8.14.2 Requirement Raspberry Pi ×1 Ultrasonic distance sensor ×1 Breadboard ×1 Several Jumper wires 8.14.3 Principle 1. What’s ultrasonic distance sensor ? Please refer to chapter 3.3 HC-SR04 Ultrasonic Distance Sensor Module 8.14.4 Procedures 1. Build the circuit 2.
UCTRONICS Ultimate Starter Leaning Kit for Raspberry Pi #K0064 2.2 Run the program $ sudo python 14_distance.py Now, you will see the distance between the obstacle and the ultrasonic sensor display on the screen. 95 www.uctronics.
UCTRONICS Ultimate Starter Leaning Kit for Raspberry Pi #K0064 8.15 Project 15: Temperature & Humidity Sensor DHT-11 8.15.1 Overview In this lesson, we will learn how to use DHT-11 to collect temperature and humidity data. 8.15.2 Requirement Raspberry Pi ×1 DHT-11×1 Breadboard ×1 Several Jumper wires 8.15.3 Principle 1. What’s Temperature & Humidity Sensor DHT-11 ? Please refer to chapter 3.2 DHT-11 Digital Temperature & Humidity Sensor 8.15.4 Procedures 1. Build the circuit 2.
UCTRONICS Ultimate Starter Leaning Kit for Raspberry Pi #K0064 2.2 Run the program $ sudo python 15_dht11.py Now, you can see the temperature and humidity data displayed on the terminal. 97 www.uctronics.
UCTRONICS Ultimate Starter Leaning Kit for Raspberry Pi #K0064 8.16 Project 16: Dot-matrix display 8.16.1 Overview In this lesson, we will program to control a 8x8 dot-matrix display to realize the display of graphical and digital we want. 8.16.2 Requirement Raspberry Pi x 1 8x8 Dot-matrix display x 1 74HC595 x 2 Breadboard x 1 Several Jumper wires 8.16.3 Principle 1. What’s Dot-matrix display ? Please refer to chapter 3.20.3 Dot-matrix Display 2.
UCTRONICS Ultimate Starter Leaning Kit for Raspberry Pi #K0064 A 8x8 dot-matrix display consists of 64 LEDs, and each LED is placed at the intersection of the lines and columns. When the corresponding row is set as high level and the column is set as low level, then the LED will be lit. A certain drive current is required for the dot-matrix display. In addition, more pins are needed for connecting dot-matrix display with controller.
UCTRONICS Ultimate Starter Leaning Kit for Raspberry Pi #K0064 MR: Reset pin, effective at low level, directly connected to 5V high level in practical applications SH_CP: Shift register clock input ST_CP: storage register clock input 8.16.4 Procedures 1. Build the circuit (Make sure that the circuit connection is correct and then power, otherwise it may cause the chips to burn.) 2. Program Python user: 2.1 Edit and save the code with vim or nano. (https://github.
UCTRONICS Ultimate Starter Leaning Kit for Raspberry Pi #K0064 8.16.1 Summary In this experiment, we have not only learned how to operate a dot-matrix display to display numbers and letters, but also learned the basic usage of 74HC595, then you can try operating the dot-matrix display to show other images. 101 www.uctronics.
UCTRONICS Ultimate Starter Leaning Kit for Raspberry Pi #K0064 8.17 Project 17: Photoresistor 8.17.1 Overview In this lesson, we will learn how to measure the light intensity by photoresistor and make the measurement result displayed in the screen. 8.17.2 Requirement Raspberry Pi ×1 ADC0832 ×1 Photoresistor ×1 10KΩ Resistor ×1 Breadboard ×1 Several Jumper wires 8.17.3 Principle 1. What’s Photoresistor ? Please refer to chapter 3.24 Light Sensor (Photoresistor) 2.
UCTRONICS Ultimate Starter Leaning Kit for Raspberry Pi #K0064 With the increase of the light intensity, the resistance of photoresistor will be decreased. The voltage of GPIO port in the above figure will become high. 8.17.4 Procedures 1. Build the circuit 2. Program Python user: 2.1 Edit and save the code with vim or nano. (https://github.com/UCTRONICS/Arducam_Starter_Kit_Python_Code_for_RPi.git) 2.2 Run the program $ sudo python 17_photoresistor.
UCTRONICS Ultimate Starter Leaning Kit for Raspberry Pi #K0064 8.17.5 Summary By learning this lesson, we have learned how to detect surrounding light intensity with the photoresistor. You can play your own wisdom, and make more originality based on this experiment and the former experiment. 104 www.uctronics.
UCTRONICS Ultimate Starter Leaning Kit for Raspberry Pi #K0064 8.18 Project 18: Thermistor 8.18.1 Overview In this lesson, we will learn how to use a thermistor to collect temperature by programming the Raspberry Pi and ADC0832. 8.18.2 Requirement Raspberry Pi ×1 ADC0832 ×1 Thermistor ×1 10KΩ Resistor ×1 Breadboard ×1 Several Jumper wires 8.18.3 Principle 1. What’s Thermistor ? Please refer to chapter 3.
UCTRONICS Ultimate Starter Leaning Kit for Raspberry Pi #K0064 8.18.4 Procedures 1. Build the circuit 2. Program Python user: 2.1 Edit and save the code with vim or nano. (https://github.com/UCTRONICS/Arducam_Starter_Kit_Python_Code_for_RPi.git) 2.2 Run the program $ sudo python 18_thermistor.py Now, press Enter, if you touch the thermistor, you can see current temperature value displayed on the screen change accordingly. 106 www.uctronics.
UCTRONICS Ultimate Starter Leaning Kit for Raspberry Pi #K0064 8.19 Project 19: LED Bar Graph 8.19.1 Overview In this lesson, we will learn how to control an LED bar graph by programming the Raspberry Pi. 8.19.2 Requirement Raspberry Pi ×1 ADC0832 ×1 LED bar graph ×1 220Ω Resistor ×10 10KΩ Potentiometer ×1 Breadboard ×1 Several Jumper wires 8.19.3 Principle 1.
UCTRONICS Ultimate Starter Leaning Kit for Raspberry Pi #K0064 8.19.4 Procedures 1. Build the circuit 2.Program Python user: 2.1 Edit and save the code with vim or nano. (https://github.com/UCTRONICS/Arducam_Starter_Kit_Python_Code_for_RPi.git) 2.2 Run the program $ sudo python ledBar.py Now, when you turn the knob of the potentiometer, you will see that the number of LED in the LED bar graph will be changed. 108 www.uctronics.
UCTRONICS Ultimate Starter Leaning Kit for Raspberry Pi #K0064 109 www.uctronics.
UCTRONICS Ultimate Starter Leaning Kit for Raspberry Pi #K0064 8.20 Project 20: Controlling an LED through LAN 8.20.1 Overview In this lesson, we will introduce TCP and socket, and then programming to control an LED through the local area network(LAN). 8.20.2 Requirement Raspberry Pi ×1 LED ×1 220Ω Resistor ×1 Breadboard×1 Several Jumper wires 8.20.3 Principle 1. What’s TCP ? The Transmission Control Protocol (TCP) is a core protocol of the Internet Protocol Suite.
UCTRONICS Ultimate Starter Leaning Kit for Raspberry Pi #K0064 A socket address is the combination of an IP address and a port number, much like one end of a telephone connection is the combination of a phone number and a particular extension. Based on this address, internet sockets deliver incoming data packets to the appropriate application process or thread. Several Internet socket types are available: 1. Datagram sockets, also known as connectionless sockets, which use User Datagram Protocol (UDP). 2.
UCTRONICS Ultimate Starter Leaning Kit for Raspberry Pi #K0064 2. Program Python user: 2.1 Edit and save the server code with vim or nano on the Raspberry Pi. (https://github.com/UCTRONICS/Arducam_Starter_Kit_Python_Code_for_RPi.git) 2.2 Run the program $ sudo python ledServer.py (On Raspberry Pi) $ python ledClient.py (On PC) Now, input “ON” in the terminal and then press Enter, you will find the LED connected to the Raspberry Pi is on, input “OFF”, the LED is off. 8.20.
UCTRONICS Ultimate Starter Leaning Kit for Raspberry Pi #K0064 8.21 Project 21: Movement Detection Based on PIR 8.21.1 Overview In this lesson, we will learn how to use the Passive Infrared (PIR) sensor to detect the movement nearby. 8.21.2 Requirement Raspberry Pi ×1 PIR Movement Sensor ×1 Several Jumper wires 8.21.3 Principle 1. What’s PIR sensor ? Please refer to chapter 3.4 Pyroelectric Infrared PIR Motion Sensor Module 8.21.4 Procedures 1. Build the circuit 113 www.uctronics.
UCTRONICS Ultimate Starter Leaning Kit for Raspberry Pi #K0064 2. Program Python user: 2.1 Edit and save the code with vim or nano. (https://github.com/UCTRONICS/Arducam_Starter_Kit_Python_Code_for_RPi.git) 2.2 Run the program $ sudo python 21_PIR.py 114 www.uctronics.
UCTRONICS Ultimate Starter Leaning Kit for Raspberry Pi #K0064 8.22 Project 22: DC Motor 8.22.1 Overview In this comprehensive experiment, we will learn how to control the state of DC motor with Raspberry Pi. The state of DC motor includes its forward, reverse, acceleration, deceleration and stop. 8.22.2 Requirement Raspberry Pi ×1 L9110 DC Motor driver ×1 DC motor ×1 Button ×4 LED ×1 220Ω Resistor ×1 Capacitor(104, 0.1uF) ×1 Breadboard ×1 Several Jumper wires 8.22.
UCTRONICS Ultimate Starter Leaning Kit for Raspberry Pi #K0064 DC motors were the first type widely used, since they could be powered from existing direct-current lighting power distribution systems. A DC motor's speed can be controlled over a wide range, using either a variable supply voltage or by changing the strength of current in its field windings. Small DC motors are used in tools, toys, and appliances.
UCTRONICS Ultimate Starter Leaning Kit for Raspberry Pi #K0064 GND: The cathode of the power supply (Ground). IA, IB: The input terminal of drive signal. 8.22.4 Procedures 1. Build the circuit 2. Program Python user 2.1 Edit and save the code with vim or nano. (https://github.com/UCTRONICS/Arducam_Starter_Kit_Python_Code_for_RPi.git) 2.2 Run the program $ sudo python 22_motor.
UCTRONICS Ultimate Starter Leaning Kit for Raspberry Pi #K0064 8.22.5 Summary I think you must have grasped the basic theory and programming of the DC motorafter studying this experiment. You not only can forward and reverse it, but also can regulate its speed. Besides, you can do some interesting applications with the combination of this course and your prior knowledge. 118 www.uctronics.
UCTRONICS Ultimate Starter Leaning Kit for Raspberry Pi #K0064 8.23 Project 23: How to control a servo 8.23. 1 Overview In this lesson, we will introduce a new electronic device (Servo) to you, and tell you how to control it with Raspberry Pi. 8.23.2 Requirement Raspberry Pi ×1 Servo ×1 Breadboard ×1 Several Jumper wires 8.23.3 Principle 1. What’s Servo ? Please refer to chapter 3.8 SG90 micro small servo motor 2.
UCTRONICS Ultimate Starter Leaning Kit for Raspberry Pi #K0064 8.23.4 Procedures 1. Build the circuit 2. Program Python user: 2.1 Edit and save the code with vim or nano. (https://github.com/UCTRONICS/Arducam_Starter_Kit_Python_Code_for_RPi.git) 2.2 Run the program $ sudo python 23_servo.py Press Enter, you should see the servo motor rotate 180 degrees. And then rotate in opposite direction. 120 www.uctronics.
UCTRONICS Ultimate Starter Leaning Kit for Raspberry Pi #K0064 121 www.uctronics.
UCTRONICS Ultimate Starter Leaning Kit for Raspberry Pi #K0064 8.24 Project 24: How to control a stepper motor 8.24.1 Overview In this lesson, we will introduce a new electronic device — stepper motor to you, and tell you how to control it with Raspberry Pi. 8.24.2 Requirement Raspberry Pi ×1 Stepper motor ×1 ULN2003 stepper motor driver module ×1 Several Jumper wires 8.24.3 Principle 1. What’s Stepper motor Please refer to chapter 3.9 DC 5V 4 Phase Step Stepper Motor 2.
UCTRONICS Ultimate Starter Leaning Kit for Raspberry Pi #K0064 8.24.4 Procedures 1. Build the circuit 123 www.uctronics.
UCTRONICS Ultimate Starter Leaning Kit for Raspberry Pi #K0064 2. Program Python user: 2.1 Edit and save the code with vim or nano. (https://github.com/UCTRONICS/Arducam_Starter_Kit_Python_Code_for_RPi.git) 2.2 Run the program $ sudo python 24_stepperMotor.py Press Enter, you should see that the stepper motor is running. 124 www.uctronics.
UCTRONICS Ultimate Starter Leaning Kit for Raspberry Pi #K0064 8.25 Project: 25 How to use the acceleration sensor ADXL345 8.25.1 Overview In this lesson, we will learn how to use an acceleration sensor ADXL345 to get acceleration data. 8.25.2 Requirement Raspberry Pi ×1 ADXL345 module ×1 Several Jumper wires 8.25.3 Principle 1. What’s ADXL345 ? Please refer to chapter 3.1 ADXL345 Triaxial Accelerometer Sensor Module The ADXL345 is well suited for mobile device applications.
UCTRONICS Ultimate Starter Leaning Kit for Raspberry Pi #K0064 ● int wiringPiI2CWriteReg8 (int fd, int reg, int data) ● int wiringPiI2CWriteReg16 (int fd, int reg, int data) These write an 8 or 16-bit data value into the device register indicated. ● int wiringPiI2CReadReg8 (int fd, int reg) ● int wiringPiI2CReadReg16 (int fd, int reg) These read an 8 or 16-bit value from the device register indicated. 8.25.4 Procedures 1. Build the circuit 126 www.uctronics.
UCTRONICS Ultimate Starter Leaning Kit for Raspberry Pi #K0064 2. Program NOTE: The following program use I2C interface. Before you run the program, please make sure the I2C driver module of Raspberry Pi has loaded normally. Python user: 2.1 Edit and save the code with vim or nano. (https://github.com/UCTRONICS/Arducam_Starter_Kit_Python_Code_for_RPi.git) 2.2 Run the program $ sudo python Adafruit_ADXL345.py Press Enter, you should see that the acceleration data will be displayed on the terminal. 127 www.
UCTRONICS Ultimate Starter Leaning Kit for Raspberry Pi #K0064 8.26 Project 26: PS2 Joystick 8.26.1 Overview In this lesson, we will learn the usage of joystick. We program the Raspberry Pi to detect the state of joystick. 8.26.2 Requirement Raspberry Pi ×1 ADC0832 ×1 PS2 Joystick ×1 Breadboard ×1 Several Jumper wires 8.26.3 Principle 1. What’s Joysticks ? Please refer to chapter 3.5 PS2 Joystick Module 2.
UCTRONICS Ultimate Starter Leaning Kit for Raspberry Pi #K0064 8.26.4 Procedures 1. Build the circuit 2. Program Python user: 2.1 Edit and save the code with vim or nano. (https://github.com/UCTRONICS/Arducam_Starter_Kit_Python_Code_for_RPi.git) 2.2 Run the program $ sudo python 26_joystick.py Press Enter, you should see that the joystick state information displayed on the terminal. 129 www.uctronics.
UCTRONICS Ultimate Starter Leaning Kit for Raspberry Pi #K0064 130 www.uctronics.