Do-It-Yourself Portable Patio Deck Installation Instructions Owner’s Manual Warranty www.UDECX.
INDEX Recommended Uses Page 2 Installation Instructions Page 6 Warnings Page 2 Installation Instructions Page 7 Tools Needed Page 2 Installation Instructions Page 8 Warranty Page 3 Leveling and Elevating Page 9 Assembly Overview Page 4 Railing Installation Page 10 Parts List Page 5 Railing Installation Page 11 UDECX RECOMMENDED USES: UDECX is a portable, modular patio decking system intended to be installed by the DIY homeowner or contractor on grade.
UDECX® LIMITED WARRANTY UDECX, LLC MAKES NO WARRANTY, EXPRESS OR IMPLIED, INCLUDING WITHOUT LIMITATION, WARRANTIES FOR MERCHANTABILITY, FITNESS FOR A PARTICULAR PURPOSE OR PERFORMANCE CHARACTERISTICS EXCEPT AS EXPRESSLY PROVIDED HEREIN. THIS LIMITED WARRANTY APPLIES ONLY TO PRODUCTS INSTALLED IN THE UNITED STATES. ALL PRODUCTS INSTALLED OUTSIDE OF THE UNITED STATES ARE SOLD “AS IS” AND WITHOUT WARRANTY OF ANY KIND.
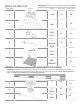
Assembly Overview: C C C B A A C D A E A C 4
Starter Kit Parts List: IDENTIFIER IMPORTANT: Check, count and verify that your Starter Kit came packaged with the following parts before you begin installation! IMAGE NAME QUANTITY PART CODE A PIER 16 PR B PAD 9 SP 36 CL 16 PA 1 CT 1 PT C CAM LOCK 12” D ANCHOR SPIKE E F LOCK TOOL PIER TEMPLATE Additional Leveling Components (Sold Separately) IMPORTANT: Manufacturer recommends that your Patio Deck is installed on level grade.
BEFORE YOU BEGIN INSTALLATION: Read and understand all of the installation instructions contained within this manual. Improper installation could result in product failure or personal injury, and may void the warranty. IMPORTANT: Before installing your new UDECX Portable Patio Deck, you must LEVEL the area where you intend to install your system, or at the location of each Pier (A).
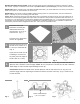
4. Place 3 additional Piers (A) on grade and locate them with the Pier Template (F). (Fig. 8 & 9) NOTE: the square printed on the Pier Template (F) indicates an outside corner.) 5. Fig. 8 Fig. 9 Fig. 10 Fig. 11 Fig. 12 Fig. 13 Fig. 14 Fig. 15 Fig. 16 Fig. 17 Level each additional Pier (A) to an adjacent Pier (A) (Fig. 10) and install Anchor Spikes (D). (Fig. 11) (NOTE: Remove the Pier Template after all Piers (A) have been leveled and anchored) 6. 7.
9. 10. 11. Place a Pad (B) onto the last 2 Piers (A) installed, and onto 2 of the first 4 Piers (A) installed. (Fig. 18 & 19) Fig. 19 Fig. 20 Fig. 21 Fig. 22 Fig. 23 Fig. 25 Fig. 26 Fig. 27 Fig. 28 Insert 4 Cam Locks (C) into the cam ways in the Pad (B) (Fig. 20) and lock them using the Lock Tool (E). (Fig. 21) Continue assembly by locating additional Piers (A) with the Pier Template (F) (Fig. 22 through 25) in the manner previously described in steps 8,9 & 10.
Leveling & Elevating your Patio Deck IMPORTANT: If you intend to purchase and install UDECX leveling components; 1” Shims (G) and/or 3” Risers (H), you will need to anchor the Pier (A) and all 1” Shims (G) or 3” Risers (H) with an 18” Spike (J). See Fig. 34 13. 14. 15. If you choose to install on a sloped or uneven grade, 1” Shims (G) (Fig. 29) or 3” Risers (H) (Fig. 30) can be used to elevate portions of your Patio Deck to help level the finished surface.
Railing Installation IMPORTANT: If you intend to purchase and install railing on your new Patio Deck, you will need to install Railing Mounting hardware prior to anchoring Piers (A) or installing Pads (B). When installing Post Mounting hardware and posts, refer to the illustration shown (Fig. 36) for hardware location and railing lengths needed. 17. Your new Railing comes complete with End, In-line and possibly Corner Posts that include pre-installed hardware for attaching railing sections (Fig. 37).
21. Start with an End Post or Corner Post by aligning the base of the Post with the Mounting Plate (L) (Fig. 45). POST MOUNT BOLT POST MOUNT BOLT Secure the Post with 2 Post Mount Bolts (S) (Shipped with each Railing Post) (Fig. 46). 22. Fig. 45 Fig. 46 Fig. 47 Fig. 48 Fig. 49 Fig. 50 Install another In-Line Post 34” from the previously installed In-Line Post and hang a 2’-8” Railing section between the 2 In-Line Posts (Fig. 52) and secure with Fig. 51 fasteners. Fig.
REGISTERING YOUR PORTABLE PATIO DECK: On-Line: www.UDECX.com By Telephone: 855.MY.UDECX Via U.S. Mail: UDECX, 2 Prestige Place, Suite 240, Miamisburg, Ohio 45342 DATE OF PURCHASE: _______________________________________________________________________ DATE OF INSTALLATION: __________________________________________________________________ 2 Prestige Place Suite 240 Miamisburg, Ohio 45342 USA Questions? Call 855.MY.UDECX 855.698.3329 www.UDECX.