
Instructions / Assembly


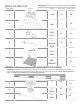


7
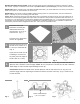
5.
6.
7.
4.
Level each additional Pier
(A) to an adjacent Pier (A)
(Fig. 10) and install Anchor
Spikes (D). (Fig. 11)
(NOTE: Remove the Pier
Template after all Piers (A)
have been leveled and
anchored)
Place a Pad (B) on top of
the 4 installed Piers (A)
(Fig. 12) and insert 4 Cam
Locks (C) into the 4 cam
ways in the Pad (B).
(Fig. 13)
Rotate each of the Cam
Locks (C) clockwise 90
degrees using the Lock
Tool (E). (Fig. 14 & 15)
(NOTE: the Cam Lock (C)
will stop and lock after a
90 degree rotation.)
8.
Place the next 2 Piers (A) in
line with any 2 of the
previously installed Piers
(A) using the Pier Template
(F). (Fig. 16) Level each
new Pier (A) and install
Anchor Spikes (D). (Fig. 17)
Place 3 additional Piers (A)
on grade and locate them
with the Pier Template (F).
(Fig. 8 & 9)
NOTE: the square printed
on the Pier Template (F)
indicates an outside
corner.)
Fig. 8
Fig. 9
Fig. 11
Fig. 10
Fig. 13
Fig. 12
Fig. 15
Fig. 14
Fig. 17
Fig. 16