
Instructions / Assembly


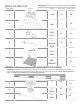


13.
14.
15.
If you choose to install on
a sloped or uneven grade,
1” Shims (G) (Fig. 29) or 3”
Risers (H) (Fig. 30) can be
used to elevate portions of
your Patio Deck to help
level the finished surface.
Simply place a shim below
the Pier (A), level and begin
DO NOT place more than
two 1” Shims (G) (Fig. 31)
or two 3” Risers (H) below
any Pier (A). (Fig. 32)
1” Shims (G) and a 3” Riser
(H) can be used in
conjunction with each
other. ALWAYS place the
1” Shim or Shims (G) below
the 3” Riser (H). NEVER
use more than 2 Shims (G)
with any Riser (H) (Fig. 33)
(NOTE: All Risers (H), Shims (G)
and Piers (A) need to be secured
with 18” Spikes (J). (Fig 34)
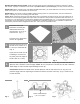
16.
Terrain will vary per
installation sight, so
careful planning and
proper leveling of the
entire system is required
by the installer. The Patio
Deck surface may not
exceed 12” off grade.
(Fig. 35)
Fig. 30
Fig. 29
Fig. 32
Fig. 31
Fig. 34
Fig. 33
Fig. 35
Leveling & Elevating your Patio Deck
9
IMPORTANT: If you intend to purchase and install UDECX leveling components; 1” Shims (G) and/or 3”
Risers (H), you will need to anchor the Pier (A) and all 1” Shims (G) or 3” Risers (H) with an 18” Spike (J).
See Fig. 34