
Instructions / Assembly


10
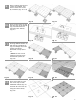
17.
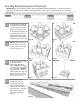
18.
Your new Railing comes com-
plete with End, In-line and
possibly Corner Posts that
include pre-installed hardware
for attaching railing sections
(Fig. 37).
A Railing Mounting Kit (Fig.
38) is shipped with every post
and includes a Hex Nut (K), a
Washer (L), 4 Self-tapping
Screws (M), Mounting Plate
(N), and Compression Cup
with Bolt (P).
Insert the Compression
Cup with Bolt (P) into the
bottom of a Pier (A) (Fig.
39) where you intend to
install a Railing Post and
place the Pier (A) on level
grade.
Anchor the Pier (A) with an
Anchor Spike (D) (Fig. 40).
LEAVE SPACE between the
head of the Anchor Spike
(D) and top of the Pier (A).
Fig. 39 Fig. 40
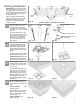
Fig. 41 Fig. 42
Fig. 44 Fig. 45
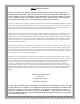
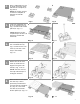
Railing Installation
IMPORTANT: If you intend to pur-
chase and install railing on your
new Patio Deck, you will need to
install Railing Mounting hardware
prior to anchoring Piers (A) or in-
stalling Pads (B).
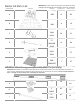
When installing Post Mounting
hardware and posts, refer to the
illustration shown (Fig. 36) for
hardware location and railing
lengths needed.
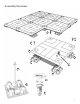
19.
After four Piers (A) are
located and anchored, place
a Pad (B) on top of the Piers
(A) (Fig. 41).
Insert a Mounting Plate (N)
into the cam way in the Pad
(B) being sure to align the
Bolt (P) with the hole in the
Mounting Plate (N). The Bolt
(P) should be protruding
through the Mounting Plate
(N) (Fig. 43).
END CORNER IN-LINE
Fig. 36
END
POST
IN-LINE
POST
CORNER
POST
(P) COMPRESSION CUP
WITH BOLT
(N) MOUNTING PLATE
(K) HEX NUT
Fig. 37
Fig. 38
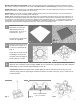
20.
Secure the Mounting Plate
(N) to the Pad (B) with four
Self-tapping Screws (M) (Fig.
44).
(NOTE: DO NOT over-
tighten screws)
Place a Washer (L) and Hex
Nut (K) on the Bolt (P) and
tighten down with a socket
wrench (Fig. 45).
(NOTE: DO NOT over-
tighten Nut (K).
RAIL MOUNTING HARDWARE LOCATIONS
3’-2” RAIL
2’-8” RAIL 3’-2” RAIL