
Instructions / Assembly


UDECX RECOMMENDED USES:
UDECX is a portable, modular patio decking system intended to be installed by the DIY homeowner or contractor on grade.
UDECX should be installed on undisturbed soil. Loose surface soil, vegetation and grass should be removed to provide a firm
surface for the piers to rest upon.
UDECX may be installed over existing concrete slabs and patios to conceal cracks or simply improve the aesthetics.
The modular nature of UDECX allows for smaller or larger configurations than our 10’x10’ starter kit. For example, using fewer
pads to elevate trash cans or provide a base for air conditioning condensers. Using additional components creates expansion
opportunities that are only limited by the space you have available.
UDECX may be used to create walkways similar to sidewalks.
UDECX offers an optional 2” aluminum railing system. In most cases, a railing system is not required by code if the surface of
the deck is not over 20” above grade.
WARNINGS:
UDECX support piers need to be installed on undisturbed soil. This requires the removal of any vegetaon including grass and loose soil unl undisturbed
soil is reached.
UDECX support piers need to be secured to the ground through the use of spikes, as detailed in these instrucons. Failure to secure the UDECX system to
the ground may result in the risk of upli in areas and mes of high winds. Check your local codes to verify whether or not addional aachment is re-
quired.
When using 1” shims and 3” riser blocks, the anchoring spikes must pass through all components securing them together and to the ground. When in-
stalling Shims or Risers 18” spikes are required.
The UDECX system should be inspected regularly for areas of selement. Should this occur, these areas should be disassembled, and the pier raised
means of addional soil or UDECX shims and riser blocks unl the desired height is reached. Reinstall the surface pads, securing them with the cam locks.
Do not place re pits, other than UDECX brand re pits, on or near the UDECX system. The heat generated by a re pit may damage, diminish structural
integrity and/or create a re hazard.
The UDECX system is not intended to have the nish decking surface higher than 12” above the surrounding grade. No combinaon of 1” shims and/or 3”
riser blocks should be used to elevate the nished surface higher than 12”.
Building codes require guardrails when a decking surface exceeds 20” above adjacent grade, The UDECX oponal railing system is dened by the manu-
facturer as a guardrail. All piers on a UDECX installaon that have a railing system installed must be secured to grade with spikes.
Use cauon in assembling the UDECX system to avoid pinch hazard when installing the surface pads.
Most jurisdicons will not require a building permit if your deck is below 30” and not permanently aached to your home, and less than 300 square feet.
Check with your local building department to verify whether or not a permit is required.
While a building permit may not be required, placement of your UDECX Pao Deck must be within setbacks of local zoning codes. Verify with your local
municipality what the required setbacks are from the side and rear of your property.
If the UDECX Pao Deck is installed against an exisng home, and the nished surface of the system is within 18” of a window sill, local codes may require
the window to be safety glass.
Do not clean the UDECX system with abrasive or causc cleaners as this may void the warranty of the components. The UDECX system should be cleaned
with mild detergent and water. Do not use a pressure washer to clean the surface, as this may result in voiding the warranty.
HURRICANE & TORNADO ZONES: The UDECX Pao Deck must be secured with 12” or 18” Anchor Spikes, or other anchoring methods deemed ac-
ceptable per region building codes. Check with code ocials in your municipality to conrm what anchoring requirements are necessary to comply with
local building codes.
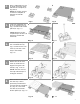
TOOLS NEEDED FOR ASSEMBLY:
Your Starter Kit includes a Cam Lock Tool for the assembly of your Portable Pao Deck, but you may need to supply the following tools:
Hand Sledge or Hammer
4’ Level
Shovel or Spade
INDEX
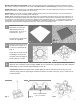
Recommended Uses Page 2 Installation Instructions Page 6
Warnings Page 2 Installation Instructions Page 7
Tools Needed Page 2 Installation Instructions Page 8
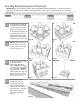
Warranty Page 3 Leveling and Elevating Page 9
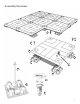
Assembly Overview Page 4 Railing Installation Page 10
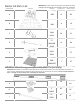
Parts List Page 5 Railing Installation Page 11
2