
Instructions / Assembly


8
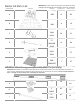
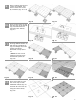
10.
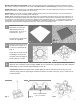
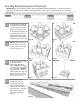
11.
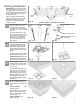
12.
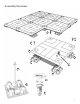
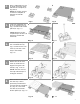
9.
Insert 4 Cam Locks (C) into
the cam ways in the Pad (B)
(Fig. 20) and lock them
using the Lock Tool (E).
(Fig. 21)
Continue assembly by
locating additional Piers (A)
with the Pier Template (F)
(Fig. 22 through 25) in the
manner previously
described in steps 8,9 &
10.
(NOTE: be sure to level
each Pier (A) and secure
with Anchor Spikes (D).
(Fig. 26)
Insert Cam Locks (C) into
the 4 cam ways in each
additional Pad (B) (Fig. 27)
and lock all Cam Locks (C)
using the Lock Tool (E).
(Fig. 28)
Place a Pad (B) onto the last
2 Piers (A) installed, and
onto 2 of the first 4 Piers
(A) installed. (Fig. 18 & 19)
Fig. 18
Fig. 19
Fig. 20 Fig. 21
Fig. 22 Fig. 23
Fig. 25 Fig. 26
Fig. 24
Fig. 27 Fig. 28