UIOT/QR4120 Manual for Intelligent Roller Shade Motor Henan UIOT Technology Co., Ltd R&D Department File Identification: UIOT-YFB-DETAILDOC Application Division: R&D Department Storage Life: Record for revision of document Date Versio n 01/01/2019 V1.0.0 14/01/2019 V1.1.0 Description Editor First edition Zhang Haoyu 1. The host is changed to the smart server in the network access instructions Zhao Xiaojuan 2. Steps 6 and 7 of the network access instructions are modified 3.
1 Product Functions 1.1. Description 1. Network Access to Zigbee First of all, make sure that the home smart server allows access to the network and the device is within an effective communication distance, and then operate the device to access the network. After successfully accessing the network, the device is displayed in the APP. At this time, you can operate the device via the APP. 2. Settings for stopping at any point The device can set the stop point through the method of operation setting. 3.
of the protocol has been successfully accessed to the network, the buzzer will sound three times. If the older version of the protocol has been successfully accessed to the network, the buzzer will sound three times. If the access to network failed, the buzzer sounded 10 times in quick succession. 3. Exit the network: Long press the settings button for 6-8 seconds until you hear the buzzer, then release it. If the exit of network succeeds, the buzzer will sound long.
2 Produ uct Sttructu ure 3 Insta allation Step ps 3.1 1. Coil preparation 1. P Prepare the t coil acccording tto the len ngth of B and you need to take t into o accountt the tota al width o of A, the thickness t e of C of the clearance mo otor top in ncluding the top o of the mottor and th he motor bracket and a thee thicknesss D of the e clearancce of mottor end in ncluding tthe end pllate and d the end bracket. (refer to ffigure 1) 行程 程端 The Top(Process)): 尾插 插端 The End(End Plug g): 2.
开口 口槽 Open sllot 内齿 齿圈径 Inner gear ring diameter 铆钉位置 置 Rivet position 转轮 轮的中间点 Middle M point of the runn ning wheel 4. O Octagonall tube and d slot tubee don’t neeed the piin. 5. C Clear the drive d tube inside b burr so ass not to afffect instaallation. 3.2 2. Asse embly Diagram D m of Partts Insstallation steps: Putt the crow wn into the t motorr so that it can be e used wiith the in nner geaar sleeve. Install th he runnin ng wheel and a the spring.
传动 动管:drive tube t 尾插:end plug Asssemble th he top of the moto or to the motor brracket, an nd install the end d plug to the t end plug brackket.
3.3 3.
4 Netw work Access A Instrruction ns 4.1 1. Netw work Acccess Insstructio ons 1. After the normal power p sup pply of th he device, connect tthe device to PP “Smarrt Home”.. As the smarrt server, register and log in the AP shown beelow: click "About me" in th he area sh hown by tthe arrow w in the lowerr right corrner. nd click "Device M Manageme ent" 2. Enter thee interfacce shown below an in the areea shown n by the reed arrow in the up pper left ccorner of the interface.
3. Enter thee device manageme m ent interfface show wn below aand click the "+" show wn by the e red arrrow in th he upperr right coorner of the interface to add th he device.
4. After enttering the e device ttype selecction inte erface, fin nd the "D Door and Window" sho own by th the red arrrow in the t figuree below and a nter the next n step.
5. In the "device type selectio on" interfface, find the "intellligent ro oller otor" icon n marked d in the fiigure belo ow and cclick to en nter shade mo the next step.
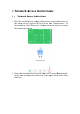
6. After cliccking, en nter the "add inttelligent roller sh hade mottor" interface as shown n in the figgure belo ow, and co onnect to the netw work nterface p prompt; Before B the device iis conneccted accordingg to the in to the network, n a room must be created.
n created,, and thee device can c be named forr conveniient has been operation n and man nagementt. 7. After the room is created, c yyou can fin nd the roo om you crreated an nd he access tto networrk in the room r as sshown in the t the devicce after th followingg figure. You can turn t on, pause p and d turn off the t motorr in the rooom.
5 Instructions 5.1. Instructions 1. After the device is connected to the network, you can control the turning on, pause and turning off of the motor in the APP, or manually drag the button to control the percentage of curtain opening.
2.
5.1.1.
(4 4)Powerr supply mode: m thee power su upply mo ode of the product (5 5)Softwaare versio on: softwaare versio on inform mation of tthe produ uct ( 6 ) Hardware version: haardware version informattion for the pro oduct (7 7)Addreess: produ uct identiffication number 5.1.2. Deviice Settiings You u can set the t directtion and sspeed of the t movem ment of th he device. E.X X.
5.1.3. Bind d light briightness Once you bind the light brigh htness, you y can le et the mootor operrate o the action you sp pecified based b on the brigh htness of the acccording to ligh ht.
E.X X.: The light in th he homee is too strong, setting s bbinding liight brightness can c make e the currtain closse automatically. SSteps are e as folllows. Bin nd light brightnes b s - click the smarrt air box - closee the curttain wh hen light iss very briight ks 5.1.4. Timing Task ming task ks allow the t devicce to exeecute one e action ffor a certtain Tim am mount of tiime beforre executi ng anotheer action. E.X X.: Set a tiiming tassk: “open”” for 30m min and “close”.
5.1.5. Focu us evice, you u can know w how oth her users control the t By focusing on the de devvice. E.X X.: Parentts can monitor m their ch hild's ope eration aand rece eive nottificationss on their phones w when the child con ntrols the device.
5.1.6. Operation Record R u can vieew the reecord of the operration of the In this interrface, you devvice.
6 Produ uct Pa arame eters 6.1 1.
2 When the motor is The process switch in powered on, it can the motor isn’t turned only operate in one on direction Rotate the crown 1 to 2 times in the opposite direction of current operation 3 After the motor is connected to the power supply, the motor doesn’t operate or starts slowly 1. Replace the motor matching the power supply voltage 2. Replace the motor matching the load 3. Check whether all parts are assembled correctly 4. Rotate the crown 1 to 2 times in any direction 4 1.
6. Keep properly the nameplate of the motor. Note: The contents of this manual and specifications of this product are subject to change without prior notice. RF exposure statement This equipment complies with the FCC RF radiation exposure limits set forth for an uncontrolled environment. This equipment should be installed and operated with a minimum distance of 20cm between the radiator and any part of your body. This equipment meets the exemption from the routine evaluation limits in section 2.
FCC Warning This device complies with Part 15 of the FCC Rules. Operation is subject to the following two conditions: (1) This device may not cause harmful interference, and (2) this device must accept any interference received, including interference that may cause undesired operation. NOTE 1: This equipment has been tested and found to comply with the limits for a Class B digital device, pursuant to part 15 of the FCC Rules.