DVD MovieFactory User Guide Ulead Systems, Inc.
Ulead DVD MovieFactory® 5 Plus © 2000-2006 Ulead Systems, Inc. All rights reserved. No part of this publication may be reproduced or transmitted in any form or by any means, electronic or mechanical, including photocopying, recording or storing in a retrieval system, or translated into any language in any form without the express written permission of Ulead Systems, Inc. Software license The software described in this document is furnished under a License Agreement, which is included with the product.
ULEAD DVD MOVIEFACTORY USER GUIDE 3 Table of Contents Video Disc . . . . . . . . . . . . . . . . . . . . . . . . . . . . . . . . . . . . . . . . . . . . . . . . . . . . . . . . . .6 Slideshow Disc . . . . . . . . . . . . . . . . . . . . . . . . . . . . . . . . . . . . . . . . . . . . . . . . . . . . . .6 Audio/Data Disc . . . . . . . . . . . . . . . . . . . . . . . . . . . . . . . . . . . . . . . . . . . . . . . . . . . . .6 Import . . . . . . . . . . . . . . . . . . . . . . . . . . . . . . . . . . . . . .
ULEAD DVD MOVIEFACTORY USER GUIDE Capturing DV video . . . . . . . . . . . . . . . . . . . . . . . . . . . . . . . . . . . . . . . . . . . . . . . . . . . . . . . . . . Capturing High-Definition video (HDV) . . . . . . . . . . . . . . . . . . . . . . . . . . . . . . . . . . . . . . . . . . . Capturing analog video . . . . . . . . . . . . . . . . . . . . . . . . . . . . . . . . . . . . . . . . . . . . . . . . . . . . . . . Capturing TV footage . . . . . . . . . . . . . . . . . . . . . . . . . . . . . . . .
ULEAD DVD MOVIEFACTORY USER GUIDE 5 Ulead DVD MovieFactory provides you with the answer to your disc-authoring needs. Instantly create Blu-ray, HD DVD, DVD, VCD, and SVCD video or slideshow discs through a user-friendly, wizard-type process and specific task oriented features. You can also enhance your video by adding transition effects, text, audio, interactive menus, and many others, or print disc label or cover to make your discs more attractive and interesting.
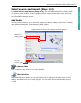
ULEAD DVD MOVIEFACTORY USER GUIDE To use the launcher: 1. Select a task by clicking the Video Disc, Slideshow Disc, Audio/Data Disc, Import, Edit Disc, Copy Disc, or Disc Tools icon. 2. Select an associated task option at the right hand side. Notes: • You can also click any tool icon located at the lower part to set project preferences, view disc and burner information, create disc labels, or copy movies using DVDCopy.
ULEAD DVD MOVIEFACTORY USER GUIDE 7 Click to format, erase, or finalize a disc. See “Disc Tools” for more details. Preferences Click to set your working folder, view product updates, register online, or view program information. Disc information Click to view the properties of the disc in your CD or DVD burner. Drive information Click to view the properties of your CD or DVD burner. Label@Once Click to open Ulead Label@Once and create a label for your CD or DVD disc. See “Label@Once” for more details.
ULEAD DVD MOVIEFACTORY USER GUIDE Video Disc Ulead DVD MovieFactory's step-by-step interface makes creating movies simple and easy. To create a video disc, click Video Disc on the Launcher and select an associated task. To create a new project, click New Project. Select your output disc type in Create Video Disc and click OK. • Blu-ray A format that allows recording, rewriting and playback of highdefinition video (HD).
ULEAD DVD MOVIEFACTORY USER GUIDE 9 Select source and import (Step: 1/3) Add Media You can add content to your movie by capturing videos, adding video files, creating and adding slideshows, and importing DVD videos. Toggle between showing and hiding advanced options Options for adding media Current project type Capture video See “Capture from devices” for more details.
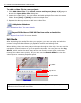
ULEAD DVD MOVIEFACTORY USER GUIDE To add a video file to your project: 1. Click Add video files in the Select source and import (Step: 1/3) page to launch the Open Video File dialog box. 2. Locate the video file(s). You can select and add multiple files under the same folder. Press [Ctrl] or [Shift] to select multiple files. 3. Repeat the above process to add more video files. Add photo slideshow See “Slideshow Disc” for more details.
ULEAD DVD MOVIEFACTORY USER GUIDE 11 The right-click menu • Move Left/Right Changes the position of the selected clip in the Media Clip list. • Change Thumbnail Changes the current thumbnail display. • Reset Thumbnail Restores the original thumbnail display. • Reset Enhanced Video Removes all enhancement made in the Enhance Video dialog box. • Recover Possible Lost AV Data Retrieves lost data from captured videos. • Audio Output Setting Includes audio data when exporting video.
ULEAD DVD MOVIEFACTORY USER GUIDE 3. Use the navigation controls or drag the Jog Slider to move to the point where the clip will end then click or press [F4]. 4. Click Play (or press [Space]) to view the trimmed video. Multi-trim Video Multi-trim Video lets you select multiple segments from a video and extract these segments to the Media Clip list.
ULEAD DVD MOVIEFACTORY USER GUIDE 13 Ulead DVD MovieFactory lets you search your videos for commercial intervals. Clicking this feature extracts the commercials to the media list. Detection sensitivity allows you to control the rate of distinguishing between commercials. Merge CF This feature merges all your extracted clips so that they appear as one thumbnail in your media list.
ULEAD DVD MOVIEFACTORY USER GUIDE The Text tab The Text tab allows you to add and format text. To add text to your video: 1. In the Text tab, drag the Jog Slider or use the playback controls to move between frames in the video. Stop when you reach the point where the text will be added. 2. Double-click the Preview Window to enter the text. Specify the duration, font type, size, color, and other properties.
ULEAD DVD MOVIEFACTORY USER GUIDE 15 The Audio tab To add audio: 1. In the Audio tab, click Add Audio to locate the audio file to add. The added audio files are displayed on the list below Add Audio. 2. To preview and trim an audio file or apply fade-in/out effects, click Set audio properties . The duration of all audio files in your project is displayed in Total duration. Note: Even if the audio is trimmed or edited, the actual audio playback duration remains the same as the video playback duration.
ULEAD DVD MOVIEFACTORY USER GUIDE The Effect tab The Effect tab displays various options that you can use to apply transition effects to your video clip. You can also add a transition effect anywhere in the video. Note: Click Auto Add Effects to easily add transition effects. DVD MovieFactory will scan the video for scene changes and add a transition effect at every point of the scene change.
ULEAD DVD MOVIEFACTORY USER GUIDE 17 To create or edit chapters linked to a video clip: 1. Select a video in the Media Clip list. 2. Click Add/Edit Chapter 3. Click Auto Add Chapters . The Add/Edit Chapter dialog box opens. . You can also drag the Jog Slider to move to a scene to use as the first frame of a chapter and click Add Chapter . Repeat this step until all chapter points have been added. 4. Click OK. Use Remove Chapter or Remove All Chapters to delete unwanted chapters.
ULEAD DVD MOVIEFACTORY USER GUIDE 4. Click Save. Note: You can also export more than one video clip. The file name you entered followed by a serial number will be used as file name for the succeeding clips that you export. Select a template to create menu (Step 2/3) To create menus and submenus, select Create menu in Select Source and Import (Step: 1/3). Clicking Next takes you to Select a template to create menu (Step 2/3). Menus allow the viewers to instantly access specific portions of your video.
ULEAD DVD MOVIEFACTORY USER GUIDE 19 Menu template categories SmartScene Menus uses both text and thumbnails. Hovering your mouse pointer over a chapter point text shows the thumbnail for that specific chapter. Selecting other text shows the corresponding chapter thumbnail. Note: The SmartScene Menus type is not supported in Straight Capture to Disc projects. The most commonly used menu type is Thumbnail Menus. The chapter points that you have previously created are represented as scene thumbnails.
ULEAD DVD MOVIEFACTORY USER GUIDE • Layout Settings Opens a menu of options for applying changes to menu pages or resetting them to their previous state. • Advanced Settings Opens a menu of options for adding title menus, chapter menus, and thumbnail numbers. • Customize Opens the Customize Menu dialog box where you can modify the layout, thumbnail frames and navigation buttons of your menu. • Menu In/Menu Out Opens a selection filters and transition effects.
ULEAD DVD MOVIEFACTORY USER GUIDE 21 Note: When working in the Customize Menu dialog box, use the Font dialog box to accurately resize text. The Font dialog box can also be launched by right-clicking the text and selecting Font Attributes. 6. To set menu pan and zoom effects, click Pan & Zoom. Select the category and your desired effect. 7. To set menu motion filter effect, click Motion Filter. Select your desired motion effect. 8. To modify menu in/menu out effect, click Menu In/Menu Out. 9.
ULEAD DVD MOVIEFACTORY USER GUIDE Editing menu thumbnail and text style After customizing your menu pages, you can edit your menu objects by doubleclicking them in the Preview Window. Double-click a frame, button, or text object to modify it. You can also right-click on these objects and select various options. Layout settings You can then choose to apply the same settings to other menu pages in your project.
ULEAD DVD MOVIEFACTORY USER GUIDE 23 Tip: As you mouseover the controls, tooltips display their specific functions. Press Burn button to create a DVD (Step: 3/3) This is the final step in the disc-authoring process. In Press Burn button to create a DVD (Step: 3/3), specify the settings for burning your videos or creating disc image files. To burn your project onto a DVD: 1. Specify the settings of your burning device in Disc burner. • Label Enter a volume name of up to 32 characters onto the CD/DVD.
ULEAD DVD MOVIEFACTORY USER GUIDE • Power off the PC when completed Select to automatically turn off your computer after the burning process. Tip: Click More settings for burning to define additional burner and output settings. 3. Click Burn to start the burning process. 4. After successfully burning your disc, a dialog box appears from which you can select the next step. • Return to Start page allows you to save the current project and begin a new one.
ULEAD DVD MOVIEFACTORY USER GUIDE 25 The Burning Options dialog box • Disc burner Specify the settings for your burning device. • Drive Select the disc burner to use in recording the video file. • Speed Select the recording speed to use in burning the video file. • Files to include on disc Choose additional items that you want to include on the disc. • Copyright information Includes copyright text or information about the author.
ULEAD DVD MOVIEFACTORY USER GUIDE Straight Capture to Disc Straight Capture to Disc provides you with a fast way to capture videos from a video device (such as DV camcorder, VCR, or TV) through an analog or IEEE-1394 (FireWire) interface card, and then burn them directly onto a video disc. When this task is selected, DVD MovieFactory will initially check both your burner and disc to ensure that there are no problems with your output device and media.
ULEAD DVD MOVIEFACTORY USER GUIDE 27 • Return to Start page returns to the launcher. • Continue stays in the Straight Capture to Disc dialog box for you to do another direct-to-disc task. • Close exits DVD MovieFactory. Note: Click Expand/Shrink preview window to enlarge the Preview Window and minimize the other options in the Straight Capture to Disc dialog box. This gives a larger view of your video. Click Expand/Shrink preview window again to return to the default Preview Window size and layout.
ULEAD DVD MOVIEFACTORY USER GUIDE 16:9 DVD In addition to the standard 4:3 display, DVD MovieFactory supports 16:9 display aspect ratio for videos and menus. This lets you create widescreen videos and burn them onto a DVD disc. To create widescreen videos, click and select 16:9 from the Display aspect ratio list in the Project Settings dialog box. The video clips and menus are then adjusted automatically.
ULEAD DVD MOVIEFACTORY USER GUIDE 29 6. Click OK after you have finished. Tips: • Click Add All to include all the photos in the current directory. • Click ExpressFix to fix common digital photo problems. • Select Match slideshow duration with background music duration to make the slideshow length the same as the length of the slideshow audio. You can also select Record a sound annotation to the selected photo to record voiceover for a selected image.
ULEAD DVD MOVIEFACTORY USER GUIDE Audio/Data Disc Audio/Data Disc allows you to select recording tasks, formats, and storage media using Ulead Burn.Now. You can compile audio files and create MP3 Audio CD, DVDAudio, or Music DVD-Video discs. You can also create data discs and store both ISO and UDF file systems. You can burn files and projects to CDs, DVDs, and dual-layer DVDs. You can also perform multi-session burning of dual-layer DVD-R using Layer-Jump Recording technology. Burn.
ULEAD DVD MOVIEFACTORY USER GUIDE 31 2. In the Select source and import (Step: 1/3) page, click Capture Video 3. Select a Capture mode: • Fixed duration sets the total duration to be captured. • Full DV tape captures the whole DV tape from tape start to end. 4. To adjust the capture options, click . • Format allows you to select the file format of the captured video. • Capture folder shows the path of the folder where captured videos are saved. Click Browse to select a different folder.
ULEAD DVD MOVIEFACTORY USER GUIDE To capture video from an HDV camcorder: 1. Connect your HDV camcorder to the IEEE-1394 interface card. Turn it on and set it to Play mode. 2. If you have a Sony HDV camcorder, make sure it is switched to HDV mode. 3. In the Select source and import (Step: 1/3) page, click Capture Video to open the Capture Video page. The source device connected to your computer is displayed in the Source list. 4.
ULEAD DVD MOVIEFACTORY USER GUIDE 33 5. Select the appropriate Capture mode. Note: You can click TV Manager to edit the list of channels in the TV Channel Manager dialog box. 7. Select the appropriate video format from the Format list. 8. Click Capture Video to start capturing. 9. Click Stop Capture or press [Esc] to stop capturing. Capturing still images In addition to video, DVD MovieFactory allows you to capture still images in BMP or JPEG.
ULEAD DVD MOVIEFACTORY USER GUIDE Capturing video directly to MPEG format DVD MovieFactory allows you to capture video from a DV camcorder or analog source straight to MPEG. To capture video in MPEG format: 1. Connect your camcorder or VCR to your capture card. Switch it on and set it to Play (or VTR/VCR) mode. 2. Select a DVD, VCD, SVCD, or MPEG format in Format. 3. Click Capture Video to start capturing. 4. Click Stop Capture or press [Esc] to stop capturing.
ULEAD DVD MOVIEFACTORY USER GUIDE 35 To import DVD video: 2. Locate the DVD drive that contains the video files and click Import. Note: Click Import DVD Folder to search your hard drive for the video files. Browse for the DVD folder and click OK. 3. The Import DVD dialog box opens. 4. In the left pane, select the video clips to import. 5. Click Import. The imported video files are displayed in the Media Clip list.
ULEAD DVD MOVIEFACTORY USER GUIDE Edit Disc With DVD MovieFactory, you can modify videos and menus directly on a rewritable disc or add files and folders on an appendable disc. To edit a disc, click Edit Disc in the Launcher and select the type of disc to modify. You can also modify the contents of your disc by clicking Edit Disc in the DVD MovieFactory main program. To edit a disc in the main program: 1. Insert the disc to edit and click Edit Disc. 2.
ULEAD DVD MOVIEFACTORY USER GUIDE 37 Disc Tools allows you to format, erase, and close your disc. Format Disc Select Format Disc to open the Format Disc dialog box. DVD MovieFactory allows you to write the UDF (Universal Disc Format) file system to a rewritable disc to enable random packet writing. Random packet writing allows disc space to be used more efficiently when burning data onto the disc.
ULEAD DVD MOVIEFACTORY USER GUIDE Save DVD MovieFactory (*.DWZ) file using the date as the file name. If you are just saving the changes you made in an existing project, its original file name will be retained. Save As Saves a copy of the current project. Preferences Select to set the program's working environment through the Preferences dialog box. To open the Preferences dialog box, click Settings and options and select Preferences or press [F6].
ULEAD DVD MOVIEFACTORY USER GUIDE 39 • Video transition effect duration Specify how long a video transition effect is displayed on screen. • Audio fade-in/out duration Specify the amount of time it will take for the volume to reach normal levels when fading-in or the lowest level when fading-out. • Working folder Enter or locate a folder for temporary files. Advanced • Create index file for MPEG seeking performance Improves real-time preview result using the Jog Slider.
ULEAD DVD MOVIEFACTORY USER GUIDE Product Updates on the Web Opens the Ulead Web site to inform you about new updates & patches or product releases. This also gives you access to the latest offerings or promotions related to the product. Online Registration Launches your Web browser then takes you to the page on the Ulead Web site where you can register your copy of Ulead DVD MovieFactory. About Ulead DVD MovieFactory Displays product and copyright information about Ulead DVD MovieFactory.
ULEAD DVD MOVIEFACTORY USER GUIDE 41 • Auto repeat when disc playback ends Select to automatically replay the video after disc playback ends. • Clip playback Determines what to display next after the playback end of a video clip. Clear Auto repeat when disc playback ends to enable this item. Display aspect ratio Toggles between standard 4:3 and widescreen 16:9 display aspect ratios for videos and menus. You can also set display aspect ratio by clicking .
ULEAD DVD MOVIEFACTORY USER GUIDE • Texture Select to use an image file as background for your disc label. Click Browse to select the image file to use. • Color Select to use a solid color as background for your disc label. Click the color box to select your desired color. • Transparency Adjust the transparency of the background by entering a value or using the slider. The Image tab allows you to adjust images in your disc label or cover design. • Brightness A higher value produces a brighter image.
ULEAD DVD MOVIEFACTORY USER GUIDE 43 Add Text Adds a text object to the label. Playlist Opens the Add/Edit Playlist Information dialog box to allow you to add information on the label such as the album title, artist name, as well as date. Clear content Click to remove all objects and background from the disc layout. This is useful when starting over with your design. Other options • Show/Hide Disc Click to show/hide the outline of the disc for better alignment of images or text.
ULEAD DVD MOVIEFACTORY USER GUIDE Designing from scratch When creating a disc label, you can add and customize the look of your images and text. To add a background image to the disc label: 1. Click the General tab. 2. Select Texture under Background and click Browse to locate the image file to be used as texture. Click Open. The image will be tiled on the label. To use a solid color as the base of your disc label: 1. Click the General tab. 2.
ULEAD DVD MOVIEFACTORY USER GUIDE 45 To add text to your disc label: . This automatically activates the Text tab. 2. Format the selected text by adjusting the font type, size, style, text color, and alignment. Adjust the text Transparency level accordingly. 3. Click a thumbnail under Wrap text to make the text wrap around the disc label. Select Auto fill if the text is too short to make a circle. 4. Select Shadow to add a shadow to the selected image, and click the color box to set the shadow color. 5.
ULEAD DVD MOVIEFACTORY USER GUIDE Designing based on a playlist You can also design a label or cover for your discs based on a playlist. You can then use these as title or track names for your disc label. To design a label based on a playlist: 1. Click . The disc label is displayed in the Preview Window of the Label@Once dialog box. 2. Click Playlist to open the Add/Edit Playlist Information dialog box. 3.
ULEAD DVD MOVIEFACTORY USER GUIDE 47 DVDCopy With DVDCopy, you can copy your DVDs, VCDs or SVCDs or other video files on to different types of discs in only three steps: Step 1: Select the source of the original movie. Select a video from your available DVD or CD drive or a file on your hard drive. Step 2: Select or specify your target location for your copied files. Step 3: Specify the file type to copy to. These are: DVD, DVD image, VCD, SVCD, DivX AVI/Media, WMV, 3GPP, 3GPP2, MP3, WMA, and WAV formats.
ULEAD DVD MOVIEFACTORY USER GUIDE Glossary Analog DV A signal that continuously varies in frequency/quantity, rather than discrete units found in digital devices. Information from an analog source must be converted to digital in order for a computer to interpret it. Abbreviation for Digital Video, which is a very specific format of video. DV can be played back/recorded by your computer if you have the proper hardware (capture card) and software (DV codec).
ULEAD DVD MOVIEFACTORY USER GUIDE 49 Normalize audio Abbreviation for Linear PCM which is a high quality uncompressed audio format similar to CD audio, but with higher sampling frequencies and quantization. Bandwidth for video on a DVD video disc is lessened if LPCM audio is used. This function evaluates and adjusts the audio waveform of video used in a movie according to the highest peaks and correcting the rest accordingly to avoid volume level variation.
ULEAD DVD MOVIEFACTORY USER GUIDE Index A Add Chapters 16 Add Media 9 Adding video files 9 Ad-Zapper 13 Anti-flicker filter 38 Audio fade-in/out duration 39 Audio/Data Disc 30 Editing a slideshow 29 Editing menu thumbnail 22 Enhance Video 13 Enhancing your video 13 export selected clips 17 H HD DVD 8 B I Blu-ray 8 Bootable Disc 37 Buffer underrun protection 25 Burn 23 J C Capture Options dialog box 32 Capture video 30 Capturing analog video 32 Capturing still images 33 Capturing TV footage 32 Cre
ULEAD DVD MOVIEFACTORY USER GUIDE 51 P R Resample quality 38 S Settings and Options 37 Slideshow Disc 28 Slideshow image duration 39 Straight to Disc 26 For DVD, VCD, or SVCD 26 T The right-click menu 11 Transition effect duration 39 TV safe area 39 TV system 38 Two-pass conversion 40 V VCD player compliant 38 DVD MovieFactory Preferences 38 Preview 22 Project Settings 40