
Operation Manual


MEDIASTUDIO PRO USER GUIDE
184
Customizing a transition
There are a number of options available in the Transition Options dialog
box that let you customize your transition. The variety of these available
options depends on the type of transition you are applying. The following is
just one example among hundreds.
To customize a transition effect:
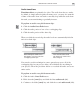
1. Insert a Box-Wipe transition effect between two
clips.
Note:
Clicking the green arrow switch changes the direction of
the transition effect from Va-->Vb to Vb--->Va.
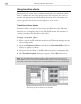
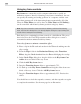
2. In the Transition Options dialog box, adjust the
Divide by X value to 2. This divides the screen
vertically to produce two box-wipe effects on the
screen at the same time.
Note:
Double-click a previously inserted transition to open the Transition Options
dialog box. It is automatically opened when you insert a new transition only when the
Display Options dialog box option is selected in File: Preferences: General tab.
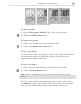
3. Enter a Border value of 1. Change the color of the border by clicking on
the Color square and selecting a color.
4. Select one of the two Direction buttons to set the movement of the
transition.
5. Enter an X value of 60 and a Y value of 50. This is the starting position
of the transition effect.
Note:
You can also set the starting position by dragging the control point that appears
in the center of the sample image. This option may not be available for all effects.
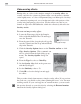
6. Click OK to close the dialog box and apply the attributes to the transition
effect. Preview the new transition.
Box-Wipe Transition