
Operation Manual

ULEAD PHOTOIMPACT USER GUIDE
83
5. Drag the sliders and watch the Preview Window to see how the new settings
are affecting the image.
Tips:
•Click Auto to let PhotoImpact automatically adjust the image.
• Click if you want to save adjustments to the EasyPalette for future use.
6. Click OK.
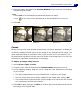
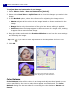
Curves
Editing curves is the most straight-forward color correction approach. It allows you
to directly remap the tonal values in the image or any channels of the image. The
most important thing to remember with curves is the X and Y axis relation. The
horizontal axis represents current values of pixels in the image from 1 to 256. The
vertical axis represents tonal values in the image.
To adjust an image using Curves:
1. Select Photo: Light - Curves.
2. Choose a color channel and select an Enhancement method to work on.
3. In the mapping window, drag the line to remap the color distribution according
to your needs.
• The gray graph shows the current distribution of colors in the image.
• The line shows how colors will be mapped to the image after clicking OK.
• The horizontal axis represents the current image color values and the vertical
axis represents the final color values.
4. Click OK to apply changes or Reset to reverse all previous actions and restore
the image to its original state.
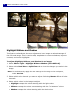
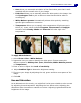
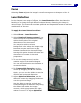
Highlight=30 Midtone=0
Shadow=0
Highlight=0 Midtone=30
Shadow=0
Highlight=0 Midtone=0
Shadow=30