
Operation Manual


122 PHOTOIMPACT USER GUIDE
Creating smooth-edged selection areas
Choose Anti-aliasing from the Options menu to smooth out selection area edges. It is especially
helpful in keeping curved selections smooth. However, since Anti-aliasing modifies the edges of
selection areas, the extent of the selection area may change.
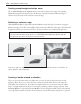
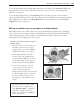
Softening a selection edge
Click Selection: Soften (or right-click and select Soften) to make the edge of a selection area appear
diffused, creating a “halo-like” effect. Higher values increase the diffusion of the edges. This effect will
be apparent when you convert the selection to an object and move it to a different background.
Note:
If you do not have Preserve Base Image [F5] selected and you move the selection, you
will notice that the base image shows a corresponding diffuse-edged hole filled in with the
background color where the selection area was before.
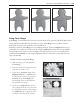
Creating a border around a selection
There are various instances when you might want to create a border around a selection area. By
applying a fill to this area, you can easily create a frame around the main subject of an image (for
rectangular and oval selections). If you have an irregular selection, you can create a custom outline
shape, or simply emphasize the subject of an image by outlining it. After creating a selection, click
Selection: Border (or right-click and select Border). You can specify the width of the border and add
a soft edge if desired. After the border selection has been created, fill it with a selected color or pattern.
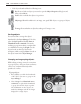
From left to right: the original selection, the softened selection, and the selection converted to an
object against a dark background