
Operation Manual


260 PHOTOIMPACT USER GUIDE
Web Slide Show
Web slide shows are a popular way of presenting images. However, creating them usually requires
intensive coding and programming knowledge. With PhotoImpact, you can now incorporate slide
shows into your Web pages without worrying much about the tediousness task of coding.
A single web page can hold multiple slide shows. Like script effects, you can specify the event that
precedes each show. You can control mouse-click behavior and add descriptions to each slide, or set
the Play duration.
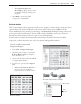
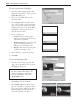
To create a Slide Show
1 Using the Slice Tool, slice a Web page
according to your preferences.
2 In the Slice Panel, select an image cell
where you will place the Web Slide
Show. Set its script effect as Triggered
by Cell.
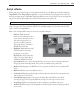
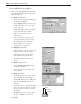
3 In the Script Effect Tab, click Add
Script Effect and select Slide Show.
4 In the Images Tab, select image files
that you want to use as slides in your
slide show. Click Add for every image
you want included. Repeat this step
until you get all images you want. You
can also drag images in the Preview
window images to rearrange the order.
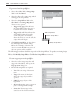
Note:
Set a hyperlink for each of your
images by specifying a remote or
local file in the URL. You can also add
some image information by typing a
short description in the Description
text box.
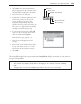
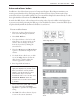
5 Click the Layout Tab and select a cell
where you will place slideshow controls.
6 Select the slideshow controls to add and
assign functions to each. Optionally,
you can add description regions in the
Image tab.
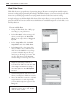
Note:
Each cell can be assigned one
slideshow control. Try to use smaller
cells for every control.