
Operation Manual


CHAPTER 3: GETTING STARTED 61
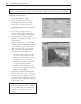
Cropping an image
Cropping trims the edges of an image and removes unwanted areas. To crop an image, select the area
you wish to retain and select Edit: Crop [Ctrl+R]. Crop references crop dimensions, even if there are
multiple objects in a document, or if the crop area covers only part of a selection. To have better
control on the crop dimensions, use the Crop Tool in the Tool Panel instead. It provides you the
capability of defining crop dimensions based on a selected area together with other objects present in
the image. Another very important function it has is that it allows you to save the crop dimensions
information to the EasyPalette, so you can use the same exact settings for trimming other images in
the future.
Notes:
•
If you select a non-rectangular area, the image is cropped to the smallest rectangle that
can contain the selected area.
•
When cropping the base image, all objects are not merged.
•
Use either Auto-process Crop or Post-processing Wizard to quickly crop an image that
has extra space along its borders.
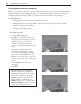
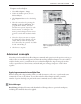
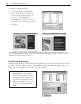
To use the Crop Tool:
1 Click Crop Tool in the Tool Panel.
2 Make a selection on your image. By
default, all areas to be cropped will be
covered by a semi-transparent shield.
You can make adjustments to your crop
area by dragging the corners of the crop
bounding box.
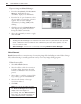
3 Alternatively, you can use preset crop
shapes by clicking Shapes and making a
selection. This feature does not actually
give an exact-size crop, but provides a
specific ratio of the crop shape.
Note:
To retain crop proportions even
when adjusting, click Keep aspect
ratio on the Attribute Toolbar.