
Operation Manual

VIDEOGRAPHICS LAB USER GUIDE
12
Guides are reference lines that you pull out from either the horizontal or
vertical rulers. When you pull out a guide, it appears as a dotted line which
you can use to mark certain areas within the edit window. You can have
any number of guides which can be easily repositioned by dragging on
them. To remove a guide, drag it off the edge of the edit window using the
Object tool.
Customizing the grid and guides
The default color for grid points and guides are red and blue respectively.
Depending on your background, as well as the color of your objects, you
may want to change these to make them easier to identify. To do this, click
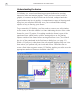
View: Grid & Guide Options to open the Grid & Guide Options dialog
box. Here you can specify the color for both the grid points and guidelines
as well as control the horizontal and vertical spacing between each point in
the grid. If you want your objects to "snap to" grid points or guides, select
the Snap to distance option and specify the range within which a snap
should occur. For example, a range of 5 pixels pulls an object to a grid
point whenever it is placed within 5 pixels of that grid point’s position.
Notes:
• "Snap to" works on the rectangular area of an object’s bounding box and not the
path of the object itself.
• For objects to snap to grid points and guides, you need to first select the Edit:
Snap to Guides and Snap to grid commands.
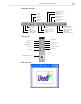
Aligning objects
While the above methods allow you to accurately place objects within an
edit window, you may also want to align a group of objects so that they
appear along the same horizontal or vertical plane. To do this, CG Infinity
provides the Edit: Align command which opens the Align dialog box. Here
you can select to position objects vertically in columns or horizontally in
rows. You can also specify to have the objects appear to the left, center or
right of each other.