EXHIBIT FEDERAL COMMUNICATIONS COMMISSION NOTE This equipment has been tested and found to comply with the limits for a Class B digital device, pursuant to Part 15 of the FCC Rules. These limits are designed to provide reasonable protection. This equipment generates, uses and can radiated radio frequency energy and, if not installed and used in accordance with the instructions, may cause harmful interference to radio communications.
User's Manual LS User's Manual How to use this manual? @ Chapter 1 : Introduction @ Chapter 2 ;: Operation @ Chapter 3 : Error Message @ Chapter 4 : Troubleshooting @ Chapter § ; Specification @ Chapter 6 : Glossary @ Chapter 7 : Registration — Ela TY 122 ed rm manna FN reactant him Page 1 of 1 1/22/99
How to use this manual? Page 1 of 1 How to use this manual? Welcome to this manual. In this Manual, cache page is provided with a browsing column separating from browser tool column. You may browse the whole Manual by using the box on the upper left corner or on the bottom. + Please press the box on the upper left corner to review the inventory list that covers inter-connected chapters. + Please press the arrow on the left or right for the preceding chapter or the following chapter.
Introduction Page 1 of 2 Introduction Preface Powerful Scanner Feature How does the scanner work? Something hold know! What's on this CD? Preface This scanner is a one-pass 600 dpi (dot per inch) color desktop scanner that will scan images into B&W. Gray scale and True color digitized format. It can communicate with image-processing applications and OCR (optical character recognition) utilities running on IBM PC or compatible platforms through the popular TWAIN interface protocol.
Introduction Page 2 of 2 Unexpected results will happen if your system does not meet the requirements. What's on this CD? & We have included a host of related information and software resources for use with this scanner on the enclosed CD title, You can install] the scanner driver and other bundled software as well as read the user's manual, ail by simply inserting CD) into your CD-ROM drive.
Operation Page Operation [Getting Started [Main J Advance [Monitor [Preference | You can scan anything that you can put on the Glass Platen, The Document Cover allows you to scan thick documents (about 2 centimeters) like books and magazines. You can even remove the Document Cover to scan very thick documents. Please keep in mind that heavy objects may crack or even break the Glass Platen.
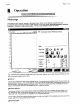
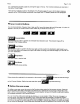
Main Page Operation [Getting started [Main [Advance [Monitor [Preference] Main page This page lets your scanner operate in the basic mode. All the control settings available here are fundamental to the scanning process. These settings include scan mode, scanning destination, resolution, brightness, contrast and scan control button. The Main page window is shown as folios.
Main Page 2 of 6 You can flip these property pages by clicking the tags on the top. Their functional details are described in the section of each page. There are four buttons located on the bottom of the Property pages for you to do the basic scanning operation of the TWAIN source window with one simple click. For details, please see next paragraph o R Scan Control Buttons Four functional buttons, Pres can, Scan, Help, and Exit, are at the lower right end of the page.
Main Page 3 of 6 left corner of the Preview Window. After reviewing the pres can image, you can use various image enhancement tools to strengthen the look and quality of your final scanned image. Please refer to Advance page for more details. dD Main Settings = Object Type There are many functions in Object Type section. You can make the most of them to acquire the best image quality.
Main Ape 4 of 6 leo mode elect Color made for color images. feo mode Select Gray mode for images that contain 256 shades of gray. ew mode Select B/W for texts and illustrations that contain only black and white without gray shading, ® Destination Destination is the location where you would like your final scanned image to be sent. There are six options available: Application, File, Printer, Email, Fax, and Clipboard.
Main Ape Sof 6 Scaling 4 | ood] ® MW Resolution The resolution is measured in dots per inch (dpi), which is used to represent the image detail in a given area. The available resolution ranges from 50 to 19200 dpi. Generally, the higher the resolution, the sharper and higher the quality of the scanned image.
Main Page 6 of 6 Brightness 4 | BN For B/W images, adjusting the brightness of a pres can Image is actually setting a threshold for the scanner sensors to interpret the scanned data. Data above the threshold will be interpreted as the white area, while data below the threshold as the dark area.
Advance : Page Operation [Gunge Stared Main J Advance [Monitor [Preference] Advance page While including the basic functions on the Main page, the Avarice page also encompasses [mage Enhancement Tools that can be used to compensate for any color distortion of the scanned images. Also, the Batch Scan lets you scan more than one selected scan area with a single operation. The Avarice page is illustrated as follows.
Advance Page 2 of 8 Gamma correction Sometimes you may want to adjust the brightness of mid tones of the scanned image while keeping shadow and highlight areas relatively unchanged. The Gamma correction function allows you to increase or decrease the intensity of the mid tones. Clio the following window is displayed EELS) Gamma values (0.01 7.99): li] A The available gamma value ranges from 0.01 to 7.99. Changing the gamma value above 1.0 will brighten the mid tones, and below 1.0 will darken the mid tones.
Advance Page 3 of 8 Click , and the Hue & Saturation dialog box will display and allow you to adjust the hue and saturation of the image while keeping the brightness level unchanged. Hue is the wavelength of light reflected directly from an image and it is represented by the name of colors. Adjusting the hue changes the whole color appearance of the image. Saturation is the strength of the color, referring to how far away the color is from a gray tone of equate intensity.
Advance Page 4 of 8 You can adjust the tone value by using the mouse cursor to reshape the tone. Curve-based editing enables you to find out a problem area and makes small or large changes to that image area. The Tone curve takes an original pixel brightness value X as input and Y as a new output brightness value The resulting curve is a visual representation of the balance between shadows, mid tones, and highlights.
Advance Page ZoBrfifg Tn, "d vertical Scroll bar and/or a| horizontal bar will pear to let you scroll through the entire image. 2 de AR The Invert function lets you obtain a positive view of a scanned image negative or a negative image of a positive original. By applying this function, the brightness value of each pixel will change to the inverse value on 256-color scale. 4 To invert an image: Click after applying the Pres can function.
Advance Page Press to acquire the adjusted image Filter Filters are provided to produce dropout effects, i.e. to rap the part of the image that is in a color difference from the specified filter. Three options are available: Red, Green, and Blue filter, Note: Filter only functions in Gray and BAW mode. Effect offers you the ability to create special and spectacular effects to your scanned image and let you get some amazing results.
Advance Page 7 of 8 Color Correction If this function is checked before scanning. you San acquire fidelity images. Batch Scan Batch scan is a very useful function that allows you to define multiple areas with different image settings in the Preview Window and then to scan the defined areas in a single operation. Please remember to pres can the document before applying the Batch Scan function.
Advance Page 8 of 8 You can define as many as 20 scan rectangles in a Preview Window. Simply drag the box in the scroll bar or click on the arrow icon on the right of the Batch Scan box to view more defined rectangle areas After defining several scan areas, if you would like to scan only one, simply release the check of the Batch Scan box. The information of all other scan areas in the Batch Scan List becomes gray except for the active area.
Monitor Page 10f2 BE Operation [Getting Started [Mam [Advance [Mont tar [Preference | Monitor page The Monitor page allows you to calibrate the monitor color by adjusting the gamma value and gain parameters of your monitor to increase the visual perception. It appears as follows. mate (%e| Man | Advance Moniker | Preference | About | Animator Calibration: . Gamma Adjustment (0.01~ 7.99} WHT df ea i» Gain Adjustment (1.00 ~ 2,00) Size.
Monitor Page vary the gamma values of the three channels together, check the “All” box In the “Gain Adjustment” box, adjust for a suitable gain parameter for each of the primary color channels. CA Adjust the value in the box until by your visual judgment, the rightmost edge of this color strip appears black which fades in graduation to the left To vary the gain values of the three channels together, check the “All” box.
Preference Page Operation [Getting Started [Main [Advance [Monitor [Preference Preference page The Preference page lets you adjust the following settings: Auto scanning setting, Pres can image area auto detection, Calibration, and Default destination setting. The preference page is shown as follows.
Preference Page 2 of 3 Open the TWAIN source window. Locate the Auto Scan button which is situated in the front panel of the scanner Press the Auto Scan button. The scanner will start the scanning process. The scanner will perform the auto area detect function if the prescience image Area Auto Detection; option is checked to define the actual area of your scanned image.
Error Message 8 Error Message Preface Elaboration on Error Message 3 Preface Page might pop-up some messages as you launch the scanner driver. We will explain the errors on the following list. {Elaboration on Error Message The error message list Error Message Solution Insufficient memory to operate. Adjust the width of The scan area or the resolution Close all the other applications, Can't load dynamic library. Failed to load the scanner driver.
Troubleshooting Page Troubleshooting Preface Frequently Asked Question Preface This section describes same abnormal conditions that may appear in the scanner. If your scanner fails to operate normally, first look through the symptoms listed below and find the one that is closest to your scanner's symptom. Try to solve the problem according to the recommended remedies listed under each symptom.
Troubleshooting Page 2 of 2 Remove the display screen filter if you have one. Adjust the light source on your desk. | the Gamma value.
Specification Page Specification 7) i@ >> General Specification 1. Scanning Method 2. Scanning Width 3. Scanning Length 4 Scanning Mode 5. Optical Resolution 6. DPI Selection 7. Interface 8. Contrast Control 9. Scan Button 10. Exposure Time Il. Paper Size Limitation Color Depth Temperature wir 14. Humidity >> Regulation Requirement Safety : UL 1950
Glossary Page Glossary Vocabulary The following vocabulary in alphabetic order will be found in this document. oB Brightness The amount of whiteness in a color, one of the three-color components (Hue, Saturation, and Brightness) of the HSB color model. Browser A browser is your window to the World Wide Web with hyperlinks, protocols, servers, media, and hypermedia in the world. oC Calibration Adjusting devices so that information is transferred from one system to another in a consistent.
Glossary Pageant device. Interpolation A Re sampling method used to create more pixel information by averaging the existing pixel information, oL LED Light-emitting diode, an exposing element. M Midterm The 50 percent dot printing area. Moire A visible, undesirable dot pattern made from incompatible screen angles or a pattern in the original copy. oP Pixel (Picture Element) The smallest element of a digital image that can be individually processed.
Registration Page Registration Registration Technical Support Information Registration If you would like to register on-line please connect to the internet before filling out the following registration form. You can also print out the form, fill it out and send it back to us via courier or via email. For fax and mail information, please refer to "Technical Support Information". Thank you! 1. General Information ) First name] Last name: Sex: « Mr. Ms.
Registration Page 2 of 4 Germany Italy Japan Korea Netherlands Portugal Russia Spanish Taiwan (ROC) United Kingdom » United States Others ( please specify! ) Home Phone Number Office Phone Number Email address] This is the first scanner you've ever purchased o Yes No Have you ever used scanner before? @ Yes No Which ONE category best describes the business or service you do? » Accounting/Finance Administration Art design Communication/public relation Data multiprocessing Document preservation Education/ Tra
Registration Page 3 of 4 You purchased the scanner mainly for: Data (Text/Image) input Fun Professional image/art work design Web page design Other ( please specify: ) and often you use it with: Negative film Newspaper Magazine Photo Spreadsheet Transparency Text document Other ( please specify: ) Type of computer used: IBM 486 586 Pentium Pentium 2 compatible Notebook Laptop Palmtop MAC Type of computer used: Windows MAC Which software bundled with scanners will help you the most? Image application softwar
Registration Page d of 4 Web pages ( please specify the URLs: ) Other{ please specify: ) IV. Suggestions and Comments {Technical Support Information Headquarters TEL: +886-2-22256300 EXT 7352 FAX: +886-2-22252674 artec.com.tw E-mail: service@mail ultimatum. tw ss: 7F, No.100, Li De Street, Chung Ho City, Taipei Shine, Taiwan, R. O. C.
— FEDERAL COMMUNICATIONS COMMISSION Authorization and Evaluation Division 7433 Oakland Mills Road Columbia, MD 21046 USA : Re: About the modification of SCANNER Gentlemen: : I, hereby, declare that all modification on the EU.T., ! ARE FCC ID:ITEVECVS12USB FCC ID: ITEUECVS12USB, will be added or layout on the mass production products. Modifications are shown as below: 1. Add a fer rite core on the I/O cable (shield) at the scanner end. (As the photo No.2) ’ ; 2.