www.UltraDisk.co.
Table of Contents Function overview .......................................................................2 Technical specifications ................................................................2 Precautions.................................................................................3 Appearance and buttons ...............................................................4 Operation ...................................................................................5 Turn on the recorder ..............
Function overview • One-key recording. • Three recording modes. • LP is hold and recording, ACT format • SP is good quality recording & Voice Activated recording, WAV format. • HP is high-Quality recording, MP3 format • Recording monitor and hearing aid function. • USB plug & play, no need USB cable. • Record telephone conversations. • Record via external microphone. • Automatic recording-section-break function. • Recording time setting function. • Work as Music player. • Low-battery indication.
Precautions Please turn off the recorder and push the power switch to “OFF” side if you are not using the recorder for a long time. Please recharge the battery properly when the lowbattery indication shows on the screen. Please read the instruction manual carefully before using. Please keep it away from moisture and high temperature, and don’t put it near the fire. Please avoid strong vibration or shocks when using the recorder. Do not press the screen forcefully.
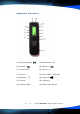
Appearance and buttons (1) Play/stop playing( (3) Forward( ) ) (2) Menu/Delete(M ) (4) Backward( ) (5) Record(REC) (6) Volume(+) (7) Volume(-) (7) Power Switch(OFF/ON) (9) Earphone( ) (10) Signal-in( ) (11) Screen (12) USB plug (13) indicator light (14) Built-in Microphone Page |4 Copyright UltraDisk™ 2009 All rights reserved
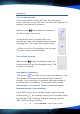
Operation Turn on the recorder If the power switch is at the OFF side. Push the power switch(OFF/ON)to the “ON” side. The screen will light up in 5 seconds, the recorder is turned on. Hold and press button when the recorder is off, the recorder is turned on. If there are SP and LP recording files, the recorder will enter into standby Playing mode for recording files. The screen shows picture (top): If there is no SP or LP recording in the recorder.
SP recording mode is the defaulted recording mode in the recorder. And it is also defaulted as Voice Activated Recording. Setting the recording mode Setting recording mode: Press “Menu” button to enter into the main menu. Press the or button to select the recording modes. Press “M” button to confirm the selection.
will automatically start recording when the microphone detects sound input. The screen shows: Attention: When screen shows “FUL”, it indicates the disk is full or the battery is low. Please check which it is by connecting to the PC. If the memory is full some files should be deleted to keep enough space to save new recording files & other PC files. The recorder can save 200 individual pieces of recording files. Attention: Please don’t switch off the power when recording is in progress.
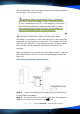
Step 3.Select the suitable recording mode in the recorder. Press “REC” button to start recording. Record through external Microphone: Step 1. Insert the external Microphone in the Jack. Step 2. Turn on the recorder. Press “REC” button to start recording. Record audio via Line-in: Step 1. Connect one end of a stereio line-in cable with the audio output of external player and the other end with jack of the recorder. Step 2.
Automatic section-break After recording for a full 4 hours, the recorder will automatically start a new file to continue recording. Play LP & SP recordings. Press or button in the main menu to select the recording file menu “VOS”. Press “M” button to enter into the recording file menu. Press to play the recordings. Re-press to pause / stop playing. Press after stop recording to play the present recordings. Re- press to pause / stop recording. Play HP recordings.
Record-time setting Press or button at standby mode to select the time-setting mode: Press “M” button to enter in. Press or button to select the part which should be adjusted. The selected part will flash. Press “VOL+/VOL-” button to adjust the part. After finishing setting the time, the recorder will automatically confirm the setting. The recorder will come back to the main menu in 10 seconds or press “M” button to enter into the main menu.
Music player Mode To enter into music mode press or button at standby mode to select the Music plater, as picture 1. Press “M” button to enter into the music standby mode as picture 2. 1 2 Please Note: If there’s no music or HP recording in the recorder. The recorder will back to main menu after press “M” button. Play and stop playing music: Press Repress button to start playing after enter into music mode. button to stop playing. Adjust volume: Press “volume+/volume-” button to adjust the volume.
Stop repeating:The recorder it will repeat all the time when repeating recorded files. Press “REC” button or press “M” button to stop repeating playback. The recorder will automatically stop repeating after playing a section for 3 times when repeating music files. Delete In the recording and playing mode, select the file which should be deleted. Press “M” button for 3 seconds to delete the one you selected.
Scan Channel: Briefly press scanning. Press and hold or or button for manual button for automatic scanning. If the channel is scanned, the recorder will stop to playback the channel automatically. Save the scanned channel: Briefly press “REC” button to save the channel when recorder has scanned and found the new radio channel. After saving the channel, press E.g. Press button to play the saved channels. button once, it will play the first channel “P01”. Repress for next channel “P02”.
Recharge the battery Please insert the USB plug into the recharger. Insert the charger into the AC plug (110V-250V). The recorder’s indicator light light up, the recharger’s red and green indicator light up indicates power recharge is proceeding. After the recharge is over. The recorder’s indicator light will off, the recharger’s red indicator light will off also. And “ FUL” will display on the screen of recorder: Please use up the power before the first recharge.
Installation of drivers Place the accompanying CD into the CD ROM of PC (or manually operate the “set up. exe” in the CD), enter in installation interface, click “Next” button, click “Next” button after selecting installation path. Click “Next” to start installing the program. After successful installation, click “Close” button to fulfill software installation. To start from PC’s “Start” → “Program”→ “MP3 Player Upgrade、Sound Convert”.
Attention: Before converting the ACT file, please rename or backup the recording file in WAV format which has the same code with ACT format need to convert. For example: We want to convert “REC001 ACT” to WAV format. Before converting it, we have to rename the “REC001”. Otherwise the new file “REC001” created by converting will replace the original “REC001”. Trouble shooting The recorder cannot turn on.