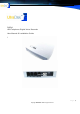
Telephone Voice Recording System DVR14 USB Telephone Digital Voice Recorder User Manual & Installation Guide l P a g e |1 Copyright UltraDisk™ 2010 All rights reserved
Table of Contents Basic Features: ..................................................................................................................................................... 4 System Characteristics ......................................................................................................................................... 5 Installation ......................................................................................................................................................
Telephone Voice Recording System Setting an Alarm ................................................................................................................................................. 24 Work Time .......................................................................................................................................................... 25 Find & Play (Recording Search) .................................................................................................................
Basic Features: 1. Supports Windows 98 / NT / 2000 / XP / 2003 2. Provides USB device for 2 Channels ,PCI Card for 4, 8 and 16 Channels and Digital Recording for 30B+D (*30) 3. Can monitor real time conversations on every line. 4. Support 3 video modes or customization : Auto-recording, Voice-control and Manual recording by using the keys 5. Can list and print out all the Incoming / Outgoing / Missed calls. Supports the conditional inquiry and special remarks. 6. Can record the call directly.
Telephone Voice Recording System System Characteristics 1. Easy to install and operates efficiently with good stability and reliability. 2. Supports Duple/Quintuple/Octuple compressions and saves in WAV format. 3. 16Ch card with Octuple compression can optimally and simultaneously record for single device with 160Ch Digital card. Optimally and simultaneously record for single device with 300 Ch. And the channels do not interfere with each other. 4.
Installation Hardware Requirement Suggested PC CPU P4 / 2.8 GHz or above Suggested Memory 512 MB or above Suggested Hard Disk 80 GB or more * Recording USB BOX Installation 1. Insert the Recording USB BOX cable line into the PCI slot. USB Cable to PC PHONE LINE USB Recording Box Installation and Cable Connection a. Connect the phone wire to the Recording Box’s LINE1, TEL1 is down-lead to Phone as showed. b. Connect the USB cable into the USB port in the PC.
Telephone Voice Recording System Recording software Installation Default Admin password: 88888 After installing the recording card, start the PC and install the Recording software. 1. Double click the Setup.exe file in the Installation CD. Setup Wizard will guide you through the installation process. 2. A shortcut will be added in the Desktop and in the Program menu under All Programs. 3. Then, the Recording System software will run automatically.
Software Operating Instructions 3.1 Main Menu (Console) Default passwords is: 88888 The system displays the main menu on execution.
Telephone Voice Recording System The Main menu Includes: Menu, Shortcut function button, Channels Status & Run info Channels Status: real time showing each Channels work status, (Recording, Free, Incoming caller, Dial Number, speaking Durations….) Run Log: This stores the history of important information so that it can be easily traced anytime. Note: The log is stored as run. log in C:\MDR and the files are automatically deleted when they exceed 200 KB. They are also stored in the backup files. 1.
Only record special Number, the other call all not recording Sample: if only the record 10000 NO. setting same for this step. 1. choose the ‘Record Special Number Only 2. put in the 10000 Tel NO. Auto Backup 1. Database Auto Backup (indexmain.mdb) When a call is finished, the call log data will be stored in the indexmain.mdb and in the Backup Database file. The default file name is D:\MDR BACKUP\Index200511.mdb, where ‘2005-11’ is the year System will Convert the Voc (2005) and the month (11).
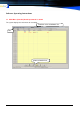
Telephone Voice Recording System Voice Files Backup When a channel is recording, pause the backup (when using a slower CPU, backup will affect the recording quality): The subscriber can customize the time for the Auto Backup. The system will automatically backup the data into and save in the designated path. BackUp Recording files automatically, Interval is (min): can user-defined the Time, System willBackUp the file to save in the designated path by 30 minutes. same the picture.
Note: The ZS-U2100 series products do not have this function Initial Number Process (Head code) In order to identify phone numbers from the phone book or customer database, you have to delete or correct some abnormal Caller IDs and dialed numbers that have the telecom service head-code. Incoming Head-codes For example, consider Caller ID: 075528282828. If you have set the area code in the Incoming headcodes, then the system will remove 0755, and search only 28282828 in the customer database (customer.
Telephone Voice Recording System Disk Management Please select a Disk to save the recorded files Enter a Drive name to store the recorded files. (Do not enter a Read-only disk like a CDROM or a DVDROM drive.) The default drive is D: (If drive D: does not exist, then it is stored in C) To Compress the Recording Files In order to compress the voice recording, set “Y”. This would help you save disk space. (Note: The default value is “Y”.
Max. Recording Length (in Minutes) It is a good practice to avoid generating large recording files. The default value is 60 minutes for a single recording file. You can also use "FULL TIME RECORDING”, “AUTO SPLIT RECORDING” files in this size. Loop Recording (erase earliest recorded files when there is no space): Will automatically delete the first recorded files when there is no remaining space in the selected partition.
Telephone Voice Recording System Explain: If setting the EXT123 is not record, this Extension dial call out or incoming caller all not record the list & voice in the database, if user need keep the record in the Indexmain.mdb, can setting the “Y” in the “If Keep Info”, but not save the Voc file.
Setting with CAS a. System\Database file setting\ Generals Information for Digital Recorder b. System\Database file setting\Open Channel to Telephone voice Recording System c. Choose PBX Type is ZDR2000 & save it Use PBX Output info when record TRK: If the Out line Dial-No. Can’t shows accurately by TVRS, can choose this Option use the PBX Output with Call Accounting System. Use PBX Output info when record EXT: same for TRK this function Step 2: Enter the CAS System \Database File Setting.
Telephone Voice Recording System Step 3 TVRS : Enter the Channel Setting as shown. Enter Line No. , Set Type to TRK. You can find the relay number through the toll software using the phone to dial the external number with relay device. Setup the corresponding channel and save. Restart the recording software to take effect. TRK must be as same as the TRK number output from the Call Accounting Software. (You can pick up an extension and dial out to see what the TRK shows in Call Accounting Software).
Channel Setup Line No.:Input the corresponding phone numbers or characters (only numbers and English alphabets) to give indication of the channel. Types: Trunk-Line, Direct-Line, Dial. The default is Line. Available: This option is used to switch on the channel or to switch it off. Options: "Y"-Enabled and "N"Disabled. When option "N" is selected, the channel will not do anything. Recording: Option "Y" allows you to record voice files. Option "N" forbids to record voice files.
Telephone Voice Recording System Recording Mode: Click Rec. Mode field, you can select the Recording Mode. The system supports 3 recording modes :PHONE (default), AUDIO and KEY. PHONE: For normal Telephone line recording. (This is the Default Setting). AUDIO: For microphone or Audio output line recording. KEY: For recording a conversation by pressing a telephone key. The default key for recording is and pressing # or simply hanging up ends the recording. Seat: View of the fixed channel or channel numbers.
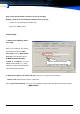
Password The system has default password protection. If you do not want the password protection, uncheck the option “Enable Password Protection”. Default Pass- User and Password The user can add and change all rights, such as System Setting , Monitor, Delete Recording, Recording inquiry, Exit, and Valid Date, etc., Select “Y” to enable or “N” to disable the functions in the different fields. The user also can enter the Authorized channels like “1, 3, 5” or "1-5, 7-9”.
Telephone Voice Recording System Only checking 175,178 Exstesion this Dial Number The Accessing Right for the Web Player working with the Recording System can also be Setting here. Seat Setup (Popup Screen) Enable IP Interface: By enabling this option, TVRS will use UDP protocol to send Customer Information to IP address list in the Seats table. The default port is “1972”.
3.2.10 Advanced Setup Language: Set the Language for the interface. Default is AUTO The software detects the language from the Operating system automatically. USER: The user sets the language. (Advanced Tool>Edit Local Language) System include support ARA,French,Hebrew,Korean,Poland,Spanish,Turkish, Portuguese,Vietnam… language Playing through the Sound Card: Use the sound card to playback the recorded files, ZS4200, D5130 Series all through the sound card player.
Telephone Voice Recording System Hide screen after startup: When this option is enabled, after startup the system will hide the main software interface. It will only show a small icon with "LOGON" on the top left screen. Click "LOGON" and enter the User ID and Password to logon and full screen will appear. Default Value: Disabled.
Setting an Alarm The main setup window shows how to e-mail the alarm information. Enter the sender’s SMTP address, User name and password and the receiver’s email address.
Telephone Voice Recording System Work Time The Work-Time is be dead against all Channels recording work start time & end time Scan setting 4 mode time phases Find & Play (Recording Search) Record Search It’s very easy to search and to play the recorded voice files from among many number of recorded voice files. Click "Find & Play". Play: select a recording list Click "Play” button . system will automatically play the selected file.
Refresh: Displays the latest updated call history and shows the current recording. Notes: While monitor listening, the voice player does not work. You should exit that before running the voice player. Can transform the Voice Complex Search Complex search condition: Contains Line Number, Channel Number, User-Name, Note, Handled By, EXT, Operation Type, Password, Call Start date and End date, Call Start time and End time, etc., to search the voice files.
Telephone Voice Recording System Call List Report: The recording files generate a report that can be printed and saved. Channel Sum Report: The call duration and phone numbers of the voice files can be printed and saved. Backup: Click Backup to back up the data to a specified directory. Each backup folder include the every Voice file * Indexmain.mdb database Choose the backup path Voice file save location: 1. The Voice file default is save in D 2. subarea hard-disk D:\VOC \ 3.
1. Click on the Monitoring button and choose a Channel No. You can listen to an ongoing conversation in that Channel Via an earphone or speakers. Click Return to quit listening. 2. Double click the wanted channel on the status column in The monitor window. The blue color changes to red. You can listen to an ongoing conversation in that Channel using an earphone or speakers. Double click again to quit listening.
Telephone Voice Recording System Stop recording When silence exceeds (sec.): is only for Audio mode record function, the default value is 12 sec., if setting short low this time, the Voice will divide into more files. Multimeter: only for ZS-4200 series: If have a channels can’t record, can use this tools checking the line Voltage 1. choose the Channel ID, 2. press the Check button, tools will shows the Voltage 3. setting more than check Voltage value to Off Hook Voltage, 4.
Search and play voice through the Web. Software requirements for installing Web Server >Win 2000/ 2003/XP Internet Information Service (IIS) version 6.0 Microsoft .NET Framework 2.0 Microsoft Data Access Components version 2.6 version or above Notes: All these software must be installed. Not necessary if you are using Win 2003. Installing and Configuring the Web Player software After successful installation of Recording software, do as follows: 1.
Telephone Voice Recording System 8. Restart the computer. Web search address within the LAN: Example: 192.168.0.187/trs-web Web search address outside the LAN: Example: 221.230.128.15/trs-web If you want to access the web outside the LAN, you should setup the local IP address and port on the router within your LAN. This is usually entered in the virtue manager of the router. Default Port is 80. 3.6.2.
If you are unable to open the recording list window, disable the Popup Blocker as follows: Go to Internet Explorer. Click Tools-> Internet Options->Privacy->Uncheck Block Pop ups. 4. Customer Incoming Caller ID Popup System Note: Need Out line have received Incoming Caller can use 4.
Telephone Voice Recording System Software Installation 1. Double click the Setup.exe file in the Installation CD. Setup Wizard will guide you through the installation process. C:\Program Files\Popup 2. A shortcut will be added in the Desktop and in the Program menu under All Programs. 3. Then, the Popup System software will run automatically. Software Uninstall Go to Desktop, Start menu -> All Programs-> Pop-UP-> Uninstall.
Default DEMO Password :88888 2. Press Hot key F8, showing Database setting option, Select ACCESS & path 3. Testing Connection, if success, please save the setting 4. restart the Popup system Log on by Demo user 4.5.
Telephone Voice Recording System Setting Company info to here, If Print the Sales consignment inform list include this info Appendix 1 Connecting the Analog Recording card for a Digital Phone "Digital Feature phone Handset recording" The TVRS has a unique feature for handset recording unlike common recording software that can only do recording. The TVRS can get the dialed number and tell whether it is an incoming / outgoing type from the CAS after the call is finished.
"Internal Diagram of a Handset" Speaker RJ11-4 Plug T Ph I t Microphone Handset Recording Mode I Speaker Connect to Recording Card. The recording mode should be changed to ‘Audio’ in ‘System ->Channel setting ‘ Handset Recording Mode II There are usually two types of wire sequence found in a hand- MIC + Speaker Speaker MIC + Speaker MIC - MIC - Speaker set.
Telephone Voice Recording System To Phone Set To Recording card QL-T01 To Handset RJ11 Jack DC 9V Power Adaptor This method of recording from a digital phone has an excellent quality, because both the SPEAKER and MIC signals are mixed and amplified. So they are very well balanced, the local voice level will not be too low and the remote voice not too high.