ALIEN616 User’s Manual V2.0.5 The Alien Ultra Digital Video Recorder Operations Manual Models: ALIEN604 ALIEN608 ALIEN616 Version 2.0.
ALIEN616 User’s Manual V2.0.5 Precautions Before connecting and operating your DVR, please take the following precautions: • Ensure that unit is installed in a well-ventilated, dust-free environment. • Unit is only designed for indoor use only. • Keep all liquids away from the DVR. • Ensure environmental conditions meet factory specifications. • Ensure that unit is properly secured to a rack or shelf.
ALIEN616 User’s Manual V2.0.5 Contents Page No: 1. Introduction 1.1 Overview 1.2 Product Key Features 1.3 Product Application Diagram 1.4 DVR Operation 1.4.1 Using the Front Panel Controls 1.4.2 Using the IR Remote Control 1.4.3 Using a USB mouse 1.4.4 Using the Keyboard 1.5 Rear Panel Diagrams 1.5.1 Rear Panel Diagram of Alien616 1.5.2 Rear Panel Diagram of Alien608 1.5.3 Rear Panel Diagram of Alien604 5 5 5 7 8 8 10 12 12 14 14 15 16 2. Getting Started 2.1 Starting and Shutting Down Your DVR 2.
ALIEN616 User’s Manual V2.0.5 8. Network Settings 8.1 Configuring Basic Settings 8.2 Configuring PPPoE Settings (not applicable in the UK) 8.3 Configuring DDNS 8.4 Configuring an NTP Server 8.5 Configuring a Remote Alarm Host 8.6 Configuring Multicast 8.7 Configuring Server and HTTP Ports 55 55 56 58 59 60 61 61 9. PTZ Controls 9.1 Navigating PTZ Menus 9.2 Configuring PTZ Settings 9.3 Setting PTZ Presets, Patrols & Patterns 9.4 Customising Presets 9.5 Customising Patrols 9.
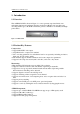
ALIEN616 User’s Manual V2.0.5 1. Introduction 1.1 Overview This ALIEN616 DVR, shown in Figure 1, is a new generation product. Built on an embedded platform and combining the latest in advanced H.264 video encoding and decoding technologies, this DVR contains the perfect combination of reliability and high performance. Figure 1. ALIEN616 DVR 1.2 Product Key Features Compression: • Support PAL/NTSC video input. • Adopt H.264 video compression standard.
ALIEN616 User’s Manual V2.0.5 • HDD file system is compatible with Windows. Use pre-allocating hard disk management technology, and no disk fragmentation. Recording and Playback: • Supports overwrite and non-overwrite recording modes. • Supports normal and event video encoding parameters. • Supports multiple recording types, including manual, continuous, alarm, motion, motion | alarm and motion & alarm recording. • Supports 8 recording time periods with different recording types.
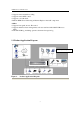
ALIEN616 User’s Manual V2.0.5 • Supports remote manual recording. • Supports remote PTZ control. • Supports voice talk back. • Built-in WEB Server delivering an Internet Explorer ActiveX component. • Other: • Supports front panel, mouse, IR control. • Supports multi-level user management, each user can have individual DVR access rights. • Powerful DVR log, including operation, alarm and exception log. 1.3 Product Application Diagram Speaker requires amplifier Figure 2.
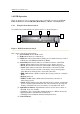
ALIEN616 User’s Manual V2.0.5 1.4 DVR Operation There are numerous ways to navigate and operate your DVR. You may use the Front Panel Controls, the included IR (Infra-Red) Remote, a Mouse or the Keyboard. 1.4.1 Using the Front Panel Controls Your DVR comes with built-in front panel controls, as shown in Figure 3. 4 7 6 2 1 3 5 8 Figure 3. DVR Front Panel Controls The controls on the front panel include: 1. Power Button: Powers DVR on/off. 2. IR Receiver: Receiver for IR remote. 3.
ALIEN616 User’s Manual V2.0.5 • ESC Button: The ESC button is used to escape to the previous menu and to arm/disarm the DVR in Preview mode. • REC/SHOT Button: The REC/SHOT button is used to enter the Manual Record interface. If used when controlling a PTZ, pressing the REC/SHOT button and then a Numeric button will call a PTZ preset. • PLAY/AUTO Button: The PLAY/AUTO button is used to enter the Playback menu. It is also used to turn audio on/off in the Playback menu and auto scan in the PTZ Control menu.
ALIEN616 User’s Manual V2.0.5 7. DIRECTION/ENTER Buttons: • DIRECTION Buttons: The DIRECTION buttons are used to navigate between different fields and items in menus. In Playback mode, the Up and Down button is used to speed up and slow down recorded video. The Left and Right button will select the next and previous day of recordings. In Preview mode, these buttons can be used to cycle through channels. • ENTER Button: The ENTER button is used to confirm selection in any of the menu modes.
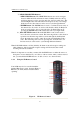
ALIEN616 User’s Manual V2.0.5 The keys on the remote control, closely resemble the ones found on the front panel. Referring to Figure 5, they include: 1. POWER Button: Same as POWER button on front panel 2. DEV Button: Enables/Disables Remote Control. 3. Alphanumeric Buttons: Same as Alphanumeric buttons on front panel. 4. EDIT Button: Same as EDIT/IRIS+ button on front panel. 5. A Button: Same as A/FOCUS+ button on front panel. 6. REC Button: Same as REC/SHOT button on front panel. 7.
ALIEN616 User’s Manual V2.0.5 1.4.3 Using a USB Mouse A regular 3-button (Left/Right/Scroll-wheel) USB mouse can also be used with this DVR. To use a USB mouse: 1. Plug USB mouse into one of the USB ports on the front panel of the DVR. 2. The mouse should automatically be detected. If in a rare case that the mouse is not detected, it may be due to an incompatibility issue, so try another make. The buttons on the mouse corresponds to: 1.
ALIEN616 User’s Manual V2.0.5 The buttons on the soft keyboard represents: Lowercase: Designates lowercase input is being used. Uppercase: Designates uppercase input is being used. Switch to Lowercase: Switch to lowercase input. Switch to Uppercase: Switch to uppercase input. Number: Designates number input is being used. Symbols: Switch to symbols input. Backspace: Delete the character in front of the cursor. Enter: Confirm selection. ESC: Exit out of Soft Keyboard. Figure 6.
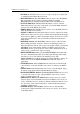
ALIEN616 User’s Manual V2.0.5 1.5 Rear Panel Diagrams 1.5.1 Rear Panel Diagram of Alien616 Figure 7. No. 1 2 Item VIDEO IN AUDIO IN VIDEO SPOT OUT VIDEO OUT 3 AUDIO OUT 4 5 6 7 8 9 10 11 12 LINE IN VGA RS232 LAN Interface USB Interface Termination Switch RS-485 Interface Controller port ALARM IN ALARM OUT GROUND POWER Rear Panel Diagram Description BNC connectors for analogue video input x 16 BNC connectors for analogue audio input x 16 BNC connector for monitor. Single window view.
ALIEN616 User’s Manual V2.0.5 1.5.2 No. 1 2 Rear Panel Diagram of Alien608 Item VIDEO IN AUDIO IN VIDEO SPOT OUT VIDEO OUT 3 AUDIO OUT 4 5 6 7 8 9 10 11 12 LINE IN VGA RS232 LAN Interface USB Interface Termination Switch RS-485 Interface Controller port ALARM IN ALARM OUT GROUND POWER Description 8 x BNC connectors for analogue video input. 8 x BNC connectors for analogue audio input. BNC connector for monitor. Single window view. BNC connector for video output.
ALIEN616 User’s Manual V2.0.5 1.5.3 No. 1 2 Rear Panel Diagram of Alien604 Item VIDEO IN AUDIO IN VIDEO SPOT OUT VIDEO OUT 3 AUDIO OUT 4 5 6 7 8 9 10 11 12 LINE IN VGA RS232 LAN Interface USB Interface Termination Switch RS-485 Interface Controller port ALARM IN ALARM OUT GROUND POWER Description 4 x BNC connections for analogue video input. 4 x BNC connections for analogue audio input. BNC connector for monitor. Single window view. BNC connector for video output.
ALIEN616 User’s Manual V2.0.5 2. Getting Started 2.1 Starting and Shutting Down Your DVR Proper startup and shutdown procedures are crucial to expanding the life of your DVR. To startup your DVR: 1. Ensure the power supply is plugged into an electrical outlet. It is HIGHLY recommended that an Uninterruptible Power Supply (UPS) be used in conjunction with the unit. 2. Turn on the switch on rear panel 3. After startup, the Status indicator LED will remain green.
ALIEN616 User’s Manual V2.0.5 5. 6. 2.2 Click “Yes” then message “Shutting down” will display. Turn off switch on rear panel. Rebooting and Locking Your DVR While in the Shutdown menu (Figure 1), you may also reboot or lock your DVR. Locking your DVR will return you to the Live Preview mode, which will require a user name and password to exit out of it. The Reboot button will reboot your DVR. To reboot or lock your DVR: 1. Enter the Shutdown menu by clicking Menu > Shutdown. 2.
ALIEN616 User’s Manual V2.0.5 To start using the Setup Wizard: 1. Click the Next button on the Wizard window. This will take you to the User Permission window, shown in Figure 3. Figure 3. User Permission 2. 3. 4. 5. Navigate to the Admin Password input field. Enter the admin password into the Admin Password input field. The default password is 12345 . To change the admin password, check the New Admin Password checkbox. Enter the new password and confirm the password in the given fields.
ALIEN616 User’s Manual V2.0.5 6. To start HDD management, click the Enter button. 7. If a new HDD was recently installed, select the HDD from the list to initialise it. Initialising the HDD will format and remove all data from it. 8. After the HDD has been initialised, click the OK button, which will take you back to the Setup Wizard window. 9. Click the Next button. This will take you to the Record Settings window, as shown in Figure 5. Figure 5. Record Settings 10.
ALIEN616 User’s Manual V2.0.5 Figure 7. Edit Schedule Settings 14. Click the OK button. This will take you back to the Schedule tab. To copy the schedule to a different channel, select the channel or all under Copy To and click the Copy button. 15. Click the Next button. This will take you to the Network Settings window, shown in Figure 8. Figure 8. Network Settings 16. To configure network settings, click the Enter button. 17. Enter the IP Address, Subnet Mask and Default Gateway. 18.
ALIEN616 User’s Manual V2.0.5 2.4 Setting Date & Time It is extremely important to setup the system date and time to accurately timestamp recordings and events. To setup date and time: 1. Open the Menu window by clicking the MENU button on the remote or front panel. You can also go to the Menu window by right clicking with the mouse and clicking the Menu button. 2. Click the Setting icon. 3. Click the General icon. You will be taken to the General Settings window, as shown in Figure 9. Figure 9.
ALIEN616 User’s Manual V2.0.5 3. Live Preview 3.1 Watching a Live Preview The Live Preview mode is automatically started after the DVR boots up. It is also at the very top of the menu hierarchy, thus hitting the ESC multiple times (depending on which menu you’re on) will bring you to the Live Preview mode. 3.1.1 Understanding Live Preview Icons There are multiple icons on each display in Live Preview mode to indicate different camera status.
ALIEN616 User’s Manual V2.0.5 3.2.1 Using the Mouse in Live Preview Many features of the Live Preview can be quickly accessed by clicking the right-button of the mouse (shown in Figure 2). These features include: • Single Camera: Switch to a full screen display of the selected camera. Camera can be selected from a drop down list. • Multi-Camera: Switch between different display layout options. Layout options can be selected from a drop down list.
ALIEN616 User’s Manual V2.0.5 Figure 3. Digital Zoom 3.4 Configuring Live Preview Displays Live Preview displays can be customised to your own needs. These settings can be accessed by entering the Display Settings menu. Figure 4. Display Settings To access the Display Settings menu: 1. Click the MENU button. 2. Click the Setting icon. 3. Click the Display icon.
ALIEN616 User’s Manual V2.0.5 The settings available in this menu include: • Video Output: Designates the output to configure the settings for. Outputs include Main Vout and Auxiliary Vout. • Mode: Designates the display mode to be use for Live Preview (Spot out only one window). • Dwell Time: The time in seconds to dwell between switching of channels when Start Sequence is selected in Live Preview. • Camera Order: The order of the cameras to be used in the selected display mode (See Setting Camera Order).
ALIEN616 User’s Manual V2.0.5 3.5 Setting Camera Order and Switching Off camera Display Setting the camera order allows you to logically position cameras for more efficient monitoring of your own individual location. Note: Spot out only displays one window division Figure 5. Camera Order Setting To set the camera order/switching off camera display: 1. Enter the Display Settings menu, shown in Figure 5 (Menu > Setting > Display). 2. Click the Set button. 3.
ALIEN616 User’s Manual V2.0.5 4. Record Settings There are multiple ways to setup your DVR for recording. They include setting up a recording schedule, triggering a recording by motion detection and/or a sensor alarm, and manually starting the recording. Only use the manual record for emergency recording. 4.1 Initialising Record Settings Before setting your DVR up for recording, certain settings should be configured first. The steps to configuring these settings are: 1.
ALIEN616 User’s Manual V2.0.5 Figure 2. Additional Record Settings 6. Set additional record settings: • Pre-Record: Sets the time in seconds to pre-record before the actual recording begins for motion or alarm recording. • Post-Record: Sets the time in seconds to post-record after the actual recording has ended for motion and alarm recording. • Recording Expired Time: Sets the expiration time in days for recorded video. Recordings after expiration time would be deleted.
ALIEN616 User’s Manual V2.0.5 4.2 Scheduling a Recording Scheduling a recording allows you to setup the DVR to only record when you want it to. To setup a recording schedule: 1. Enter the Record Settings menu (Menu > Setting > Record). 2. Select the Schedule tab to open the Schedule menu, shown in Figure 4. Figure 4. Schedule Settings 3. 4. 5. 6. Select Camera to edit schedule for. Click the Edit button. Click and check Enable Schedule.
ALIEN616 User’s Manual V2.0.5 4.3 Starting a Manual Recording A manual recording can be started at any time. To start a manual recording: 1. Press the REC/SHOT button on the front panel or in the Main menu to bring up the Manual Record menu (shown in Figure 5). Figure 5. Manual Record Menu 2. Start manual recording by selecting On or Off for the cameras desired.
ALIEN616 User’s Manual V2.0.5 Figure 6. Video Search Menu 2. Search for desired recording by entering search parameters. Search parameters include Camera number, Video/File Type, and Start/End Time. 3. Click the Search button. A list of recordings (similar to Figure 7), matching the search parameters, will be displayed. 4. Select the file you would like to lock/unlock. 5. Click on the Lock button to lock file. If the file is already locked, click on the Unlock button to unlock file.
ALIEN616 User’s Manual V2.0.5 4.4.2 Setting HDD to Read-Only To set an HDD to read-only: 1. Navigate to the HDD Management menu by going to Menu > HDD Management. The HDD Management menu is shown in Figure 8. Figure 8. HDD Management Menu 2. Select the General tab. 3. Select the HDD to set to read-only. 4. Click the Property button. This will take you to the Property Settings menu, shown in Figure 9. Figure 9. HDD Property Settings Menu 5. Set HDD to Read-Only. 6. Click the OK button.
ALIEN616 User’s Manual V2.0.5 order to enable recordings on that particular disk again, you must set the HDD to R/W (Read/ Write) in the HDD Property Settings menu. If multiple HDDs are used, the DVR will automatically record to the next HDD that is not set to read-only. 4.5 Configuring Advanced HDD Settings 4.5.1 Setting up HDD Redundancy To ensure unexpected failures of hard disk drives, it is recommended to set up HDD redundancy. This will create duplicated data.
ALIEN616 User’s Manual V2.0.5 Figure 11. HDD Property Settings 7. Navigate to the Record Settings menu by clicking Menu > Setting > Record Setting. 8. Click on the General tab. 9. Select the Camera to be used for redundancy. 10. Next to More Settings, click on the Set button. This will bring up additional settings for the selected camera (shown in Figure 12). Figure 12. Additional Record Settings 1. Set Redundantly Record to Yes. 2. Click the OK button to save settings. 3.
ALIEN616 User’s Manual V2.0.5 5. Playback You must first search for recordings to play them back. There are multiple ways to search for recordings, including searching for them by time, by channel, by file type and by log. There are various controls on the Playback interface that makes viewing recordings more efficient. A screenshot of the Playback interface is shown below in Figure 1. Figure 1.
ALIEN616 User’s Manual V2.0.5 5.1 Playback Methods 5.1.1 Playing Back from Search To playback files from a video search: 1. Enter into the Video Search menu by clicking Menu > Video Search. 2. Set the search parameters by selecting cameras to search, video/file type and the start/end time (as shown in Figure 3). Figure 3. Video Search Menu 3.
ALIEN616 User’s Manual V2.0.5 5.1.2 Playing Back from Live Preview You may also instantly playback from a channel while watching a Live Preview. The playback will be of recordings from the past 5 minutes. To playback from a channel instantly in Live Preview: • Using a Mouse: 1. Right-click the mouse on desired channel and select the Playback button. 2. Recordings from the selected channel will start playing back in the Playback interface.
ALIEN616 User’s Manual V2.0.5 Figure 6. Log Search Menu 2. 3. 4. 5. 6. Set Major Type setting to Information. Set Minor Type setting to Start Record or End Record. Set Start Time and End Time. Click the Search button. A list of results with your search criteria will be returned. Select the video log to playback and click Play. 7. The recording will begin to play in the Playback interface. 5.2 Playing Back Frame-by-Frame To playback frame-by-frame in the Playback interface: • Using a Mouse: 1.
ALIEN616 User’s Manual V2.0.5 Figure 7.
ALIEN616 User’s Manual V2.0.5 6. Backup Recorded files can be backed up to various devices, such as USB flash drives, USB HDDs or a DVD writer. 6.1 Exporting Files To export recorded files: 1. Enter the Export Video menu (shown in Figure 1) by clicking Menu > Video Export. Figure 1. Export Video Menu 2. Select desired parameters to search for files to export. 3. Press the Export button. This will take you to the Video Search menu. 4. Select the files to export, as shown in Figure 2.
ALIEN616 User’s Manual V2.0.5 5. The size of the currently selected files is displayed in the lower-left corner of the window. Select the Next button to enter the Export menu, shown in Figure 3. Figure 3. Export Menu 6. Select device to export to, from drop-down list (USB Flash Drive, USB HDD, DVD Writer). If backup device is not recognised: • Click the Refresh button. • Reconnect device. • Check for compatibility from vendor. 7. Click Start to begin backup process, shown in Figure 4. Figure 4.
ALIEN616 User’s Manual V2.0.5 Figure 5. Export Successful Screen Note: Video Player software will automatically be copied on to the device that the recorded files were exported on. 6.2 Exporting Video Clips You may also select video clips to export directly during Playback. A maximum of 30 clips can be selected for each channel. To export video clips during Playback: • Using the Mouse: 1. Enter into the Playback interface (See Playing Back a Recording). 2.
ALIEN616 User’s Manual V2.0.5 • Using the Front Panel / Remote: 1. Enter into the Playback interface (See Playing Back a Recording). 2. During playback, press the EDIT button to mark start of clip. 3. Press the EDIT button again to mark end of clip. 4. Repeat for additional clips. 5. Press the ESC button to exit from the Playback interface. You’ll then be prompted to save the clips, as shown in Figure 6. 6. Click the Yes button to enter Backup interface or select No to exit to Playback interface. 7.
ALIEN616 User’s Manual V2.0.5 7. Motion Detection and Alarm Settings 7.1 Setting up Motion Detection Set up properly, using motion detection, recording will increase the number of days your DVR is able to record. It will only record relevant events rather than recording everything, making searching for an event easier. To set up motion detection: 1. Enter Camera Setting: Enter the Camera Settings interface by navigating to Menu > Setting > Camera. Select channel to configure motion detection. 2.
ALIEN616 User’s Manual V2.0.5 Figure 2. Motion Detection Area 6. Set the Motion Detection Sensitivity, shown in Figure 3. The higher the sensitivity value, the higher the sensitivity. Figure 3. Motion Sensitivity Setting 7. Click OK to return to the Camera Settings menu. 8. Click the Handle button to open the Exception Handle menu, shown in Figure 4.
ALIEN616 User’s Manual V2.0.5 . Figure 4. Exception Handle Menu 9. Select cameras to trigger for recording when motion is detected by checking the checkboxes under the desired cameras. 10. Click OK to complete motion settings for the selected camera. You may now add a schedule to start recording when motion is detected (See Scheduling a Recording). 7.2 Setting up Sensor Alarms Recordings can also be triggered from an external sensor alarm device. To setup sensor alarms: 1.
ALIEN616 User’s Manual V2.0.5 2. Select the Alarm Input number and click the Set button. This will open the Alarm Input Setting menu, shown in Figure 6. Figure 6. Alarm Management Settings 3. Set the alarm input type under Type. The options available are Normally Open (N.O.) and Normally Closed (N.C.). 4. Check the checkbox next to Setting and click the Handle button to enter the Alarm Input Handle menu. 5. Select the Triggered Camera tab. 6.
ALIEN616 User’s Manual V2.0.5 7. Click the OK button to complete setup. You may now add a schedule to start recording when an alarm is triggered (See Scheduling a Recording). Alarm outputs may also be configured in the Alarm Management menu. To set up Alarm Output: 1. Select the Alarm Output tab. This will bring up the Alarm Output interface, shown in Figure 8. Figure 8. Alarm Output Interface 2. Select the output you would like to configure and click the Set button.
ALIEN616 User’s Manual V2.0.5 4. Select OK to save and exit. Note: If the Hold For option is selected as Manually Stop, the alarm will only stop when you manually stop it (See Triggering Alarm Outputs Manually). 7.3 Triggering Alarm Outputs Manually You may also trigger alarm outputs manually through the Manual Alarm menu. To trigger alarm outputs manually: 1. Enter the Manual Alarm menu (Figure 10) by clicking Menu > Manual Alarm. Figure 10. Manual Alarm Menu 2.
ALIEN616 User’s Manual V2.0.5 click the Set button. 3. Select the Advanced tab. 4. Check the Video Loss Detection checkbox to enable feature, as shown in Figure 11. Figure 11. Camera Settings Menu 5. Click the Handle button to enter the Exception Handle menu, shown in Figure 12. 6. Select the Handle tab to configure exceptions handling. Exception trigger options are further explained in the next section (See Understanding Exception Trigger Options). Figure 12. Exception Handle Menu 7.
ALIEN616 User’s Manual V2.0.5 7.5 Detecting Video Tampering Video tampering (i.e. moving camera to a different position) can also be detected and set to trigger an action on your DVR. To setup video tempering detection: 1. Enter Camera Management/Settings menu by clicking Menu > Setting > Camera. 2. Select camera under Channel number to configure video loss detection and click the Set button. 3. Select the Advanced tab. 4. Check the Tamper Detection checkbox, as shown in Figure 13. Figure 13.
ALIEN616 User’s Manual V2.0.5 9. Click the Handle button to enter the Exception Handle menu, shown in Figure 15. 10. Select the Handle tab to configure exceptions handling. Exception trigger options are further explained in the next section (See Understanding Exception Trigger Options). Figure 15. Exception Handle Menu 11. Select the Schedule tab. Set the schedule of when you want video loss detection to be enabled. Schedule can be set for all week or any day of the week with up to 8 time periods per day.
ALIEN616 User’s Manual V2.0.5 Figure 16. Exception Menu 4. Click OK to save and exit Exception menu. 7.7 Understanding Exception Trigger Options When setting up exception handlers for such features as motion detection and sensor alarms, you may select triggering options to alert you of these exceptions. The triggering options that you may select include: • Pop-up Image on Monitor: When an alarm is triggered, the local monitor (VGA or BNC monitor) will display an image under Live Preview mode.
ALIEN616 User’s Manual V2.0.5 8. Network Settings Network settings must be configured before you’re able to use your DVR over the network. 8.1 Configuring Basic Settings To configure basic network settings: 1. Enter the Network Settings menu, shown in Figure 1 by clicking Menu > Setting > Network. Figure 1. Network Settings Menu 2. Select the General tab. 3.
ALIEN616 User’s Manual V2.0.5 4. If you would like to configure your own settings, enter the settings for: • IP Address: IP address you would like to use for your DVR. • Subnet Mask: Subnet Mask of network. • Default Gateway: IP address of your Gateway. Typically the IP address of your router. • Preferred/Alternate DNS Server: The preferred and alternate Domain Name System (DNS) Server to be used with your DVR. 5. Click OK to save and exit the Network Settings menu.
ALIEN616 User’s Manual V2.0.5 Figure 4. Advanced Network Settings 5. Click the Set button next to PPPoE to enter PPPoE settings menu, shown in Figure 5. Figure 5. PPPoE Settings 6. Check the PPPoE checkbox to enable feature. 7. Enter User Name, Password, and Confirm Password for PPPoE access. PPPoE credentials can be obtained from your network administrator. Once the setup is completed, your DVR will automatically dial-up into your network after rebooting. 8.
ALIEN616 User’s Manual V2.0.5 8.3 Configuring DDNS If your DVR is setup to use PPPoE as its default network connection, you may setup Dynamic DNS (DDNS) to be used in conjunction. To setup DDNS: 1. Enter the Network Settings menu by clicking Menu > Setting > Network. 2. Select the Advanced tab. 3. Select the Set button next to DDNS to enter the DDNS settings menu, shown in Figure 6. Figure 6. DDNS Settings Menu 4. Check the DDNS checkbox to enable feature. 5. Select DDNS Type.
ALIEN616 User’s Manual V2.0.5 Figure 7. DynDNS Settings 8.4 Configuring an NTP Server A Network Time Protocol (NTP) Server may also be setup on your DVR to keep the date and time current and accurate. To setup an NTP server: 1. Enter the Network Settings menu by clicking Menu > Setting > Network. 2. Select the Advanced tab. 3. Select the Set button next to NTP to enter the NTP settings menu, as shown in Figure 8. Figure 8. NTP Settings Menu 4. Check the NTP checkbox to enable feature. 5.
ALIEN616 User’s Manual V2.0.5 • NTP Server: IP address of NTP server. 6. Click OK to save and exit menu. 7. Reboot the DVR for this to take effect Note: Time synchronisation interval has a range of 0-10080ms, normally 7200ms. If the DVR is used on a public network, you should use an NTP server that has a time synchronisation function, such as the server at the National Time Center (IP Address: 210.72.145.44).
ALIEN616 User’s Manual V2.0.5 8.6 Configuring Multicast Setting up multicasting solves limitation issues when streaming videos through a network access device. A multicast address spans the Class-D IP range of 224.0.0.0 to 239.255.255.255. It is suggested that the IP address range of 239.252.0.0 to 239.255.255.255 be used. To set up multicasting: 1. 2. 3. 4. Enter the Network Settings menu by clicking Menu > Setting > Network. Select the Advanced tab.
ALIEN616 User’s Manual V2.0.5 2. Select the Advanced tab. 3. Click the Set button next to Host/Others to enter the Host/Others menu. 4. Enter new Server Port and HTTP Port, as shown in Figure 11. Figure 11. Host/Others Menu Note: The Server Port has a port range of 2000-65535 and is used for remote client software access. The HTTP port is used for remote internet browser access.
ALIEN616 User’s Manual V2.0.5 9. PTZ Controls 9.1 Navigating PTZ Menus PTZ menus can be navigated with either the mouse or the front panel/remote. For quick access to certain PTZ settings, right clicking with the mouse in a display while in PTZ control mode will bring up the PTZ settings menu. This menu is shown in Figure 1. Figure 1. Mouse PTZ Settings Menu The items that can be found on this menu include: • Camera: Select a PTZ camera. • Call Preset: Call a PTZ preset.
ALIEN616 User’s Manual V2.0.5 Figure 2. PTZ Settings Menu 2. Select channel where PTZ camera is installed next to Camera label. 3. Enter PTZ settings so it matches that of the PTZ camera. 4. Click OK button to save and exit menu. 9.3 Setting PTZ Presets, Patrols & Patterns Your DVR allows you to customise presets, patrols and patterns for a connected PTZ camera. Before setting presets, patrols and patterns, it’s important to understand some of the features of the PTZ control panel, shown in Figure 3.
ALIEN616 User’s Manual V2.0.5 3. 4. 5. 6. 7. 8. 9. Focus: Used to adjust the focus of the PTZ. Iris: Used to open up or close the iris of the PTZ. Speed: Adjusts the movement speed of the PTZ. Light: Turns PTZ light (if applicable) on and off. Wiper: Turns PTZ wiper (if applicable) on and off. Zoom In: Instantly zooms PTZ in. Center: Centers PTZ. 9.4 Customising Presets Presets can be set to move your PTZ camera to a desired preset location at the click of a button.
ALIEN616 User’s Manual V2.0.5 9.5 Customising Patrols Patrols can be setup to move the PTZ to different key points and have it stay there for a set duration before moving on to the next point. The key points are defined by presets which can be set following the steps above in Customising Presets. To set up and use PTZ patrols: 1. Enter the PTZ Control interface, shown in Figure 3 by clicking PTZ in the mouse menu or the PTZ button on the front panel. 2.
ALIEN616 User’s Manual V2.0.5 Figure 6. Patrol Configuration Menu 4. Click OK to return to Patrol Management menu and repeat steps 2-3 to configure other key points. 5. After all key points have been configured, click OK to save and exit menu. • Clear Patrol: 1. Select a valid Patrol Number. 2. Click the Clear button to delete patrol. • Call Patrol: 1. Select a valid Patrol Number. 2. Click the Start button to call the patrol, select the stop button to stop the patrol, as shown in Figure 7. Figure 7.
ALIEN616 User’s Manual V2.0.5 9.6 Customising Patterns Patterns can be setup by recording the movement of the PTZ. To setup and use PTZ patterns: 1. Enter the PTZ Control interface, shown in Figure 3 by clicking PTZ in the mouse menu or the PTZ button on the front panel. 2. Select the Pattern button to enter the Pattern Management menu shown in Figure 8. Figure 8. Pattern Management Menu 3. Select a Pattern Number. 4.
ALIEN616 User’s Manual V2.0.5 10.Camera Management 10.1 Configuring OSD Settings On Screen Display (OSD) settings can be configured in the Camera Management menu. The OSD is shown in each display during Live Preview mode and includes the time and date as well as the camera name. To configure OSD settings: 1. Enter the Camera Management/Settings menu, shown in Figure 1 by clicking Menu > Setting > Camera. 2. Select channel to setup OSD settings under Channel number. Click the Set button. 3.
ALIEN616 User’s Manual V2.0.5 Figure 2. Advanced Camera Settings Menu 4. Check the Mask checkbox to enable feature. 5. Click the Area Settings button to enter Area Settings menu. 6. Setup mask area, as shown in Figure 3. Up to 4 areas can be set. Figure 3. Setting Mask Area 7. Select OK to save and exit mask setup.
ALIEN616 User’s Manual V2.0.5 10.3 Adjusting Display Settings Display settings such as the brightness, contrast, saturation and hue can also be adjusted in the Camera Management menu. To adjust display settings: 1. Enter the Camera Settings menu by clicking Menu > Setting > Camera. 2. Select channel to adjust display settings under Channel number. Click the Set button. 3. Select the Advanced tab to enter the Advanced Camera Settings menu, shown in Figure 4. 4.
ALIEN616 User’s Manual V2.0.5 11. 11.1 HDD Management Initialising HDDs A newly installed hard disk drive (HDD) must be first initialised before it can be used with your DVR. Initialising the HDD will erase all camera video on it. To initialise an HDD: 1. Enter the HDD Management menu shown in Figure 1 by clicking Menu > HDD. Figure 1. HDD Management Menu 2. Select HDD to initialise. 3. Click the Init button. 4. Select OK button to begin initialisation.
ALIEN616 User’s Manual V2.0.5 Figure 2. HDD Group Settings Menu 5. Select OK to save and exit menu. Note: By default, all HDDs belong to group 1. 11.3 Setting HDD Status You may change the behavior of your HDD by changing its status. The status of a HDD can be set to redundancy, read-only or read/write (R/W). 11.3.1 Setting HDD to Read-Only A HDD can be set to read-only to avoid important recorded files from being overwritten when the HDD becomes full. To set a HDD to read-only: 1.
ALIEN616 User’s Manual V2.0.5 4. Set HDD Status to Read-Only. 5. Select OK to save and exit menu. Note: Once set to read-only, the HDD cannot be written to until it is set back to read/write (R/W). If the HDD that is currently being written to is set to read-only, the data will be recorded to the next HDD. If there is only one HDD present, setting it to read-only will cause the DVR to not record. 11.3.
ALIEN616 User’s Manual V2.0.5 To view SMART information of a HDD: 1. Enter the Log Search menu, shown in Figure 4 by clicking Menu > Maintenance > Log. Figure 4. 2. 3. 4. 5. Log Search Menu Set Major Type to Information. Set Minor Type to HDD SMART. Enter Start Time and End Time. Click the Search button to begin log search. A result list, similar to that of Figure 5 will be returned. Figure 5. Log Search Results 6. Select log item to view and click the Details button. 7.
ALIEN616 User’s Manual V2.0.5 Figure 6. 11.5 SMART Information Configuring HDD Alarms HDD alarms can be set to trigger when an HDD is uninitialised or in an abnormal state. To set HDD alarms: 1. Enter Exception menu, shown in Figure 7 by clicking Menu > Exception. Figure 7. Exception Menu 2. Select HDD Error under Exception Type. 3. Select trigger action. Trigger actions are further explained in Understanding Exception Trigger Options.
ALIEN616 User’s Manual V2.0.5 12. DVR Management 12.1 Configuring General Settings General settings such as the system language can be configured in the General Settings menu of your DVR. To configure general settings: 1. Enter the General Settings menu, shown in Figure 1 by clicking Menu > Setting > General. Figure 1. General Settings Menu 2. Select the General tab. 3. Configure general settings. These settings include: • Language: Default language used in DVR menus.
ALIEN616 User’s Manual V2.0.5 12.2 Configuring Advanced Settings To configure more advanced settings: 1. Enter the General Settings menu, shown in Figure 1 by clicking Menu > Setting > General. 2. Click the More Settings tab; this will take you to the More Settings menu, shown in Figure 2. Figure 2. More Settings Menu 3. Configure settings, including: • Device Name: Name to use for DVR. • Device No.: Device number to use for DVR. • CVBS Output Brightness: Video output brightness.
ALIEN616 User’s Manual V2.0.5 Figure 3. RS-232 Settings Menu 2. Configure RS-232 Settings. 3. The RS-232 port can be used in two ways: • Parameter Control: Connect a PC to the DVR using the PC serial port. Device parameters can then be set using software such as HyperTerminal. The serial port parameters must be the same as the DVR’s when connecting with the PC serial port. • Transparent Channel: Connect a serial device directly to the DVR.
ALIEN616 User’s Manual V2.0.5 12.4.1 Adding a New User You may add up to 31 new users to your DVR. To add new users: Enter the User Settings menu, shown in Figure 4 by clicking Menu > Setting > User. Figure 4. User Settings Menu 1. Select the Add button to enter the Add User menu, shown in Figure 5. Figure 5. Add User Menu 2. Enter information for new user, including User Name, Password, Level and User’s MAC.
ALIEN616 User’s Manual V2.0.5 3. The Level is the user level and is separated into two tiers. • Operator: The Operator user level has the authority to configure two-way audio in network settings and all parameters in channel settings. • Guest: The Guest user cannot configure network settings, but can configure the local playback as well as the remote playing in channel settings. 4. If User’s MAC is configured and enabled, the user may only access the DVR from that particular MAC address. 5.
ALIEN616 User’s Manual V2.0.5 Figure 7. Network Privileges Menu • Remote Log Search: Remotely view logs that are saved on the DVR. • Remote Configuration: Remotely configure parameters, restore parameters to factory defaults and import settings to as well as export settings from DVR. • Remote Serial Port Control: Configure settings for RS232 and RS485 ports. • Remote Video Output Control: Configure settings for video output.
ALIEN616 User’s Manual V2.0.5 • Remote Live View: Select and view live video over the network. • Local Manual Record: Locally start and stop manual recording on any of the channels. • Remote Record Starting: Remotely start and stop manual recording on any of the channels. • Local Playback: Locally play recorded files that are on the DVR. • Remote Playback: Remotely play and download recorded files that are on the DVR. • Local PTZ Control: Locally control PTZ cameras.
ALIEN616 User’s Manual V2.0.5 4. Edit user information. 5. To modify user permissions, click on the privileges button. Permission settings are defined in the section above Adding a New User. 6. Click the OK button to exit menu. 12.5 Importing & Exporting Configuration Configuration information from your DVR can be exported to a USB device and imported into another DVR. This will allow you to efficiently setup the same configuration on numerous DVRs. To import or export DVR configuration: 1.
ALIEN616 User’s Manual V2.0.5 12.6 Updating System Firmware WARNING: Upgrading an incorrect version of system firmware can damage the DVR and render it inoperable. Do not attempt any firmware upgrade without detailed instructions from your supplier. The firmware on your DVR can be updated using two methods. These methods include updating via an USB device or over the network via an FTP server. To update via an USB device: 1. Connect USB device to DVR.
ALIEN616 User’s Manual V2.0.5 Figure 12. FTP Firmware Update 4. Input the FTP server address. 5. Select Upgrade to begin update process. 6. After the system firmware has been update, reboot the DVR. Note: If the DVR fails to update, please contact your system supplier for further assistance. 12.7 Restoring Default Settings To restore default factory settings to your DVR: 1. Enter the Default Settings menu, shown in Figure 13 by clicking Menu > Maintenance > Default. Figure 13.
ALIEN616 User’s Manual V2.0.5 Select OK to restore factory defaults. Note: Network information such as IP address, subnet mask and gateway will not be restored. 12.7.1 Special Instructions following Restoring Default Settings If you get an alarm following a restore of the Default Settings you will need to take the following action: 1. 2. 3. 4. 5. Right click mouse button and click on Menu. Enter password, click on Enter and then OK. Click on Setting menu. Click on Exception menu.
ALIEN616 User’s Manual V2.0.5 2. Select OK to exit to the previous screen. 12.9 Viewing System Logs Many events of your DVR are logged into the system logs. To access the system logs and search for these events: 1. Enter the Log Search menu, shown in Figure 15 by clicking Menu > Maintenance > Log Search. Figure 15. Log Search Menu 2. Set search parameters. 3. Click the Search button to begin search.
ALIEN616 User’s Manual V2.0.5 4. To view more detail information about a particular log entry, select the entry and click the Details button. 5. If applicable, you may also view the associated video to the selected log entry by clicking the Play button. 6. Log files can also be exported onto a USB device. To export a log file, connect a USB device to the DVR, select the log file to export and click the Export button. This will take you to the Log Search Export menu, shown below in Figure 17.
ALIEN616 User’s Manual V2.0.5 13. Special Features 13.1 1fps background recording switching to 25fps in CIF This DVR has a special feature that allows the unit to be set for recording at a low frame rate but when motion is detected to revert to 25fps recording. 1. Enter System Settings. 2. Select camera number required 3. Ensure Encoding Parameters set to Normal. 4. Reduce frame rate to low rate. 5. Select OK and re-enter Record Settings. 6.
ALIEN616 User’s Manual V2.0.5 9. Select Camera Settings. 10. Select Advanced tab 11. Tick Motion Detection Box 12. Click on Area Settings 13. Drag detection box to cover detection area. 14. If you enter the Handle option you can tick the Pop-up image on Monitor to display a single screen display of the triggered camera. 15. Click on OK and confirm in each menu to save. 16. Repeat for other camera channels. 17.
ALIEN616 User’s Manual V2.0.5 14. Glossary • Dual Stream: Dual stream is a technology used to record high resolution video locally while transmitting a lower resolution stream over the network. The two streams are generated by the DVR, with the main stream having a maximum resolution of 4CIF and the sub-stream having a maximum resolution of CIF at 12 frames per second. • DVR: Acronym for Digital Video Recorder.
ALIEN616 User’s Manual V2.0.5 15. Frequently Asked Questions • Why does my DVR make a beeping sound after booting? There are a few reasons for the warning beep your DVR makes after booting. 1. There is no HDD present in the DVR. 2. The HDD has not been initialised. 3. The HDD is defective. If you wish to use your DVR without any HDDs, you may disable this warning beep in the Exception Settings menu (See Setting Exception).
ALIEN616 User’s Manual V2.0.5 16. Record Timings 16.1 Record Timings for Alien616 CIF mode Frame HDD Rate 320Gb 25 12 6 4 2 1 3dys 7hr 6dys 14hr 13dy 4hr 17dy 14hr 35dy 4hr 52dy 18hr 2CIF mode Frame HDD Rate 320Gb 25 12 6 4 2 1 1dy 15hr 3dy 7hr 6dy 14hr 8dy 19hr 17dy 14hr 26dy 9hr HDD 640Gb HDD 750Gb HDD 1.0Tb HDD 1.5Tb HDD 2.
ALIEN616 User’s Manual V2.0.5 16.2 Record Timings for Alien608 CIF mode Frame Rate 25 12 6 4 2 1 HDD 320Gb HDD 640Gb HDD 750Gb HDD 1.0Tb HDD 1.5Tb HDD 2.
ALIEN616 User’s Manual V2.0.5 16.3 Record Timings for Alien604 CIF mode Frame Rate 25 12 6 4 2 1 HDD 320Gb HDD 640Gb HDD 750Gb HDD 1.0Tb HDD 1.5Tb HDD 2.