
- Ultra Electronics Printers Instructions

3461/07/01 ISSUE 2 PRINTHEAD INSTALLATION & COMMISSIONING SPEC. DCR No. 26106
IV
2. Removing old printhead/assembly
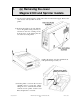
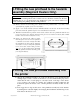
(1) Remove the dye-film and
dye-film carrier from the
printer.
(2) If a tye-wrap is fitted to the
grey ribbon cable plug on the
back of the printhead, cut this
tye-wrap taking great care not
to cut the ribbon cable itself.
(3) Disconnect both cables from
the printhead.
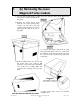
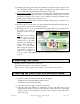
(4) If a head bar is fitted, remove the securing
screw at each end and lift away the head bar.
This should leave the earthing strap loose at the
right hand side of the chassis cover.
If no head bar is fitted, disconnect the earthing
strap from the reatining screw at the left hand
side ot the printhead assembly
(5) Disengage the two lugs at the ends of the
two nylon side brackets by spreading apart the
legs of the nylon brackets until the lugs just
clear the chassis cover, swing them forwards
and allow them to rest against the leading edge
of the chassis cover.
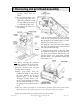
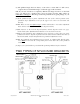
N.B.
Before removing the printhead
assembly completely from the printer,
take careful note of how the two
springs are attached at the rear and
each side of the assembly.
(6) Using both hands, hold the
printhead assembly at each side by
the nylon brackets, and move it
upwards. Note : as the assembly
disengages from the chassis cover,
the two springs will push it forwards
and care must be taken not to lose
the springs as the printhead is lifted
clear.
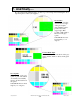
(7) Place the printhead assembly on a bench with the printhead and its labels at the bottom.
Undo and remove the printhead pivot screw (see diagram) and its two washers .
(8) Slide the printhead backwards (plugs first) out of the heatsink.