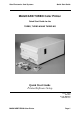
Ultra Electronics Card Systems Quick Start Guide MAGICARD TURBO Color Printer Quick Start Guide for the TURBO, TURBO M AND TURBO MS Quick Start Guide Printer/Software Setup Iss. 04 Apr 99 3505-22-01 Stock No.
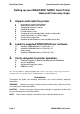
Quick Start Guide Ultra Electronics Card Systems Setting up your MAGICARD TURBO Color Printer takes just three easy steps: 1. Unpack and install the printer A B C D E F G H I 2. Load the supplied WINDOWS Driver software. Jx Jy K L 3.
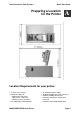
Ultra Electronics Card Systems Quick Start Guide Preparing a Location for the Printer A Location Requirements for your printer: • A clean, level surface. • Adequate space for: - opening the Top Cover - cable access at the rear. - allowance for air circulation. • An adequately ventilated room. MAGICARDTURBO Color Printer • • • • An adequate power supply. Ambient temperature +10 to +30 deg C. Relative Humidity 20/70% RH. Protection from direct sunlight and chemicals.
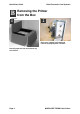
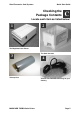
Quick Start Guide B Ultra Electronics Card Systems Removing the Printer from the Box changes. 1 2 Place on a smooth, level table and remove the polyethylene container. Carefully open the box and remove any accessories.
Ultra Electronics Card Systems Quick Start Guide Checking the Package Contents C Locate each item as listed below: 1 2 The MagiCard Color Printer The Card Cassette 3 Take-up Core MAGICARD TURBO Color Printer 4 A Power Cord with Moulded Plug for your Country Page 5
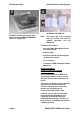
Quick Start Guide Ultra Electronics Card Systems 6 5 OPTIONAL STARTER KIT Envelope containing this Quick Start Guide and the PrintMAGIC WINDOWS Driver 3.5" floppy disk. Note: This Starter Kit is not supplied with your printer and must be ordered separately, Part No M9004-698.
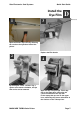
Ultra Electronics Card Systems Quick Start Guide Install the Dye Film 1 D Recesses 3 Open the Printer Top Cover by releasing the catch on the right-hand side of the printer. Replace the Film Carrier 2 By turning the “Dzus” fastener ring a quarter turn counter-clockwise, the dye film carrier can be removed. MAGICARD TURBO Color Printer 4 Open the Dye Film package. Fit the dye film on the lower boss, observing the correct orientation of the dye film.
Quick Start Guide 5 Ultra Electronics Card Systems 6 Manually turn the Spur Gear until the slots on the core engage with the lugs. Turn the 'Dzus' Fastener 1/4 turn clockwise to lock in place. Lay the ring flat against the panel 7 Pull about 6" of dye film off the roll of dye film, observing that it should be coming off the top of the roll, as per the label illustrations.
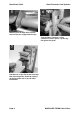
Ultra Electronics Card Systems 8 Avoid touching the tip of the thermal printhead with your hands. Feed the leading edge of the dye film over the tip of the Thermal Printhead and beneath the two guide bars, where fitted. (Refer to the diagram on the side). MAGICARD TURBO Color Printer Quick Start Guide 9 Fasten the end of the dye film onto the Take-up Core with a small piece of adhesive tape, and wind on a couple of turns. Avoid creasing of the dye film and position it centrally on the core.
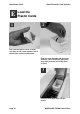
Quick Start Guide E Ultra Electronics Card Systems Load the Plastic Cards 1 2 Flex a stack of plastic cards, to make sure they are not 'stuck' together. Avoid touching the surfaces to be printed. Drop the cards flat down into the plastic Cassette, side to be printed uppermost, mag stripe to the left and facing down (if used). 3 Refit the card hopper back into the printer.
Ultra Electronics Card Systems Quick Start Guide Cleaning the Card Cleaning Roller (sticky or tacky roller) 1 F 2 The 'tacky' roller should be removed for cleaning before each batch of 100 cards. To remove the ‘tacky’ roller, release the locking tab on the left-hand side and, by putting your fingers beneath it, the roller can then be removed. Remove surface dust by using a strip of ‘Scotch’ adhesive tape, and ‘snap’ back into place. 3 4 Close the Printer Cover and secure the front latch.
Quick Start Guide G Ultra Electronics Card Systems Connect the Printer to a Power Supply 1 Locate the Mains Switch on the rear panel. 3 Switch ON. The indicators should all flash and the motors run briefly. Finally, the READY LED will remain ON. 2 Plug in the Power Cord. Plug the other end into a Power Supply socket.
Ultra Electronics Card Systems Quick Start Guide Test the Printer Operation H Print an Internally-Generated Test Card to make sure your printer is working correctly: 1 At the rear of the printer, locate the TEST Push-button. This is located in the rear panel, just above the Centronics parallel interface connector. Press the push-button momentarily. 2 It will take a few seconds before printing commences. When finished, a Test Card will be ejected from the aperture in the Front Panel.
Quick Start Guide I Ultra Electronics Card Systems Install the parallel Interface Cable and Ultra Secure Key 1 Switch the printer OFF. Locate the UltraSecure Interface connector on the rear panel. 2 3 Plug a good quality, screened Centronics Interface cable into this socket and secure the wire latches. Plug the other end into the Printer connector of your PC (LPT1 or LPT2) 4 Note the position for the UltraSecure Key at the rear of the Magicard Printer.
Ultra Electronics Card Systems Quick Start Guide Install the WINDOWS Driver J Procedure to be followed if your PC uses WINDOWS 95: • Start the PC and from the desktop select the My Computer folder. Select and open the Printers folder: • Select and open the Add Printer icon. • Select the Have Disk button: • Insert the PrintMagic WINDOWS Driver Disk into the PC Drive A.
Quick Start Guide • Select the Next> button: Ultra Electronics Card Systems • If you opt to print a test page, do so only if the printer is connected, switched ON, loaded with cards and dye film and ready to run. The test page may be incomplete. Select the Finish button to complete the installation. • Select the desired port (usually LPT1) and select the Next> button: You may then be offered the choice of which printer to use as the default printer.
Ultra Electronics Card Systems K Quick Start Guide Printer Setup Printer Setup procedure to be followed if the default settings differ from your requirement: Printer Setup Changes to the printer setup options performed via the Control Panel are non-volatile, until subsequently changed, even though the PC may be switched off after use.
Quick Start Guide Degrees Ultra Electronics Card Systems rotated 180 degrees. Opposing Rotation Between Sides is only significant if interfacing to a Magicard Flip Double-Sided printing model. Display Popup, when selected will enable the Magicard printer spooler that normally is displayed on the bottom right hand side of the PC VDU when printing. The number of copies may be set from 1 to 255.
Ultra Electronics Card Systems Quick Start Guide The default settings are for complete coverage to the card margins. For MAGICARD 300 it is 0,36,947,631 and for MAGICARD 300 plus and Turbo it is 0,0,985,641. The four numbers are the X and Y coordinates of the bottom left and top right corners of each area. applies to Magicard Flip models so leave this checkbox switched off.
Quick Start Guide Ultra Electronics Card Systems position. A 1% shift is approximately 0.1mm close the setup window and to accept any changes that have been made. X Start Position - This function allows the operator to adjust the position of the start of the image. A 1% shift is approximately 0.1mm. For interfacing to earlier models, leave set at the default value of 50, to prevent file errors.
Ultra Electronics Card Systems New York, New York 10036 Tel: (212) 642-4900 Parallel Port Configuration Quick Start Guide switch to the ECP version later when you are ready, or when you install new system hardware. Non-ECP Operation If you are using Windows 3.x or if you are using Windows 95 but are unfamiliar with the process of reconfiguring your parallel port for ECP operation, we suggest you use the driver in its “NON-ECP” mode.
Quick Start Guide L Ultra Electronics Card Systems Install the WINDOWS NT4 Driver Install the Windows Driver Procedure to be followed if your PC uses Windows NT 4.0: Start the PC and log in as Administrator to be sure you have the rights to install the driver. Select the My Computer folder and open the Printers folder. Double click the Add Printer icon. Select one or more of the available ports to print to. With the Add Port.. option a printer port can be added.
Ultra Electronics Card Systems Select the Next button: Fill in the printer name (max. 32 characters, default Ultra card printer) and select the Next button. Now indicate whether you would like to share the printer with other network users. If you will share the printer, fill in a Share Name for the printer and select one or more operating systems that will be used by the other PCs. Select Next to continue.
Quick Start Guide Paper Size Copy Count Film Type Duplex Orientation Use Paper Size to determine the printed area of the card. Standard Size or Full Bleed (Magicard 300 plus only) can be selected. Sets the number of copies printed of each card. Tells the printer which kind of dye film you have installed.
Ultra Electronics Card Systems Area Window Quick Start Guide If area is selected the coordinates define the start and end of the overcoat area If window is selected the coordinates define the start and end of the area that has to remain blank (no overcoat) It is possible to define up to 10 overcoat areas or windows, they will be combined to one area or window on the card.
Quick Start Guide On this page color corrections can be made (a corrected image will be send to the printer). The available settings depend on the ribbon used. For the color ribbon (YMCKO Resin - UR1 in the example), blue, green and red intensity and contrast can be corrected. The effect of the correction is visualized by the bitmap on the left. In this way the user will know what the impact of the correction will be on the printed card.
Ultra Electronics Card Systems Quick Start Guide Verifying Computer to Printer Communication in WINDOWS M The simplest way to verify correct operation is to print a test image from a WINDOWS application: • Ensure that the Printer is switched ON and that the POWER ON and ON LINE indicators are lit. • Run a WINDOWS application (badge-making, desk-top publishing or image processing) on your PC, with a suitable image or artwork. • Ensure that the PrintMagic MAGICARD Printer is the default printer.
Quick Start Guide N Ultra Electronics Card Systems In Case of Difficulty Check the Installation: • • • • • • • • • Repeat the Installation Steps in this Guide. Check that all cables are correctly connected. Check the Printer Setup in the WINDOWS Driver. Check the dye film and cards are correctly loaded. See what happens in the PrintMagic print manager (the icon appears on the Desktop during printing and the print status can be checked).
Ultra Electronics Card Systems Quick Start Guide Important Cleaning Procedures P It is very important that the MagiCard Printer be cleaned at regular intervals in accordance with these instructions. Cleaning Cards and a Cleaning Pen are included with every printer shipped. Thermal Printhead Cleaning It is recommended that the Thermal Printhead be cleaned after every roll of dye film, i.e. after every 250 cards printed.
Quick Start Guide Ultra Electronics Card Systems Mechanism Top Cover Dye Film Carrier Thermal Printhead Dzus Fastener 4. Whilst changing the dye film, and with the dye film removed, gently wipe the tip of the Thermal Printhead, using a gentle side-to-side action, with the Felt Tip Cleaning Pen supplied. 5. Using a tissue, remove any deposits from the pen tip and replace the pen cap to avoid solvent evaporation.
Ultra Electronics Card Systems Quick Start Guide 1. Lift up the Top Cover to the vertical position, and remove the Cassette. Switch ON the power supply. 2. Get the motor to turn the rollers by operating the Microswitch in the front of the print engine, by hand. Allow the motors to achieve full operating speed before applying the Cleaning Card to the rollers, otherwise the motors will stall and the rollers fail to turn. 3.
Quick Start Guide Ultra Electronics Card Systems Cleaning the Optics 1. Ensure the two light emitting diodes (LED's) adjacent to the Thermal Printhead, are clean and not obscured, the felt tip cleaning pen can be used as in diagram 1. 2. Check that the two apertures to the two optical sensors (one is 3mm diameter, the other is a fine slit in a stainless steel strip) are not obscured by debris, the felt tip pen can be used as in diagram 2. Cleaning the Magnetic Head (if fitted) 1.
Ultra Electronics Card Systems Quick Start Guide LED Error Codes Q The MAGICARD printer has extensive error trapping facilities, to provide the operator or service agent with fault diagnosis information. READY and ERROR Indicator Flashing The READY indicator flashing indicates that the printer is receiving and processing a file of image data. If the ERROR indicator is also illuminated continuously, it indicates that the file of image data is incomplete and that the printer is waiting for the rest.
Quick Start Guide Ultra Electronics Card Systems Notice The information contained in this document is subject to change without notice. Ultra Electronics Limited shall not be liable for errors contained herein or for incidental consequential damages in connection with the furnishing, performance or use of this material.
Ultra Electronics Card Systems Quick Start Guide Limited Warranty Information 1) Coverage: Ultra Electronics Ltd Warrants that the MAGICARD printer shipped with this Warranty statement will conform to the manufacturers specifications and be free from defects in materials or workmanship for a period of 12 months from the date of original purchase by the user, but there are additional conditions on the printhead Warranty (see para 2).
Quick Start Guide Ultra Electronics Card Systems EC Declaration of Conformity Manufacturer's Name: Manufacturer's Address: Ultra Electronics Limited. Waverley House, Hampshire Road, Granby Estate, Weymouth, Dorset DT4 9XD England. declares that the products Product Name: Model Numbers: MAGICARD TURBO Color Card Printer.
Ultra Electronics Card Systems Quick Start Guide Ultra Electronics Ocean Systems Waverley House Hampshire Road Granby Estate, Weymouth Dorset DT4 9XD England Telephone 01305 784738 Fax 01305 777904 Date: 01 April 1999 Year 2000 Compliancy Statement Dear Sirs The equipment listed below has been tested as appropriate in accordance with Ultra Electronics Ocean Systems specification 0008/04/01 and found to be Year 2000 compliant in all respects.