REV.2006.03 OWNER’S GUIDE MANUAL TRANSMISSION ONLY! www.ultrastarters.com Warning!! The system must be placed into Service Mode before any service work CARBON MONOXIDE MAY CAUSE SERIOUS INJURY, EVEN DEATH! is started on the vehicle. It is the sole responsibility of the vehicle owner It is the sole responsibility of the user to place the system in Service Mode to ensure that this is done.
OWNER’S GUIDE PAGE 2 Table Of Contents Table Of Contents This Guide Covers...
OWNER’S GUIDE PAGE 3 This Guide Covers The Following Systems: 1271M - 2271M - 3266M - 3271M - 4266M - 4271M. About Ultra Start It is our continuing objective to design and manufacture the absolute best Remote Car Starters, Vehicle Security Systems, Keyless Entry Systems and Security Bypass units available in today’s competitive market. This objective is met by utilizing installation professionals with decades of industry experience to assist in each step of the design process.
OWNER’S GUIDE PAGE 4 Safety VERY IMPORTANT SAFETY NOTES! The owner/user MUST INSTALL a CARBON MONOXIDE DETECTOR in the living area near to where the vehicle is being stored or parked. It is the sole responsibility of the owner/user to keep the remote transmitters away from the reach of children and handle with care so that the system does not unintentionally start. When the vehicle is parked in an enclosed/partially enclosed area (ex: garage, car port...
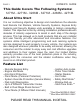
OWNER’S GUIDE PAGE 5 =1 =2 =3 =4 2-WAY LED 2-WAY LCD
OWNER’S GUIDE PAGE 6 Remote Star ter Functions Remote Starting (if remote start fails to start see page 19) 1. Press and release the button. 2. The park lights will flash and the siren* or horn (optional) will chirp once to confirm. The vehicle will then remote start, the siren* or horn (optional) will chirp and the park lights will then flash four times then remain on while the vehicle is running**.
OWNER’S GUIDE PAGE 7 Reservation Mode Very Important! Do not set Reservation Mode if the vehicle is occupied. Manual transmission remote starters must be set into Reservation Mode before the remote starter will activate. The activation type of Reservation Mode is determined when the system is installed. Auto Reservation Mode (Default) Step 1 - While the vehicle is running, place into neutral and apply the park brake. Step 2* - Press and release the brake pedal twice.
OWNER’S GUIDE PAGE 8 Remote Transmitter Functions Arm/ Lock (optional) 1. Press and release the button. 2. The park lights will flash and the siren* or horn (optional) will chirp one time. 3. The system will arm and doors will lock (optional). NOTE: The LEDs on the antenna will start flashing within five seconds. If installed, the starter disable will activate. Disarm/ Lock (optional) 1.Press and release the button on the remote transmitter. 2.
OWNER’S GUIDE PAGE 9 Remote Transmitter Functions Trunk (default button) 1. Press and hold the button. 2. The doors will unlock (optional), continue holding until the Trunk Release activates. The trunk release will be confirmed by one park light flash and siren*** or horn (optional) chirp. Trunk (optional button*) 1. Press and hold the button. 2. The doors will unlock (optional), continue holding until the Trunk Release activates.
OWNER’S GUIDE PAGE 10 Timer Mode Timer Mode will start the vehicle at a user selectable start interval. The vehicle can be set to start once every 2, 3 or 4 hours, for a maximum of 12 starts. The vehicle will start at the selected start interval and run for the programmed runtime*. EXAMPLE: If the 4 hour start cycle was selected, the vehicle will start once every 4 hours and run for the programmed runtime*. To Enter Timer Mode.
OWNER’S GUIDE PAGE 11 Remote Transmitter Learn IMPORTANT! All remote transmitters not programmed at this time will be erased from memory for security. STEP 1 - Within 3 seconds turn the ignition key to the “ON” position three times leaving “ON” the third time. STEP 2 - Press and hold the Program Button. The park lights will turn “ON” and the siren or horn (optional) will chirp once.
OWNER’S GUIDE PAGE 12 System Service Mode (Valet Mode) System Service Mode will disable the remote starter. This will only effect the remote start portion of the system. The optional lock, unlock and trunk release features will still be operational. When the vehicle is to have any under hood or service work done, the system must be placed into Service Mode. This feature may also be used if a transmitter is lost, damaged or if the system malfunctions. ENTERING SERVICE MODE 1.
OWNER’S GUIDE PAGE 13 LCD DISPLAY 3265/4265 series These icon’s display the current status of the system. The icons may not all be present on the screen at all times, certain icons will only turn on when a feature is activated. PROGRAMMABLE ICON’S STATUS ICON’S STATUS CHECK MODE This feature is used to check the status of the system. To check the status press and release button on the remote transmitter. The remote will display the icons of the active features on the LCD screen.
OWNER’S GUIDE PAGE 14 LCD DISPLAY 3265/4265 series RUN TIMER- This icon activates during remote starting. The bar graph will count down in 2 minute increments, indicating how much time is left on the remote starter’s runtime. NOTE: At rest four bars will scan back and fourth. EXHAUST and WHEEL’S- These icons activate during remote starting. They will stay on during the runtime countdown. LOCK ICON- This icon indicates the ARMED status of the system.
PAGE 15 OWNER’S GUIDE LCD DISPLAY 3265/4265 series TRUNK ICON- This icon indicates that the trunk has been opened. SIREN and LOCK ICONS*- These icons indicate that the alarm has been triggered by the door, hood or ignition inputs. SIREN and HAMMER ICONS*- These icons indicate that the alarm has been triggered by the shock sensor input.
OWNER’S GUIDE PAGE 16 LCD DISPLAY 3265/4265 series Setting The Time Press and hold the and buttons until the remote transmitter chimes and the minute portion of the clock begins to flash. To change from minutes to hours, press and release the button. To increase the minutes or hours, press and release the button. To decrease the minutes or hours, press and release the button. Press and release the button to exit or the remote transmitter will exit if there is no activity for 20 seconds.
OWNER’S GUIDE PAGE 17 LCD DISPLAY 3265/4265 series Programable Icons-The six squares found at the bottom of the display are user/dealer programmable (see page 16 to enter). TIMER ICON- When the vehicle starts in Timer Mode, this icon will appear in conjunction with the usual icons that indicate that the vehicle is running by the remote starter. TELEPHONE ICON- N/A KEY ICON- This icon is displayed if the ignition key is in the “ON” position or if the system detected a start fault.
OWNER’S GUIDE PAGE 18 Shock Sensor-Alarm series ONLY! Shock Sensor Programming/ Adjustment To enter shock sensor programming: Press and hold the and the buttons for three seconds. The park lights will flash and the siren will three times. While the park lights are “ON”, strike the vehicle with the amount of force wanted to trigger the alarm. NOTE: The siren will chirp 3 times each time the system detects impact.
OWNER’S GUIDE PAGE 19 Diagnostics If the remote starter does not activate when the button is pressed the park lights will flash a diagnostic code to indicate what shutdown input has been triggered.
OWNER’S GUIDE PAGE 20 Limited Lifetime Warranty The manufacturer warrants to the original purchaser of their remote starters and alarms, that the product shall be free from defects in material and workmanship.