Rev. 2006.02 Advanced Remote Vehicle Security Systems www.ultrastarters.com FCC/ID Notice This device complies with Part 15 of the FCC rules. Operation is subject to the following conditions: 1. This device may not cause harmful interference, and 2.This device must accept any interference received, including interference that may cause undesired operation. CAUTION: Changes or modifications not expressly approved by the part responsible for compliance void the user’s authority to operate this devise.
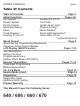
OWNER’S MANUAL PAGE 2 Table Of Contents Table Of Contents Alarm Functions Arm System Disarm System Priority Unlock* Silent Arm/Disarm Panic Trunk Release* Auxiliary #1 (Ch 4)* Page 2 Pages 3-5 Auxiliary #2 (Ch 5)* Car Finder Ignition Auto Locks* Passive Arming* Starter Disable* Dome Light Supervision* False Alarm Circuit *(optional features) Shock Sensor Page 6 Shock Sensor Programming/Adjustments Temporary Shock Sensor Bypass LCD Display (660/670 series) Pages 7-10 Icon Descriptions Setting The Time Pr
PAGE 3 OWNER’S MANUAL Alarm Functions Arm System 1. Press and release the button on the remote transmitter. 2. The park lights will flash and the siren will chirp one time. 3. The doors will lock (optional). 4. The LEDs on the antenna will start flashing within five seconds. Disarm System 1.Press and release the button on the remote transmitter. 2.The park lights will flash and the siren will chirp two times.* 3.The doors will unlock (optional). 4.The LEDs on the antenna will stop flashing.
OWNER’S MANUAL PAGE 4 Alarm Functions Panic Mode Activating Panic Mode Press and hold the button for three seconds. The park lights will begin to flash and the siren will activate. Disabling Panic Mode Press and release the or button to disable Panic. NOTE: Panic mode will stay activated for sixty seconds. Trunk Release Ch 3 (optional) Press and hold the button. The system will disarm, unlock the doors and continue to hold the button until the trunk release activates.
OWNER’S MANUAL PAGE 5 Alarm Functions Car Finder Mode (not available on the 670) 1. Press and hold the button for three seconds. 2. The park lights will flash and the siren will chirp five times to draw attention to the location of the vehicle. Ignition Auto Locks (optional) Ignition On/Off 1) The system will lock the doors 2 seconds after the ignition key is turned to the “on” position. 2) The system will unlock the doors when the ignition key is turned to the “off” position.
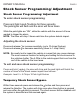
OWNER’S MANUAL PAGE 6 Shock Sensor Programming/ Adjustment Shock Sensor Programming/ Adjustment To enter shock sensor programming: Press and hold and buttons for three seconds. The park lights will flash and the siren will three times. While the park lights are “ON”, strike the vehicle with the amount of force wanted to trigger the alarm. NOTE: The siren will chirp 3 times each time the system detects impact.
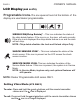
OWNER’S MANUAL PAGE 7 LCD Display (660 & 670) STATUS ICONS These icons display the current status of the system. The icons may not all be present on the screen at all times, certain icons will only turn on when a feature is activated. STATUS CHECK MODE This feature is used to check the status of the system. To check the status press and release the button on the remote transmitter. The remote will display the icons of the active features on the LCD screen.
OWNER’S MANUAL PAGE 8 LCD Display (660 & 670) Setting The Time To enter: Press and hold the and buttons until the remote transmitter chime and the minute portion of the clock begins to flash. To change from minutes to hours, press and release the button. To increase the minutes or hours, press and release the button. To decrease the minutes or hours, press and release the To exit: Press and release the button. button or no activity for 20 seconds.
OWNER’S MANUAL PAGE 9 LCD Display (660 & 670) Programable Icons-The six squares found at the bottom of the display are user/dealer programmable. SIREN ICON(Chirp Delete)* - This icon indicates the status of the chirp delete feature. If the icon is on, the siren will work normally. If the icon is not displayed the chirp delete feature is on and the siren will not chirp. NOTE: Chirp delete disables the Lock and Unlock chirps Only. SHOCK SENSOR ICON* - This icon indicates the status of the shock sensor.
OWNER’S MANUAL PAGE 10 LCD Display (660 & 670) LOCK ICON- This icon indicates the LOCKED status of the system. NOTE: The doors will be locked (optional) and the LEDs on the antenna will be flashing. UNLOCK ICON - This icon indicates the UNLOCKED status of the system. NOTE: The doors will be unlocked (optional) and the LEDs on the antenna will be off. TRUNK ICON- This icon indicates that the trunk has been opened.
OWNER’S MANUAL PAGE 11 Remote Transmitters Transmitter Programming IMPORTANT! All remote transmitters not programmed at this time will be erased from memory for security. STEP 1 - Within 3 seconds turn the ignition key to the “ON” position three times leaving “ON” the third time. STEP 2 - Press and hold the Program Button. The park lights will turn “ON” and the siren will chirp once Continue to hold the Program Button, the park lights will turn “OFF” and the siren will chirp 5 times quickly.
OWNER’S MANUAL PAGE 12 Remote Transmitters NOTE: Pause for 2-3 seconds between transmitters All the transmitters to be used must be programmed at the same time. All transmitters not programmed at this time will be erased from memory for security. The system holds a maximum of 3 transmitter codes. Battery Replacement The transmitter battery should be changed at least once every year to maintain proper operating range. Replace with a quality 23A 12volt Alkaline battery.
PAGE 13 OWNER’S MANUAL Car Jack Mode To activate Car Jack Mode: Type 1 (Door)- With the ignition key in the “On” position, open and close the door. The LEDs will begin to flash rapidly for 30 seconds. After an additional 30 seconds the siren will begin to chirp on/off for 10 seconds, followed by full siren. Type 2 (Ignition)- With the ignition key in the “On” position, turn the ignition key to the “Off” position.
OWNER’S MANUAL PAGE 14 Emergency Ser vice Mode - (Valet Mode) This feature will disable the system except for lock, unlock and trunk functions. This mode is used if a remote is misplaced, damaged or if the system malfunctions. If the system was installed with a starter disable this feature will disable the starter disable relay and allow the vehicle to start.
OWNER’S MANUAL PAGE 15 Diagnostics If the alarm system is triggered while armed, the system will retain in memory the cause of the trigger. The diagnostics can then be used to determine what the cause of the trigger was. When disarming the alarm, the siren/horn will chirp 3 times instead of the usual 2 times to indicate the alarm had been triggered. The system’s LED will also flash in pulses to indicate which input triggered the alarm.
OWNER’S MANUAL PAGE 16 Limited Lifetime Warranty The manufacturer warrants to the original purchaser of their remote starters and alarms, that the product shall be free from defects in material and workmanship.