
Instruction manual


18
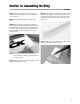
Section 4: Bolting the Wing to the Fuselage
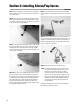
Step 5. With the wing centered check the alignment by measur-
ing from each wing tip to the rear of the fuselage. Be sure to use
the same point on each wing tip exactly the same distance on
each side from the center of the wing. Refer to the figure below.
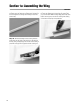
Step 6. With the wing centered and aligned to the fuselage,
mark the wing exactly in line with the sides of the fuselage.
Step 7. Remove the wing from the fuselage. You will use the
wing bolts installed through the bottom of the wing bolt blind
nuts to mark the location for the wing on the fuselage. In the
fuselage, locate the wing bolt block with the preinstalled blind
nuts. Partially thread the wing bolts through the blind nuts from
the bottom up until the wing bolts are just slightly above the
wing saddle.
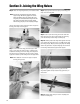
Step 8. Carefully install the wing back onto the fuselage without
touching the wing bolts.
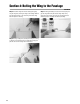
Step 9. With the leading edge dowels of the wing installed in
the fuselage, hold the trailing edge just above the upside down
wing bolts in the fuselage. Hold the trailing edge over the bolts,
aligning the center of the wing over the marks you previously
made on the wing. Carefully lower the trailing edge of the wing
until it contacts the wing bolts. Gently press down on the trail-
ing edge, to make indents on the bottom of the wing, marking
where to drill for the wing bolts.
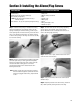
Step 10. Remove the wing and the wing bolts from the fuse-
lage. Note the indents on the bottom of the wing.
CONTINUED