
Instruction manual

21
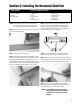
Section 5: Installing the Horizontal Stabilizer
Note: Before assembling the tail, be sure the elevator and
the CA hinges are removed from the horizontal stabi-
lizer. The hinges and elevator will be installed later.
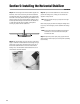
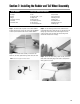
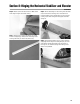
Step 1. Measure and mark the center of the horizontal stabilizer
at its leading and trailing edges.
Step 2. Install the wing onto the fuselage.
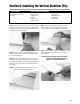
Step 3. On the bottom of the aft end of the fuselage is a saddle
cut-out for the horizontal stabilizer to be mounted. Make a center
mark on the front of the saddle on the fuselage and place the
horizontal stabilizer into the horizontal stabilizer saddle. Align the
two marks you just made. Tape the leading edge and trailing edge
of the horizontal stabilizer to the fuselage to secure it for now.
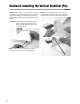
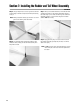
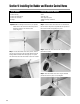
Step 4. With the fuselage and horizontal stabilizer resting on a
flat surface, align the horizontal stabilizer by measuring from
fixed points on the wing to the outside of the trailing edge tip
of the horizontal stabilizer. Be sure that the trailing edge of the
horizontal stabilizer stays on its center mark.
Step 5. Adjust the stabilizer until you have an equal distance
on both the right and left sides of the stabilizer to the wing.
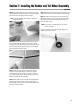
Step 6. When you’re satisfied with the alignment of the horizontal
stabilizer with the wing, carefully mark the position with a pencil at
the junction where the horizontal stabilizer meets the fuselage.
Step 7. Remove the horizontal stabilizer from the fuselage.
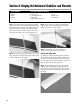
Using a hobby knife and a straight edge, carefully cut the cover-
ing approximately 1/16 " inside the lines you drew.
Caution: It’s very important that you do not press
hard enough to cut into the wood structure,
as doing so could weaken the horizontal
stabilizer.
• Horizontal stabilizer
• Fuselage
• Assembled wing
• Hobby knife
• Ruler
• Felt-tipped pen
• Pencil
• 30-minute epoxy
• Paper towels
• Rubbing alcohol
• Mixing stick
• Epoxy brush
• Masking tape
Parts Needed Tools and Adhesives Needed