
Instruction manual


55
Section 19: Programming Guide —
JR XP783/XP347/XP388S
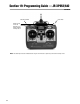
JR’s XP783, XP347 and XP388S all feature the same base level
programming, so the procedure for setting up quad flaps for
each radio is identical.
Note: Most of the quad flap features needed for the Ultra
Stick are already preprogrammed in the glider
(referred to as GLID) software included in these three
radios. While the Ultra Stick
™
40 is not a glider, there
are several built-in features in the glider programming
that make quad flap easier to program and use. We
strongly suggest using the GLID model type program-
ming that’s included in these radios.
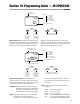
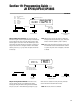
First, it’s important to plug each servo into the correct port in
the receiver.
Programming Your JR XP783, XP347 and XP388S in 14 Easy Steps
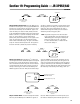
Receiver Battery
4N600
4.8V 600mAh
JAPAN REMOTE CONTROL CO., LTD.
®
ON
OFF
Not Used
Auxiliary 2/Flap (left)
Auxiliary 1/Flap (right)
Aileron (left)
Rudder
Elevator
Aileron (right)
Throttle
Pulse Code Modulation
BATT
AUX 4
AUX 3
AUX 2
AUX 1
GEAR
RUDD
ELEV
AILE
THRO
9 CHANNEL RECEIVER
NER-649S
NEW ABC & W SYSTEM
JAPAN REMOTE CONTROL CO. LTD
MADE IN JAPAN
72 MHZ
Not Used
NER-649S
S-PCM Receiver
JRPR649
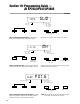
When setting up a new aircraft, it’s important to reset the
programming to the factory defaults.
MDL.1
RSET
Function Being ProgrammedModel No. to be Reset
Data Reset Key
+
CLR
–
UP CHDN
Step 1. Resetting the programming to factory defaults:
Hold down both the Up and the Down keys simultaneously and
turn on the radio to enter System Setup mode. Now press the
Up key until “RSET” (reset) appears on the screen. Pressing the
CLR key will reset the programming to the factory defaults.