
Instruction manual

66
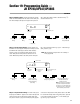
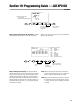
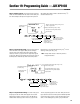
Trim Display
Pot 5: Flaperon Flap Trim
Pot 6: Dual Flap-Flap Trim
Pot 7: Aileron Trim of Dual Flap
Press the + or - key
to inhibit or activate
“Trim POT.”
Press either CH key
to select the desired
trim POT.
Press the Clear key to
activate selected Trim POT.
DN
SELECT
CH CH CLEARUP
→POT 5
↓
POT 6
↓
POT 7
Setting Operation
→Channel→INH
Each Trim’s Operational Direction
Section 19: Programming Guide — JJR XP8103
CONTINUED
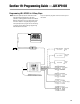
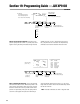
Step 6. Turning off the trim knobs: In Function mode,
press the Up key until the “D/FLAP T”. (dual flap trim) screen
appears. Pressing the CH key will advance through the three
available trim pots: 5, 6 and 7. Inhibit all three by pressing
the (+) key when each one is selected. This will prevent any
unwanted control movement should the knobs be moved.
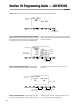
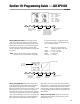
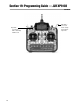
Sub-Trim Value
(max ± 125)
Increase or decrease
sub-trim value
(L&R/U&D)
Channel Selection
(press to manipulate
arrow)
Press to reset sub-trim
value to factory preset (0).
Press to display channels
1-4 and 5-8
(2 Screens).
DN
SELECT
CH CH CLEARUP
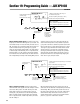
Channel Being Programmed
SPOI Throttle
AILE1 Aileron Left
ELEV Elevator
RUDD Rudder
AILE2 Aileron Left
FLAP Flap (Right)
AUX2 Flap (Left)
Step 7. Adjusting the sub-trims: Turn on the transmitter
and receiver and center the trims. Move the flap switch in the
upper position. Now reposition all the servo arms so that all
the control surfaces are as close as possible to their neutral
positions. In System Setup mode, press the Up key until the
“Sub-Trim” screen appears. Now press the Channel key to
access the desired channel and press the (+) or (-) key to per-
fectly center each control surface. Press the Select key to access
the other four channels.
Note: The throttle is refereed to as “SPOI” in the glider model.