
Instruction manual


73
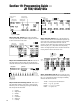
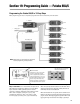
Step 7. Dual Rate and Exponential, Code 13: Enter
Code 13. The Page key will allow you to select the aileron, ele-
vator and rudder channels while each respective dual rate switch
will allow you to select positions 0, 1, or 2 for that channel.
Adjust the high rates to 100%, the middle rates to 75% and the
low rates to 50% for all three channels. First flights should be
made at a low 50% rate.
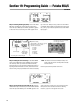
Exponential is used to reduce the control sensitivity around
center while still providing full control authority when the control
stick is fully deflected. Because the Ultra Stick
™
40 has large
recommended control throws, it’s a good idea to give expo a try,
even if you’ve never used it before, to prevent over-controlling.
With the PCM-10 channel radios, exponential adjusts exactly
like dual rate. Select the desired channel using the Page key,
then select the switch position using the corresponding dual rate
switch, then use the (+) or (-) key to adjust the expo value.
We recommend 30% as a good starting point for all channels
and positions.
Later you can fine-tune the control feel to your liking after
several test flights.
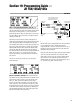
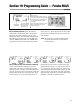
Step 8. Flap System, Code 66: Enter Code 66. Move the
flap switch to the mid-position and below the “FLAP MID” on the
right side of the screen, press the (-) key until the flap comes
down 1
1
/4". Next, move the flap switch to the down (land)
position and, below the “FLAP LAND” on the right side of the
screen, press the (-) key until the flaps come down 1
5
/8". With
the flap switch still in the down position, press the (+) key below
“ELEV LAND” until the elevator comes down
5
/8". We have just
setup the takeoff flaps (switch in the center position) and the first
part of the crow (switch in the lower position).
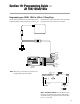
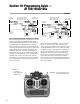
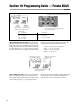
Step 9. Programmable mix for up ailerons in crow, Code 51:
We will need to set up a programmable mix to allow the ailerons
to move upward when crow is activated. Enter Code 51,
Programmable Mix 1. Press the “6” key and then the “5” key at
the bottom of the screen to select the FLAP as the master and
the GEAR as the slave channels.
Next, press Enter. Now press Page to access the switch selection
screen and press the key below the LD to select the LAND
switch position to turn on the mix. Press the Page key twice to
return to the mix screen. Move the flap switch to the lower
(LAND) position, then press the (+) key until the ailerons go up
3
/4". If the ailerons go down, press the Turn key.
CONTINUED
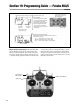
Section 19: Programming Guide —
JR 10X/10SxII/10Sx
Switch or stick position where mixing
values will become active. All except
FIX will have a 0 and a position 1
Indicates
direction of mix
Indicates program
being accessed
Touch the
keys to alter mixing
value
Flap is the maste
r
channel, gear is
the slave
Touch to
change mix direction
Refer to mixing
value and directions
Touch to
proceed to other
mixing screen
Shaded box indicates
value being adjusted
Mixing
percentage
value