
Instruction manual


76
Section 19: Programming Guide — Futaba 8UA/S
CONTINUED
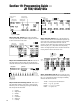
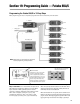
Step 2. Selecting model type (GLID): Press the two Basic
Menu keys simultaneously to enter the basic programming
mode. Now press Mode key until “PARA” (parameters) appears
on the screen. Press a Cursor key until “TYPE” appears on the
top of the screen. Next press the (+) button until “GLID 2FLP”
is displayed. With “GLID 2FLP” displayed on the screen press
the (+) and (-) key simultaneously twice to access the Glider 2
flaps program.
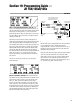
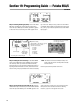
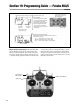
Channel display
NORM or REV
display indicates
travel setting
* The blinking item is what is being set.
These keys are used to reverse channels
1-8 in this menu as needed.
Indicates NORM or REVERS throw setting
Data Input Keys
1. Right Aileron Setting
Select “NORM” or “REV” with the (+)(-) keys.
2. Repeat above procedure to reverse
channels 2-8 as necessary.
2 = Elevator
3 = Throttle
4 = Rudder
5 = Right Flap
6 = Left Flap
7 = Left Aileron
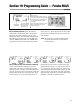
Step 3. Setting the servo reversing: In the BASIC MENU
mode, press the Mode key until the “REVERS” screen appears.
The Cursor key allows you to access the different channels,
while pressing the (-) key reverses the selected channel (the (+)
key changes that channel back to normal). Check that all chan-
nels are moving in the proper direction and reverse as necessary.
Note: The throttle is referred to as ABK (air brake) in the
glider mode and functions normally with the throttle
stick and trimmer.
Don’t worry about the flap direction at this time.
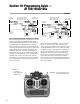
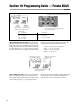
Step 4. Turning off the flap trim knob (Ch. 6): Press the
Advance Menu keys simultaneously to enter the Advanced Menu
mode. Now press the Mode key until “FLPTRM” appears on the
screen. Press the (+) button to turn on the flap trim function.
Now press the Cursor so that the +30 value is blinking.
Press the (-) key until a “0” appears in the screen.