USING YOUR SUPERPRINT 4425 & LARGE VISUAL DISPLAY (LVD) ™ 305-003603
Acknowledgement In 1963, Dr. Robert H.Weitbrecht, an American physicist who was deaf, developed an acoustic coupler that could send and receive teletypewriter signals over the telephone lines. His invention, the Weitbrecht Modem, enabled people who are deaf to use the telephone for the first time. While modern technology now makes it Dr. Robert H. Weitbrecht, possible to build advanced microcomputer 1920–1983, inventor of the first TTY modem.
CONTENTS Chapter 1 Chapter 2 Chapter 3 Important safety instructions p. 4 Introduction p. 6 Features . . . . . . . . . . . . . . . . . . . . . . . . . . . . . . . . . . . . . . .6 Overview . . . . . . . . . . . . . . . . . . . . . . . . . . . . . . . . . . . . . .7 Set-up p. 9 Plugging in power, a telephone line and the LVD . . . . . . . .10 About the control key Ctrl . . . . . . . . . . . . . . . . . . . . . . . .13 Turning on the LVD option Ctrl + 9 . . . . . . . . . . . . . . . . . .
Chapter 4 Auto busy redial Ctrl + Shift + Return . . . . . . . . . . . . . Change to other TTY Ctrl + Shift + C . . . . . . . . . . Three-way calling Ctrl + Shift + F . . . . . . . . . . . . . . Transferring a call Ctrl + 1 . . . . . . . . . . . . . . . . . Auto-answer How auto-answer works . . . . . . . . . . . . . . . . . Turning on auto-answer Ctrl + ............ Turning off auto-answer Esc . . . . . . . . . . . . . . . Interrupting auto-answer Esc . . . . . . . . . . . . . .
Chapter 8 Chapter 9 Appendix A Setting the outgoing auto-answer memo Ctrl + 9 . . . . . . . .67 Changing the auto-answer password Ctrl + 9 . . . . . . . . . . .67 Changing the greeting memo Ctrl + 9 . . . . . . . . . . . . . . . .68 Turning off printing of the date and time Ctrl + 9 . . . . . . .68 Setting the date and time Ctrl + 9 . . . . . . . . . . . . . . . . . . .68 Saving a relay voice announcer number Ctrl + 9 . . . . . . . . .69 Turning off Turbo Code Ctrl + 9 . . . . . . . . . . . . . . . . . .
Important Safety Instructions General safety Save these instructions! When using your Superprint 4425 and LVD, always follow these basic safety precautions to reduce the risk of fire, electric shock, and injury to persons. 1. Read and understand all instructions. 2. Follow all warnings and instructions marked on the Superprint 4425 and LVD. 3. Unplug the Superprint 4425 and the LVD from the wall outlet before cleaning. Do not use liquid or aerosol cleaners. Use a damp cloth for cleaning. 4.
11. Unplug the Superprint 4425 and LVD from the wall outlet and refer servicing to qualified service personnel under the following conditions: a. When the power supply cord or plug is damaged or frayed. b. If liquid has been spilled into the Superprint 4425 or LVD. c. If the Superprint 4425 or the LVD has been exposed to rain or water. d. If the Superprint 4425 or LVD does not operate normally by following the operating instructions.
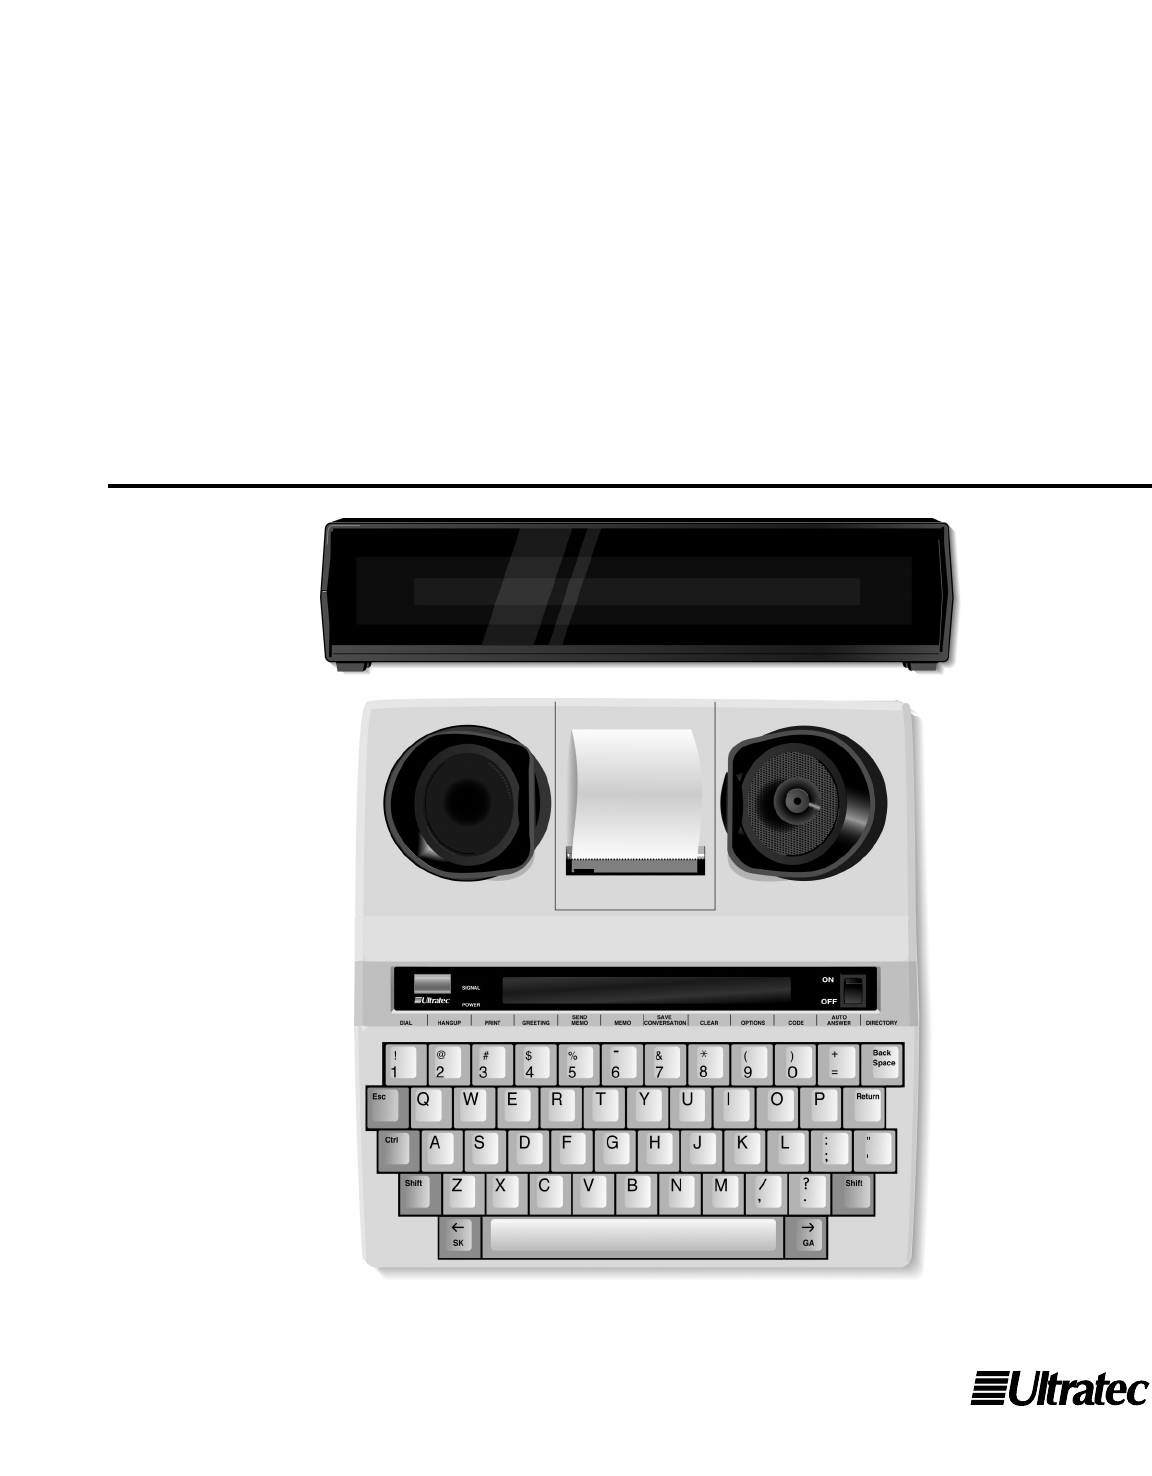
INTRODUCTION Features Welcome to the Superprint 4425™ TTY from Ultratec. Your new TTY has the following special features: A ring flasher that tells you when someone is calling. Turbo Code® communication protocol. This feature transmits signals to other Turbo Code TTYs as fast as you type. Turbo Code also lets you interrupt the other person’s typing. Auto ID™ alerting system. Auto ID automatically alerts the answering party that you are calling by TTY.
Overview INTRODUCTION • 7
8 • INTRODUCTION
CHAPTER 1 SETUP All you need to do to set up the Superprint 4425 and Large Visual Display (LVD) is plug them in. You must plug in the Superprint 4425 AC adapter for at least 24 hours to charge the batteries. The ring flasher will not work properly until the batteries are fully charged. After that, leave both AC adapters plugged in all the time unless you need to use batteries during a power outage or while traveling. (The LVD does not have a battery and can only be used with the AC adapter.
Plugging in power, a telephone line and the LVD Be sure to pull the plastic tab out of the battery compartment under the Superprint 4425 before you plug in the AC adapter. Caution! The Large Visual Display (LVD) comes with its own AC adapter. Do not mix up the Superprint 4425 and LVD adapters. If you plug the Superprint 4425 adapter into the LVD, you will damage the LVD. If you plug the LVD adapter into the Superprint 4425, you will damage the Superprint 4425.
1. Plug the small 2. Plug the large end of the end of the ribbon cable ribbon cable into the into the LVD. Superprint 4425. 3. Plug one end 4. Plug the other end of the of the teletelephone line phone line into into a teleeither phone wall telephone jack outlet. on the Superprint 4425. 7. Plug the LVD 6. Plug the 5. Plug the AC adapter Superprint Superprint cord into the 4425 AC 4425 AC LVD. adapter into an adapter cord electrical into the jack outlet. on the back of the Superprint 4425. 8.
The picture on the previous page shows how to set up for direct connect use. Direct connect means that the telephone line is plugged directly into the Superprint 4425. You do not need a telephone. When you use direct connect, you can dial directly from the keyboard and use auto-answer. You can also connect by putting a telephone handset in the acoustic cups if for some reason you cannot plug a telephone line into the Superprint 4425. See Acoustic calling and answering on page 28 for more information.
Connecting a signaler or telephone The Superprint 4425 has an extra jack for a telephone or a signaler. You can use either jack for the telephone line. About the control key Ctrl The control key, Ctrl , gives instructions to the Superprint 4425 when you hold it down and press a function key. Most of the function keys are on the top row of the Superprint 4425. See Superprint 4425 function keys on pages 16–18 for a complete list. You must hold down the Ctrl key while pressing the other key.
Turning on the LVD option 1. Press the options key (hold down the Ctrl key and press the 9 key). 2. Press the Return key until you see the LVD option on the display. 3. Press the Spacebar to change the setting to ON. 4. Press the Esc key when you finish. The LVD setting stays on until you change it.
Using the Large Visual Display (LVD) Use the switch on the back of the LVD to turn it on or off when you are not using it. LVD prompts Some display messages will be slightly different on the LVD than on the Superprint 4425 display because the LVD displays 15 characters per line while the Superprint 4425 displays 20 characters per line.
Superprint 4425 function keys This diagram shows the most important Superprint 4425 functions. Functions tell the Superprint 4425 to do something or change a setting. For example, the auto-answer function turns on auto-answer, and the options function can be used to change the print size. All functions begin Ctrl + 2 hangs up the telephone line (page 26). Ctrl + 3 turns the printer on and off (page 20). Ctrl + 4 Ctrl + 5 sends the greeting memo (page 34). sends a memo (page 53).
by pressing and holding the Ctrl key. The chart on the next page lists all of the Superprint 4425 functions. Use the page numbers to find more information about each function. Ctrl + 8 clears all or part of memory (page 32). Ctrl + 9 Ctrl + 0 changes settings (page 63). changes codes (page 81). Ctrl + + = turns on auto-answer (page 41). Ctrl + Bcksp saves telephone numbers (page 57). Ctrl + H tells how to use functions (page 21). Ctrl + Spacebar turns on the TTY Announcer (page 35).
Complete list of function keys Dial Hangup Print Greeting Send memo Memo Save conversation Clear Options Code Auto-answer Directory Help Relay voice Announcer Interrupt Time Auto busy redial Wait for response Three-way calling Change to Baudot Remain Ctrl Sensitivity Change to other TTY 18 • SETUP Ctrl Ctrl Ctrl Ctrl Ctrl Ctrl + + + + + + + 1 2 3 4 5 6 7 Ctrl +8 +9 +0 + += + Backspace +H +V + Spacebar +I +T + Shift + Return Ctrl + Shift + W Ctrl + Shift + F Ctrl + Shift + B Ctrl + Ctrl +S
About Auto ID ™ The Auto ID feature alerts a hearing person that you are calling from a TTY. It alerts the person by sending several audible tones over the telephone line every few seconds. Auto ID helps emergency services such as 911 detect that you are calling by TTY. Auto ID is not the same as Caller ID, a separate service available through your telephone service provider that requires additional equipment.
About the printer Ctrl +3 The printer is on when you turn on your Superprint 4425 for the first time. Press the print key ( Ctrl + 3 ) to turn off the printer. The display says PRINTER OFF. Press the print key again to turn the printer back on. You can turn the printer on or off at any time, including during a call. The printer starts a new line after 24 characters are typed. If a word is too long to fit at the end of a line, the printer divides it with a dash.
The print size stays set until you change it again or reset the Superprint 4425. Turning off printing of the date and time Ctrl + 9 You can stop the Superprint 4425 from printing the date and time on conversations and messages by following these steps: 1. Press the options key ( Ctrl + 9 ). You will see PRINT (UP/LOW) CASE on the display. 2. Press the Return key until you see PRINT DATE/TIME (ON) on the display. 3. Press the Spacebar to change the setting to OFF. 4.
22 • SETUP
CHAPTER 2 CALLING This chapter covers the basics of making and receiving TTY calls and how to review a conversation after you finish a call. It also explains Turbo Code and how Turbo Code allows you to interrupt the other person while he or she is typing.
Making a call in direct connect 1. Turn on the Superprint 4425 and the LVD. 2. Press the dial key (hold down the Ctrl key and press the 1 key). 3. Type the telephone number you are calling. Use the Backspace key to correct mistakes. Press the Return key to dial the number. 4. When you see an answer on the Superprint 4425 display or the LVD, type a greeting. Turn off the Superprint 4425 and the LVD when you finish.
Signal light and display The signal light (and display when you use direct connect) show what is happening on the telephone line in the following ways: Signal light Display Telephone line Steadily on Dial tone Flashing slowly RINGING Flashing quickly BUSY Telephone ringing Telephone busy Flickering Person picking up telephone or speaking Dialing tips You may need to type a 9 or other number to reach an outside line if you are using the Superprint 4425 in an office.
Dialing from the directory Ctrl + 1 You can dial from the directory if you have numbers saved. (See Directory on page 57 for more information about the directory.) Follow these steps to dial from the directory: 1. Press the dial key (hold down the Ctrl key and press the 1 key). You will see TYPE NAME, NUM, OR CR on the display. 2. Type a name or press the Spacebar to review the list of directory names. 3. Press the Return key when you find the name you want.
Answering a call in direct connect 1. The ring flasher flashes when the telephone rings. 2. Turn on the Superprint 4425 and the LVD. You will see RING on the display. 3. Type a greeting and wait for an answer. 4. Turn off the Superprint 4425 and the LVD when you finish.
Acoustic calling and answering 1. Put the telephone handset in the acoustic cups on the Superprint 4425. Make sure the telephone cord is on the left side. 2. Turn on the Superprint 4425 and the LVD. If you are answering a call, type a greeting. If you are making a call, go on to Step 3. 3. Dial the number on the telephone. 4. When you see an answer on the Superprint 4425 display or the LVD, type a greeting. Hang up the telephone and turn off the Superprint 4425 when you finish.
® About Turbo Code Turbo Code is an improved version of Baudot code. It sends signals to other Turbo Code TTYs as fast as you type and allows you to interrupt the other person at any time during a conversation. The Superprint 4425 automatically connects in Turbo Code or Baudot code, depending on which code the other TTY is using. It only uses Turbo Code when you connect with another Turbo Code TTY.
3. The other person will see INTERRUPT on his or her display. He or she can choose to stop typing and let you go ahead or ignore your interruption and continue. If you see INTERRUPT on your display while the ring flasher flashes, it means that the other person wants to interrupt you and start typing. You can choose to stop and let the other person go ahead or continue typing yourself.
Reading conversation memory Shift + A conversation is everything you and the other person type during a call. Conversations are saved one after another in the conversation memory until the memory fills up. When the memory is full, the Superprint 4425 starts clearing the oldest conversations to make room for new ones. 1. Press the left arrow key (hold down the Shift key and press the key) to move back in memory. To move faster, hold down the Shift key and let go of the key. 2.
Clearing conversations If for some reason you do not want to leave a conversation in memory, you can clear the conversation memory yourself. This erases all conversations, but does not clear memos, directory entries, or auto-answer messages. Follow these steps to clear all conversations: 1. Press the clear key ( Ctrl + 8 ). You will see CLEAR (CONVERSATION) on the display. 2. Press the Return key. 3. Press the Y key when you see CLR CONVERSATION Y/N. Press the N key if you decide not to clear.
CHAPTER 3 ADVANCED CALLING This chapter describes Superprint 4425 features that can make your calling easier and more enjoyable. Several of these features enable you to take advantage of your telephone’s advanced calling features. For the basics of making and answering calls, see Chapter 2.
Using the greeting memo Ctrl +4 Your Superprint 4425 comes with a greeting memo already saved in the list of memos. The memo says HELLO GA. Follow these steps to answer a call with the greeting memo: 1. Turn on the Superprint 4425. 2. Press the greeting key (hold down the Ctrl key and press the 4 key). You will see HELLO GA on your display while the memo is sent over the telephone line.
Using the TTY Announcer ™ Ctrl + Spacebar The TTY Announcer™ message is a recording of a woman’s voice that says, “TTY call, please use text telephone.” Each time the voice speaks, the message is also displayed. Use the TTY Announcer when you think the person you are calling is expecting a voice call and may hang up if no one responds after they say hello. 1. Dial a number (see pages 24, 25, and 28 for more information on dialing).
Wait for response Ctrl + Shift + W Use the wait for response feature when the other person tells you to hold. The Superprint 4425 will flash the ring flasher when the other person starts typing again. Follow these steps to turn on wait for response: 1. When the other person types, “Hold please,” or something similar, hold down the Ctrl and Shift keys and press the W key ( Ctrl + Shift + W ). The display says WAITING. 2. When you see the ring flasher flashing, the other person is typing.
Saving a relay voice announcer number Ctrl +9 1. Press the options key (hold down the Ctrl key and press the 9 key). 2. Press the Return key until you see the relay option on the display, then press the Spacebar to change the setting to YES. 3. Press the Return key and type the relay service telephone number. Use the Backspace key to correct mistakes. 4. Press the number.
Auto busy redial Ctrl + Shift + Return When a number is busy, the Superprint 4425 can redial the number by itself up to 30 times. It will let you know when it makes a connection by flashing the ring flasher. You must be using direct connect to use this feature. Follow these steps to turn on auto busy redial: 1. Dial a number. If the number is busy, the display says BUSY. 2. Hold down the Ctrl key and the Shift key and press the Return key ( Ctrl + Shift + Return ). The display says AUTO REDIAL 01.
Three-way calling Ctrl + Shift + F If your telephone service includes three-way calling, the Superprint 4425 three-way calling feature lets you put one call on hold, call another number, and carry on a conversation among three people. Follow these steps to use the three-way calling feature: 1. Call the first number and begin your conversation. 2. Place the first person on hold by pressing the Ctrl key, the Shift key, and the F key ( Ctrl + Shift + F ).
4. Press the Return key. 5. Press the hangup key ( Ctrl + 2 ) or turn off your Superprint 4425 to hang up when you see the last number you dialed appear on the display. The exact steps you need to follow will depend on your local telephone system. Transferring a TTY call will require the same steps as transferring a voice call.
CHAPTER 4 AUTO-ANSWER Use auto-answer when you want the Superprint 4425 to answer TTY calls and take messages when you are busy or away. You can also use autoanswer when you are working around your home or office to make sure you do not miss calls. You must be using direct connect to turn on autoanswer.
How auto-answer works The Superprint 4425 answers a call by sending the relay voice announcer message and the outgoing auto-answer memo. The relay voice announcer message says, “Please use text telephone or dial relay.” It also adds a relay number if you have saved one. See Using the relay voice announcer on page 36 for more information about the relay voice announcer message. The auto-answer memo is a short text message which says, “You have reached an answering machine, please leave a message, GA.
Turning on auto-answer Ctrl + + = 1. Press the auto-answer key (hold down the Ctrl key and press the + = key). If you see REVIEW MESSAGES Y/N on the display, press the Y key to read messages or press the N key if you decide not to read them. 2. Press the Return key. Auto-answer is on. Be sure to leave the Superprint 4425 on. Turning off auto-answer Esc Press the Esc key or turn off the Superprint 4425 to turn off auto-answer.
Reading auto-answer messages When auto-answer is on, the display shows how many messages you have received. 1. Press the Esc key to turn off auto-answer. 2. Press the Y key to read your messages. Each message begins with 5 dashes and the date and time of the call. Press the Spacebar to pause. Press the Spacebar again to continue. 3. To stop reading messages, press the Esc key.
4. Press the Y key to clear your auto-answer messages. Press the N key if you decide not to clear them. Hold down the Shift key and the key to read messages at normal speed. Keep holding down the Shift key but let go of the key to go faster. Hold down the key again to return to normal speed. Hold down the Shift key and the key to read back through messages. If you do not want to read messages when you turn off auto-answer, you can do it later. Messages stay in memory until you clear them.
Auto-answer options Changing to a different auto-answer memo Ctrl + + = You can change to a different auto-answer memo by typing a new memo name (and contents if necessary) when you turn on auto-answer. Follow these steps to change your auto-answer memo: 1. Press the auto-answer key ( Ctrl + ). You will see ANSWER MEMO and the name of your answer memo on the display. 2. Type a new name and press the Return key. 3.
Turning off the auto-answer relay voice announcer Ctrl + 9 When the Superprint 4425 answers the telephone, it sends out the relay voice announcer message before it sends your auto-answer memo. If you do not want the Superprint 4425 to send the message, follow these steps to turn it off: 1. Press the options key ( Ctrl + 9 ). You will see PRINT (UP/LOW) CASE on the display. 2. Press the Return key until you see AUTO ANSW VOICE (ON) on the display. 3. Press the Spacebar to change the setting to OFF. 4.
Remote message retrieval Remote message retrieval allows you to use another TTY when you are away from home or work to call your Superprint 4425 and read your auto-answer messages. You must enter and save a password before you can use remote message retrieval. The password prevents others from reading your messages. You can only have one password per household or office. Saving a password Ctrl + 9 Follow these steps to save a password: 1. Press the options key ( Ctrl + 9 ). 2.
4. Type / and your password, like this: /PASSWORD 5. Press the Return key again. Your Superprint 4425 sends the number of messages you have and the number of free characters in auto-answer memory. After a pause, it sends the first message. The Superprint 4425 pauses briefly after each message. It sends (END OF MESSAGES) at the end. 6. When your Superprint 4425 asks CLEAR MESSAGES Y/N, press the Y key to clear them. Your Superprint 4425 sends MESSAGES CLEARED and hangs up to wait for the next call.
5 0 • A U TO - A N S W E R
CHAPTER 5 MEMOS A memo is a short message that you save in the Superprint 4425 memory and later send to someone during a conversation. Examples of memos are: ● The auto-answer memo that the Superprint 4425 sends out when you are away. ● The greeting memo that you can send when you answer the telephone. ● The memo that you create when you save a conversation. ● A memo that contains a message, perhaps about an upcoming meeting, that you want to send to several people.
Saving a memo Ctrl +6 1. Press the memo key (hold down the Ctrl key and press the 6 key). The display will ask for a memo name. 2. Type a name and press the Return key. Names can be up to 8 letters, numbers, or spaces. The display shows the memo name with space to type the memo. (This example uses the name “Hello.”) 3. Type the memo. 4. Press the finish.
Use these function keys when you type your memo: ● The left arrow key ( Shift + ) and the right arrow key ( Shift + ) move the memo back and forth across the display. ● The Backspace key erases characters. ● The Return key starts a new line when the memo is printed. ● The remain key ( Ctrl + R ) shows free space in memory. ● The clear key ( Ctrl + 8 ) erases the memo contents. Sending a memo Ctrl +5 1. Press the send memo key (hold down the Ctrl key and press the 5 key). 2.
Editing or clearing a memo Editing a memo Ctrl + 6 1. Press the memo key ( Ctrl + 6 ). You will see EDIT MEMO on the display. 2. Press the Spacebar until you see the memo name on the display. 3. Press the Return key. Use these function keys to edit the memo: ● The left arrow key ( Shift + ) and the right arrow key ( Shift + ) move the memo back and forth across the display. ● The Backspace key erases characters. ● The Return key starts a new line when the memo is printed.
4. Press the Y key to clear all memos. (Press the not to clear all memos.) Printing memos Ctrl N key if you decide +6 Printing one memo 1. Press the memo key ( Ctrl + 6 ). You will see EDIT MEMO on the display. 2. Type the name of the memo or press the Spacebar to read through the list of memos. 3. Press the Return key when you see the name of the memo you want to print. 4. Press the print key ( Ctrl + 3 ). The Superprint 4425 prints the memo. Press any key to stop printing before the end of the memo.
Saving a conversation as a memo Ctrl +7 You can save your conversation as a memo at any time during or after a call, but you must do it before you turn off your Superprint 4425. The conversation is recorded from the beginning of the conversation until you hang up or tell the Superprint 4425 to stop. The memo stays in memory until you clear it. The memo can be edited, sent, or printed in the same way as any other memo. Follow these steps to record a conversation: 1.
CHAPTER 6 DIRECTORY The directory lets you dial a number by typing the name of an entry. This makes dialing the number much faster and easier. There is no limit to the number of telephone numbers you can save as long as the total number of characters in all directory entries and memos is less than 9,500. Saving a telephone number Ctrl + Backspace Editing or clearing a telephone number Printing directory numbers Ctrl + Backspace p. 58 p. 60 p.
Saving a telephone number Ctrl + Backspace You can save as many telephone numbers as memory will allow—up to 9,500 total characters for telephone numbers and memos. 1. Press the directory key (hold down the Ctrl key and press the Backspace key). 2. Type a name and press the Return key. Names can be up to 8 letters, numbers, or spaces, but must start with a letter. The name is displayed with space for a number. 3. Type the number. 4. Press the finish.
Use these function keys when you type the number: ● The left arrow key ( Shift + ) and the right arrow key ( Shift + ) move the number back and forth across the display. ● The Backspace key erases characters. ● The remain key ( Ctrl + R ) shows free space in memory. ● The clear key ( Ctrl + 8 ) erases the whole number. Dialing tips: ● ● ● ● ● ● ● In an office, you may need a 9 or other number at the beginning to reach an outside line. Use a comma to add a one-second pause.
Editing or clearing a telephone number Editing a number Ctrl + Backspace 1. Press the directory key ( Ctrl + Backspace ). You will see DIR NAME on the display. 2. Press the Spacebar until you see the number you want to change on the display. 3. Press the Return key. Use the following function keys to make your changes: ● The left arrow key ( Shift + ) and the right arrow key ( Shift + ) move the number back and forth across the display. ● The Backspace key erases characters.
4. Press the Y key to clear all entries. Press the not to clear them. Printing directory numbers Ctrl N key if you decide + Backspace Printing one number 1. 2. 3. 4. Press the directory key ( Ctrl + Backspace ). You will see DIR NAME on the display. Press the Spacebar until you see the number that you want to print on the display. Press the Return key. Press the print key ( Ctrl + 3 ). The entry is printed. Printing a list of numbers in the directory 1. Press the directory key ( Ctrl + Backspace ).
6 2 • D I R E C TO RY
CHAPTER 7 OPTIONS This chapter describes all of the settings you can change with the options key. They are listed in the order they appear on the display when you press the options key ( Ctrl + 9 ) and then the Return key. Use the Spacebar to show the different settings for each option. Use the Return key to select a setting.
Setting the print case Ctrl +9 Follow these steps to print in all uppercase letters: 1. Press the options key ( Ctrl + 9 ). You will see PRINT (UP/LOW) CASE on the display. 2. Press the Spacebar to change the setting to UPPER. 3. Press the Esc key to save the setting and leave options or press the Return key to save the setting and go to the next option. Changing to an external printer Ctrl +9 Follow these steps to set up the Superprint 4425 to use an external printer: 1.
Note: This option is not displayed when the Printer option is set to external. Setting up to use an LVD Ctrl +9 This option is only displayed when the print option is set to internal. Follow these steps to set up the Superprint 4425 to use an LVD: 1. Press the options key ( Ctrl + 9 ). You will see PRINT (UP/LOW) CASE on the display. 2. Press the Return key until you see LVD (OFF) on the display. 3. Press the Spacebar to change the setting to ON. 4.
Setting pulse dialing Ctrl +9 The Superprint 4425 is set for tone dialing, which is correct for almost all telephone lines. You can, however, change the setting to pulse dialing if your line does not accept tone dialing. This setting remains changed until you change it again or reset the Superprint 4425 or lose power. Follow these steps to set pulse dialing: 1. Press the options key ( Ctrl + 9 ). You will see PRINT (UP/LOW) CASE on the display. 2.
Setting the outgoing auto-answer memo Ctrl + 9 Follow these steps to choose any memo as your outgoing auto-answer memo: 1. Press the options key ( Ctrl + 9 ). You will see PRINT (UP/LOW) CASE on the display. 2. Press the Return key until you see ANSWER MEMO on the display. 3. Type a memo name or press the Spacebar to read through the list of memos. Use the Backspace key to move back through the list. 4. Press the Return key when the display shows the name of the memo you want to use. 5.
Changing the greeting memo Ctrl +9 Follow these steps to change the memo that the Superprint 4425 sends when you press the greeting key ( Ctrl + 4 ): 1. Press the options key ( Ctrl + 9 ). You will see PRINT (UP/LOW) CASE on the display. 2. Press the Return key until you see GREET MEMO>GREETING on the display. 3. Either type a new name or press the Spacebar to find the name of a different memo in the list of memos. 4. Press the Return key to save the setting. 5. Press the Esc key to leave options.
3. Press the Spacebar key to change the setting to YES, then press the Return key. The display will show the date and time, with the month blinking. 4. Press the Spacebar or the Backspace key to change the month. 5. Press the Return key to move to the day. 6. Repeat steps 4 and 5 to change the day, year, and time. If you only want to change part of the setting, you can press the Esc key twice at any time to leave options.
Turning off Turbo Code Ctrl +9 Follow these steps to turn off Turbo Code: 1. Press the options key ( Ctrl + 9 ). You will see PRINT (UP/LOW) CASE on the display. 2. Press the Return key until you see TURBO CODE (ON) on the display. 3. Press the Spacebar to change the setting to OFF. 4. Press the Esc key to save the setting and leave options or press the Return key to save the setting and go to the next option. Turning off Auto ID Ctrl +9 Follow these steps to turn off Auto ID: 1.
Changing ASCII seek time Ctrl +9 Follow these steps to change the ASCII seek time: 1. Press the options key ( Ctrl + 9 ). You will see PRINT (UP/LOW) CASE on the display. 2. Press the Return key until you see ASCII SEEK TIME (3) on the display. 3. Type a number to change the setting to 0 or any number between 0 and 9. 4. Press the Esc key to save the setting and leave options or press the Return key to save the setting and go to the next option.
72 • OPTIONS
CHAPTER 8 CARE & REPAIR Ordinary care of your Superprint 4425 requires changing the printer paper when the paper runs out and replacing the batteries when they no longer hold a full charge. If you have any other problems, you may be able to solve them by reading the troubleshooting section. Besides the printer paper and battery compartments, the Superprint 4425 and LVD have no other user-serviceable parts. Any repair work should be done by a qualified service person.
Replacing the printer paper The printer uses high-quality thermal paper. Use the order card that comes with the Superprint 4425 to order paper or contact your dealer or Ultratec (the Ultratec address is on the inside front cover of this manual). Turn the Superprint 4425 on and be sure the printer is on, then follow these steps to put in a new roll of paper: 2. Hold the new roll 1. Take the printer so it unrolls from cover off by the bottom. pushing in on the back and lifting up. 3.
About the batteries The Superprint 4425 uses batteries when you unplug the AC adapter or the power fails. Fully-charged, the six AA rechargeable NiCad batteries will provide 45 to 60 minutes of normal use. When the power light blinks, you have about 5 minutes of power left. The batteries will last longer if you turn off the printer. Checking the batteries The batteries lose their ability to hold a full charge if you keep the Superprint 4425 plugged in all the time.
Replacing the batteries Replace the batteries every two or three years, or when they run down in less than 30 minutes and exercising them does not help. Use only AA NiCad rechargeable batteries. Turn over the Superprint 4425 and follow these steps to change batteries: 3. Put the battery 1. Take off the battery 2. Take out the old cover back on. batteries and put in cover by pushing in new ones. Be sure on the latch and the+and - ends lifting up. match the symbols on the holder.
Troubleshooting Direct connect Dialing does not work. Make sure you have the right tone or pulse setting for your telephone system. The display says NO DIRECT CONNECT. The Superprint 4425 is not properly connected to the telephone line. Be sure the cord is firmly plugged into the Superprint 4425 and the telephone wall jack. You can also try using a different telephone cord or wall jack. Poor reception The display shows all numbers, symbols, or unreadable characters instead of words. Press the Spacebar .
Printer The printer does not work. Be sure the printer is on. If it is, try resetting the printer by turning the Superprint 4425 off and on again. Be sure the Printer setting in the Options is set to Printer(Internal). See Changing to an external printer on p. 64 for more information. The printer works, but it prints too lightly or not at all. Make sure you have high-grade thermal printer paper and it is correctly installed. See Replacing the printer paper on page 74.
The Superprint 4425 works fine in the evening, but does not work during the day. You may have plugged one or both of the AC adapters into a switchcontrolled outlet. Try a different outlet that you are sure is not controlled by a switch. Clearing all memories You can clear all conversations, memos, directory entries, and auto-answer messages at one time. Follow these steps to clear all memories: 1. Press the clear key ( Ctrl + 8 ). You will see CLEAR (CONVERSATION) on the display. 2.
Repair If your Superprint 4425 or LVD is not working, we may be able to help you solve the problem over the telephone. Call Ultratec at the number on the inside front cover. Sending the Superprint 4425 for repair Follow these steps if you need to send the Superprint 4425 to our repair center: 1. Pack it in the original shipping carton or a similar sturdy box. 2. Include a note that describes the problem. The note will help the technicians find the problem. 3. Insure the Superprint 4425 for shipment.
CHAPTER 9 CODES The standard code setting for the Superprint 4425 is automatic. With this setting, the Superprint 4425 will use either Baudot code, Turbo Code, or ASCII code to answer calls, depending upon which code the other TTY uses. When you make a call using the standard setting, the Superprint 4425 will automatically connect in Turbo Code or Baudot code.
Setting the Baudot code baud rate Ctrl +0 The Superprint 4425 is set to use whichever code it needs to answer a call, but you can set the unit so that it will only use Baudot code. When you do, the Superprint 4425 will not try to use other codes. Follow these steps: 1. Press the code key ( Ctrl + 0 ). You will see CODE (AUTOMATIC) on the display. 2. Press the Spacebar to change the setting to BAUDOT. 3. Press the Return key. You will see BAUDOT (AUTO) BAUD on the display. 4.
Duplex controls how characters are displayed. If you get double characters (lliikkee tthhiiss) or none at all, change the option between half duplex and full duplex. The default is half duplex. Parity controls error-checking. You can choose 7N1, 8N1, 7E1, or 7O1. The first number is data bits. The middle letter means (N)o parity, (E)ven parity, or (O)dd parity. The last number is stop bits. 8N1 and 7E1 are used most often. The default is 8N1 parity.
Changing ASCII seek time Ctrl + 9 This option sets the length of time during which the Superprint 4425 sends out an ASCII seek tone. The normal TTY seek time is three seconds. You may need more time if you often connect to computers. Six seconds is recommended. Follow these steps to change the setting: 1. Press the options key ( Ctrl + 9 ). You will see PRINT (UP/LOW) CASE on the display. 2. Press the Return key until you see ASCII SEEK TIME (3) on the display. 3.
If the code option is set to automatic and your Superprint 4425 loses the ASCII connection, the Superprint 4425 will display NO ASCII CONNECTION! and change to Baudot code. To return to ASCII code, you must turn on ASCII yourself. See Turning on ASCII code and changing options on page 83.
86 • CODES
APPENDIX A USING AN EXTERNAL PRINTER You can use the LVD connector on the back of the Superprint 4425 to connect a parallel (Centronics-type) printer instead of the LVD. Follow these steps to change the printer setting if you use an external printer: 1. Press the options key ( Ctrl + 9 ). You will see PRINT (UP/LOW) CASE on the display. 2. Press the Return key until you see PRINTER (INTERNAL) on the display. 3. Press the Spacebar to change the setting to EXTERNAL. 4.
STICKY KEYS Ordinarily, when you use the Ctrl or Shift keys, you must hold down either key while you press another key. If you have trouble pressing two keys at one time, the sticky keys feature lets you use the Ctrl and Shift keys by pressing one key at a time. Press either Shift key five times to turn on sticky keys. You will see STICKY KEYS ON on the display. Now you can dial by pressing the Ctrl key and then pressing the 1 key. You do not need to hold down the Ctrl key.
SPECIFICATIONS Physical Dimensions Size: 10" x 9.5" x 3" (25.4 cm x 24.1 cm x 7.6 cm) Weight: 3.6 lbs (1.7 Kg) with batteries Power AC adapter–9VDC, 650 mA (barrel is positive) AC adapter is UL/CSA listed The six AA NiCad rechargeable batteries are userreplaceable. They power the unit for 45 to 60 minutes. Keyboard 50 ergonomic keys in 5 rows Control key plus 24 function keys Sticky keys for single-handed typists Character set: A-Z, 0-9, +=-$’()”/:;?,.
FCC Information The Superprint 4425 has been tested and found to comply with the specifications for a Class B digital device pursuant to Part 15 of the FCC Rules. These limits are designed to provide reasonable protection against harmful interference in a residential installation. This equipment generates and uses radio frequency energy and if not installed and used in accordance with the instructions, may cause harmful interference to radio communications.
Industry Canada Information NOTICE: This equipment meets the applicable NOTICE: The Ringer Equivalence Number (REN) for Industry Canada Terminal Equipment Technical Specifications. This is confirmed by the registration number. The abbreviation, IC, before the registration number signifies that registration was performed based on a Declaration of Conformity indicating that Industry Canada technical specifications were met. It does not imply that Industry Canada approved the equipment.
INDEX A B D AC adapter Superprint 4425, 7, 9, 10, 11, 75, 78 LVD, 7, 10, 11 Batteries, 12, 75–76 charging, 9, 12 checking, 75 disposing of, 5, 76 exercising, 75 how long they last, 12, 75 low power in, 75 replacing, 76 Date, see Clock Acoustic cups, 7 using, 9, 28 Adapter, see AC adapter Address, Ultratec, inside front cover Announcer, see TTY Announcer Announcer key, 7, 17, 18, 35 Answer setting, for ASCII code, 83 Battery compartment, 7, 10, 76 Baud rate for ASCII code, 83 for Baudot code, 82 Dial
G GA, back cover Greeting key, 16, 18, 34 Greeting Memo, 34, 51, 68 H Hangup key, 16, 18, 26 Hanging up, after a direct connect call, 24, 27 after an acoustic call, 28 and auto-answer, 42, 49 by using the hangup key, 26 Memos, 51–56 auto-answer and, see Auto-answer memo changing, see Memos, editing clearing, 54–55 editing, 54 erasing, see Memos, clearing memory for, 51 printing, 55–56 saving, 52–53, 56 sending, 53 Printer last line of conversation and, 20 paper, 74 resetting, 77 print size, 20–21, 64–65
Spacebar, 63 Special characters {! “ # $ % ‘ - ( ) *}, 29, 77 Specifications, 89 Sticky Keys, 88 T Telephone, 9 connecting a, 11 dialing with a, 26, 28 jack, 7 Telephone line connecting a, 10, 12 Three-way calling, 39 Time, see Clock Time key, 15, 18 Toll saver setting, 46 Tone dialing, 12–13, 66 Troubleshooting, 77–79 TS, see Toll saver setting TTY Announcer, 35 Turbo Code, 6, 29–30 turning off, 29, 39, 70 W Wait For Response, 36 94 • INDEX
Conversation etiquette GA When you talk with another person by TTY, you type while the other person reads. When you want the other person to respond, type GA for “Go ahead.” GA OR SK To say goodbye, type GA OR SK. This gives the other person a chance to say any last words before ending the conversation. SKSK Type SKSK to end the conversation. Q Some people prefer to type Q instead of a question mark because it saves time and is easier to type.