Astra 2400S Operation Manual This operation manual contains information not found in the Quick Start Guide. For quick installation instructions, see the Quick Start Guide accompanying your scanner. Important: Unlock scanner before operating. Lock the scanner before moving it. Trademarks Presto! PageManager is a trademark of NewSoft Technology Corporation. IBM PC/AT is a trademark of International Business Machines Corporation. MS-Windows, Windows, and MSDOS are trademarks of Microsoft Corporation.
Table of Contents A Glance At Your Scanner …………………………………………………………….. 3 Unlocking The Carriage ……………………………………………………………….. 4 Installing Application Software and VistaScan ……………………………………… 5 Testing The Scanner …………………………………………………………………… 7 Completing Your First Scan …………………………………………………………... 8 Start Your Scan By Using VistaScan …………………………………………………. 9 Troubleshooting ………………………………………………………………………. 16 Maintenance …………………………………………………………………………... 18 Specifications …………………………………………………………………………..
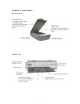
A Glance At Your Scanner The Front View The Rear View 3
Unlocking the Carriage Before operating the scanner, please unlock the restraint. To unlock the restraint, move the restraint toward the unlocked position. !! Warning: You must lock the scanner before transporting it. Failure to do so can cause extensive damage to your scanner. Be sure the scanner lamp is in the return position before locking the scanner. To lock the restraint, move the restraint toward the locked position.
Installing Application Software and VistaScan For Windows 95/98 users: Installing Adobe PhotoShop LE (Install first prior to installing VistaScan) a. Insert the Adobe PhotoShop CE into your CD-ROM drive. b. The installation program will launch automatically. Note: If the installation program does not launch, please follow these steps: 1. Click the Start button on the taskbar and select the Run command. 2. On the command line of the Run dialog box, type D:\INSTALL (where D: indicates the CDROM drive).
For Macintosh Users: Installing Adobe Photoshop LE (Install first prior to installing VistaScan) a. Insert the CD labeled Adobe PhotoShop into your CD-ROM drive. b. Double click on the PhotoShop CD icon located on the desktop. c. Double click on the PhotoShop installer icon. d. Follow the onscreen instructions to install the software. Installing UMAX Astra 2400S VistaScan CD (Install PhotoShop LE first prior to installing VistaScan) a.
Testing the Scanner Note: Before proceeding with the steps below, please complete the hardware installation. Refer to the Quick Start Guide included with the scanner. The scanner automatically performs a simple self-test each time it is turned on to help spot major system errors in the scanner itself. Once the scanner has been unpacked and the shipping restraint has been removed, the scanner is ready to perform this test. To start the scanners self-test, do the following: 1.
Completing your First Scan Testing Your Scanner (for PC only) 1. Unlock the Optical Assembly Restraint. 2. Turn on your scanner. 3. Run Windows and open the VistaScan program group. 4. Click the “Scanner Test” icon to begin self-testing. If the scanner test fails, please refer to the Troubleshooting section of this manual for a solution. Original Image Placement 1. Raise the scanner’s document cover. 2. Place the document (graphic, text, or photo) face down on the scanner.
Start Your Scan by Using VistaScan Note: It is important to realize that different applications may use different methods of acquiring an image and only the most general case is given here. Please refer to your application’s user documentation for details on its usage. For Windows Users There are two ways to initiate VistaScan. A. Using Application programs to invoke VistaScan 1. From Microsoft Windows, launch the application that will be used to call VistaScan. (e.g.
B. Initiating VistaScan directly 1. Launch the VistaScan program group. 2. The VistaScan interface will appear as shown on page 12. 3. From the “Scan to” panel in the main menu, choose a destination for the scanned image. 4. Click one of the small icons in the “Scan To” panel representing the desired destination (a file, printer, e-mail application, etc.) for the scanned image. For example, if you want to save the image in a particular file, click the small icon “Preferences” button box will appear.
C. Scanning the Image 1 Click the “Preview” button. A quick, low resolution scan will be made and appear in the Preview Window. From this image, you can determine the area you want to scan. 2 From the five “Scan to” choices, click the icon that represents the desired destination for the scanned image. 3 Click the “Preferences” button. The Preferences dialog box will appear from which you should enter the relevant details into the dialog box.
For Macintosh Users There are two ways to initiate VistaScan. A. Using Application programs to invoke VistaScan 1. Launch scanning software that supports plug-in drivers (e.g. Presto! PageManager. If you use other image acquisition software, please refer to its accompanying documentation for operational details). 2. Pull down the “File” menu. 3. Choose “Select Source”, and then select the “Plug-ins” command. 4. Choose “VistaScan” as the data source. 5.
B. Initiating VistaScan directly 1. Launch the “UMAX VistaScan DA 3.x” program group. 2. The VistaScan interface will appear as shown on page 15. 3. From the “Scan to” panel in the main menu, choose a destination for the scanned image. 4. Click one of the small icons in the “Scan To” panel representing the desired destination (a file, printer, email application, etc.) for the scanned image.
C. Scanning the Image 1 Click the PREVIEW button. A quick, low-resolution scan will be made and appear in the PREVIEW WINDOW. From this image, you can determine the area you want to scan. 2 From the five “Scan to” choices, click on the icon that represents the desired destination for the scanned image. 3 Click the “Preferences” button. The Preferences dialog box will appear from which you should enter the relevant details into the dialog box.
Troubleshooting UMAX scanners are designed to be reliable and easy to install. If, however, you have a problem with your scanner, these troubleshooting steps should indicate where the problem lies. Scanner Troubleshooting This section will cover problems you may encounter when installing or using your scanner and suggest possible solutions. If the scanner lamp flickers, is dim, or fails to come on: The scanning lamp is failing or has failed and needs to be changed.
Changing the SCSI ID Number If you have other devices connected to your SCSI port, you need to check and see what SCSI ID’s are already used. The scanner is preset at the factory to SCSI ID 5. If, after checking other devices in the SCSI chain, you find that SCSI ID 5 is unused, you do not need to change the ID on the scanner and you can go ahead with the installation.
Maintenance With the exception of periodic cleaning or lamp replacement, the scanner is virtually maintenance free. The following sections give the procedures for basic maintenance of the scanner. Static Electricity Precautions Static electricity is a constant danger to computer systems. The charge that can build up in your body may be strong enough to damage electronic components on the scanner’s printed circuit board or the computers interface card.
Specifications Scanner Type ………………………………………………………………………………………… Flatbed Scan Speed ………………………………………………………... 42.2 Seconds/A4 (600 dpi, Color Mode) Preview Speed ……………………... 5.3 Seconds/A4 (Color Mode); 3.5 Seconds/A4 (Gray/Line art Mode) Maximum Scannable Area ……………………………………………….. 216 x 356.6 mm (8.5 c 14 inches) Optical Resolution …………………………………………………………………………… 600 x 2400 dpi Maximum Resolution ………………………………………………………………………. 9600 x 9600 dpi Scanning Density …………………………………………….
Glossary ADF: Automatic Document Feeder; a scanner option which automatically feeds and scans multiple page documents. Apple-Compatible Driver: An interface software module for applications other than Photoshop that support Apple scanners. Application Software: Software that is used to perform a specific function, e.g., image processing, OCR (Optical Character Recognition), or DTP (Desktop Publishing). ASPI: SCSI communication standard developed by Adaptec. BET: Bit Enhancement Technology.
Optical Assembly: The component system of the scanner that contains all of the optical components. Sometimes referred to as a carriage or carriage assembly. Option (ADF/UTA) Indicator: Glows when an automatic document feeder or transparency adapter is installed and ready for use. Peripheral Device: A device attached to a computer that adds functionality to a computer system. Pixel: The smallest unit within an image file. The actual pixel displays a value based on the bit-depth of the image.
Note: “Although the scanner is compatible with the German power supply systems, we do not include the German power cord along with the product except in Germany. If you bought your scanner outside of Germany, but intend to use it there, you should purchase a power cord compatible with the German system.” Plug Connector Cord No. 1. 2. 1. 2. 1. 2. 3. 4. 5. 6. 7. 8.